
Introduction
Images are an important part of many web pages. They can show products, people, places, diagrams, logos, icons, illustrations, screenshots, and many other types of visual content.
In HTML, images are added using the <img> element.
The most important parts of an image element are:
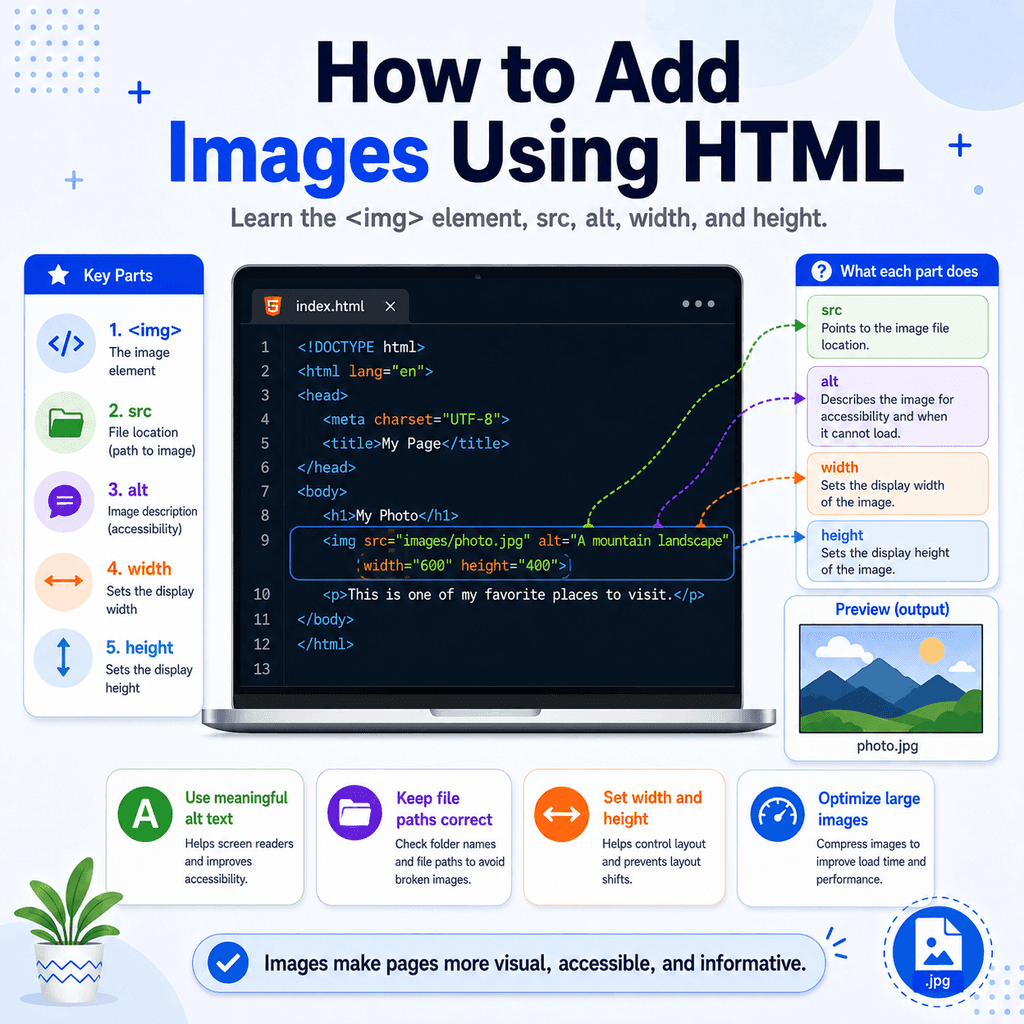
<img>srcaltwidthheightThe <img> element adds the image. The src attribute tells the browser where to find the image file. The alt attribute provides alternative text for the image. The width and height attributes can give the browser the image dimensions.
The Basic Image Element
A simple image element looks like this:
<img src=”images/photo.jpg” alt=”A person walking through a park”>This tells the browser to display an image from the file path:
images/photo.jpgThe alternative text is:
A person walking through a parkThe image element is different from many other HTML elements because it does not wrap around text.
For example, a paragraph usually has an opening tag, content, and a closing tag:
<p>This is a paragraph.</p>An image does not work like that.
You do not write:
<img src=”images/photo.jpg” alt=”A person walking through a park”></img>Instead, write:
<img src=”images/photo.jpg” alt=”A person walking through a park”>The <img> element is an empty element, also called a void element. It does not have a closing tag.
The src Attribute
The src attribute tells the browser where the image file is located.
The letters src stand for “source”.
For example:
<img src=”logo.png” alt=”Company logo”>This tells the browser to look for a file called:
logo.pngIf the image is inside a folder, include the folder name:
<img src=”images/logo.png” alt=”Company logo”>This tells the browser to go into the images folder and find logo.png.
If the file path is wrong, the image will not load.
For example, if the image is really here:
my-website/ index.html images/ logo.pngthen this is correct:
<img src=”images/logo.png” alt=”Company logo”>But this is incorrect from index.html:
<img src=”logo.png” alt=”Company logo”>The browser would look for logo.png in the same folder as index.html, not inside the images folder.
The alt Attribute
The alt attribute provides alternative text for the image.
For example:
<img src=”images/team.jpg” alt=”Our team standing outside the office”>The alt text is used when the image cannot be displayed. It is also used by assistive technologies, such as screen readers, to help users understand the image content.
Good alt text should describe the purpose or meaning of the image.
For example:
<img src=”images/dog.jpg” alt=”A brown dog sitting on grass”>This is better than:
<img src=”images/dog.jpg” alt=”dog”>The second example is not wrong in every situation, but it is usually less useful because it does not give much information.
Why Alt Text Matters for Accessibility
Alt text is important because not every user experiences images in the same way.
Some users may be blind or partially sighted and may use a screen reader. A screen reader can read the alt text aloud so the user can understand what the image communicates.
Some users may have a slow connection, or the image may fail to load. In that situation, the browser can display the alternative text instead of the missing image.
Some users may use text-only browsers or tools that simplify web pages.
Alt text helps make image information available even when the image itself cannot be seen.
For example:
<img src=”images/fire-exit-map.png” alt=”Map showing the nearest fire exit beside the main reception desk”>This is useful because the image communicates important information.
If the image did not load, the user would still understand what the image was meant to show.
How to Write Good Alt Text for Images
Good alt text is clear, concise, and useful.
It should describe the image in a way that matches the image’s purpose on the page.
For example, imagine this image appears on a company “About Us” page:
<img src=”images/team.jpg” alt=”The design team standing together in the office”>This is useful because it explains what the image shows.
A weaker version would be:
<img src=”images/team.jpg” alt=”image”>This is not helpful because it does not describe anything meaningful.
Another weak version would be:
<img src=”images/team.jpg” alt=”team”>This is slightly better, but still vague.
A better version is:
<img src=”images/team.jpg” alt=”The web design team standing together in the office”>This gives the user more useful context.
Match the Alt Text to the Purpose of the Image
The same image may need different alt text depending on how it is used.
For example, imagine you have a photo of a laptop.
If the image is used in an article about remote working, useful alt text might be:
<img src=”images/laptop-desk.jpg” alt=”A laptop on a desk set up for remote working”>If the same image is used on a product page selling the laptop, useful alt text might be:
<img src=”images/laptop-desk.jpg” alt=”Silver 14-inch laptop open on a wooden desk”>The image is the same, but the purpose is different.
Good alt text should describe what matters in that context.
Keep Alt Text Concise
Alt text should usually be short and direct.
Good:
<img src=”images/mountain.jpg” alt=”Snow-covered mountain at sunrise”>Too vague:
<img src=”images/mountain.jpg” alt=”mountain”>Too long:
<img src=”images/mountain.jpg” alt=”A very large mountain covered in snow with lots of rocks and trees and clouds in the background and the sun coming up behind it”>The long version may contain useful details, but it is probably more than the user needs.
A good approach is to include the important information without turning the alt text into a long paragraph.
Do Not Start Alt Text with “Image of”
In most cases, you do not need to write “image of” or “picture of” in the alt text.
Avoid:
<img src=”images/cat.jpg” alt=”Image of a cat sitting on a windowsill”>Better:
<img src=”images/cat.jpg” alt=”Cat sitting on a windowsill”>Screen readers and browsers already know that the content is an image. The alt text should focus on what the image communicates.
There may be rare cases where the fact that it is a photograph, painting, screenshot, chart, or diagram matters. In those cases, it is fine to mention the image type.
For example:
<img src=”images/sales-chart.png” alt=”Bar chart showing sales increasing from January to June”>Here, saying “bar chart” is useful because the type of visual matters.
Decorative Images and Empty alt
Not every image needs descriptive alt text.
If an image is purely decorative and does not add useful information, use an empty alt attribute:
<img src=”images/decorative-line.png” alt=””>This tells assistive technologies that the image can be ignored.
Decorative images might include:
background patternsdecorative bordersdivider linespurely visual flourishesicons that repeat nearby textFor example, if you have a decorative arrow icon beside a button that already says “Next”, the icon may not need descriptive alt text:
<img src=”images/arrow-icon.svg” alt=””><button>Next</button>The button text already gives the meaning. Describing the arrow as well may create unnecessary repetition.
However, if the image communicates information, use meaningful alt text:
<img src=”images/warning-icon.png” alt=”Warning”>A useful question is:
If the image did not load, what would the user need to know?That answer can often help you write better alt text.
Meaningful Images Need Meaningful Descriptions
Some images carry important meaning. These should not have empty or vague alt text.
For example, a product image should usually identify the product:
<img src=”images/running-shoes.jpg” alt=”Blue running shoes with white soles”>A staff photo should usually identify the person or group if that matters:
<img src=”images/jane-smith.jpg” alt=”Jane Smith, senior web designer”>A chart should describe the key information it communicates:
<img src=”images/revenue-chart.png” alt=”Line chart showing revenue increasing steadily from 2021 to 2024″>A screenshot should describe what the screenshot shows:
<img src=”images/settings-screen.png” alt=”Settings screen showing the dark mode toggle switched on”>Meaningful images need descriptions that communicate the relevant information, not just the visual appearance.
Alt Text for Linked Images
Images can also be placed inside links.
For example:
<a href=”gallery.html”> <img src=”images/gallery-thumb.jpg” alt=”View the photo gallery” width=”300″ height=”200″></a>In this case, the image is acting as the link content.
The alt text should describe the link’s purpose, not just the image.
For example, this is useful:
<a href=”gallery.html”> <img src=”images/gallery-thumb.jpg” alt=”View the photo gallery”></a>This is less useful:
<a href=”gallery.html”> <img src=”images/gallery-thumb.jpg” alt=”Small photo”></a>The user needs to know where the link goes. “View the photo gallery” gives better information.
Alt Text for Logos
Logos usually need alt text if they identify a brand, organisation, or website.
For example:
<img src=”images/logo.png” alt=”Bright Web Studio”>If the logo is also a link to the homepage, the alt text can describe the link purpose:
<a href=”index.html”> <img src=”images/logo.png” alt=”Bright Web Studio homepage”></a>Avoid writing:
<img src=”images/logo.png” alt=”logo”>The word “logo” alone does not tell the user which logo it is.
The width Attribute
The width attribute sets the display width of the image in pixels.
For example:
<img src=”images/photo.jpg” alt=”A mountain landscape” width=”600″>This displays the image at 600 pixels wide.
The value is written as a number, without px.
Write:
width=”600″Not:
width=”600px”The width attribute can help the browser understand how much space the image needs before it fully loads.
The height Attribute
The height attribute sets the display height of the image in pixels.
For example:
<img src=”images/photo.jpg” alt=”A mountain landscape” width=”600″ height=”400″>This displays the image at 600 pixels wide and 400 pixels high.
As with width, the value is written as a number, without px.
Write:
height=”400″Not:
height=”400px”Using width and height Together
It is often useful to include both width and height:
<img src=”images/photo.jpg” alt=”A mountain landscape” width=”600″ height=”400″>This helps the browser reserve space for the image before it loads, which can reduce layout shifting.
However, make sure the width and height match the image’s real proportions.
For example, if the image is naturally 1200 pixels wide and 800 pixels high, then 600 by 400 keeps the same ratio.
But if you write:
<img src=”images/photo.jpg” alt=”A mountain landscape” width=”600″ height=”200″>the image may appear stretched or squashed.
Image Size and CSS
The width and height attributes are useful, but CSS is often used to control how images behave in a layout.
For example, this makes an image scale down if the container is smaller than the image:
<img class=”responsive-image” src=”images/photo.jpg” alt=”A mountain landscape” width=”1200″ height=”800″>.responsive-image { max-width: 100%; height: auto;}The HTML gives the browser the original image dimensions.
The CSS allows the image to resize responsively.
This is a common pattern for modern web pages.
Image File Paths
Images use file paths in the src attribute.
For example:
<img src=”photo.jpg” alt=”A photo”>This looks for photo.jpg in the same folder as the HTML file.
<img src=”images/photo.jpg” alt=”A photo”>This looks inside the images folder.
<img src=”../images/photo.jpg” alt=”A photo”>This goes up one folder level, then into the images folder.
Choosing the correct path depends on where the HTML file is and where the image file is.
Common Image File Types
Common image file types for websites include:
.jpg.jpeg.png.webp.svgJPEG images are often used for photos.
PNG images are often used when transparency is needed.
WebP images are often used because they can give good quality with smaller file sizes.
SVG images are often used for logos, icons, and simple illustrations.
The file type you use depends on the image and the purpose.
A Complete Example
Here is a simple HTML page with an image:
<!DOCTYPE html><html lang=”en”><head> <meta charset=”UTF-8″> <title>HTML Image Example</title></head><body> <h1>Our Team</h1> <p>Meet the people behind our website.</p> <img src=”images/team.jpg” alt=”Our team standing outside the office” width=”800″ height=”500″> </body></html>This example uses:
<img>to add the image,
src=”images/team.jpg”to locate the image file,
alt=”Our team standing outside the office”to describe the image,
and:
width=”800″ height=”500″to give the image dimensions.
Common Mistake: Missing the src Attribute
If the src attribute is missing, the browser does not know which image to display.
Incorrect:
<img alt=”Company logo”>Correct:
<img src=”images/logo.png” alt=”Company logo”>The src attribute is essential because it tells the browser where the image is.
Common Mistake: Missing the alt Attribute
Another common mistake is leaving out the alt attribute.
Incomplete:
<img src=”images/team.jpg”>Better:
<img src=”images/team.jpg” alt=”Our team standing outside the office”>The alt attribute helps users who cannot see the image and helps when the image cannot load.
For decorative images, use an empty alt attribute:
<img src=”images/decorative-line.png” alt=””>This is different from forgetting the alt attribute completely.
Common Mistake: Using Poor Alt Text
Even when the alt attribute is present, it may not be useful.
Too vague:
<img src=”images/product.jpg” alt=”image”>Better:
<img src=”images/product.jpg” alt=”Black wireless headphones in a charging case”>Too repetitive:
<img src=”images/save-icon.svg” alt=”Save icon”><button>Save</button>Better if the icon is decorative:
<img src=”images/save-icon.svg” alt=””><button>Save</button>The button already says “Save”, so the icon does not need to repeat the same information.
Common Mistake: Wrong File Path
If an image does not appear, the path is often the problem.
Incorrect:
<img src=”logo.png” alt=”Company logo”>Correct if the image is inside the images folder:
<img src=”images/logo.png” alt=”Company logo”>Also check file names carefully.
For example:
<img src=”images/logo.png” alt=”Company logo”>does not necessarily match:
Logo.PNGUse lowercase file names consistently to avoid confusion.
Common Mistake: Distorting the Image
If the width and height values do not match the image’s proportions, the image may look stretched.
For example:
<img src=”images/photo.jpg” alt=”A mountain landscape” width=”600″ height=”200″>This may distort an image that should be taller.
Better:
<img src=”images/photo.jpg” alt=”A mountain landscape” width=”600″ height=”400″>Or use CSS to preserve proportions:
img { max-width: 100%; height: auto;}Common Mistake: Using Very Large Images
A large image file can slow down a page.
For example, uploading a huge photo directly from a camera may create a file that is much larger than needed for a web page.
Before using images online, it is usually best to resize and optimise them.
This can make your page load faster and improve the user experience.
The HTML may be correct, but the image file may still be too large.
Best Practices
Use the <img> element to add images.
Always include a valid src attribute.
Use meaningful alt text for informative images.
Use alt="" for purely decorative images.
Write alt text that matches the image’s purpose in context.
Avoid vague alt text such as alt="image" or alt="photo".
Avoid unnecessary phrases such as “image of” unless the image type matters.
Use correct file paths.
Use lowercase file and folder names.
Avoid spaces in image file names.
Include width and height when you know the image dimensions.
Keep the image proportions correct.
Use CSS for responsive image sizing.
Optimise large images before using them on a website.
Summary
Images are added in HTML using the <img> element.
A basic image looks like this:
<img src=”images/photo.jpg” alt=”Description of the image”>The src attribute tells the browser where to find the image.
The alt attribute describes the image or provides alternative text.
The width and height attributes can give the browser the image dimensions:
<img src=”images/photo.jpg” alt=”Description of the image” width=”600″ height=”400″>The <img> element is an empty element, so it does not need a closing tag.
Good image HTML is about more than displaying a picture. The image should have a correct file path, useful alternative text, appropriate dimensions, and a sensible file size.
Use meaningful alt text for informative images, empty alt="" for decorative images, and CSS when you need responsive sizing.
These habits will make your images more reliable, more accessible, and easier to manage.