
Introduction
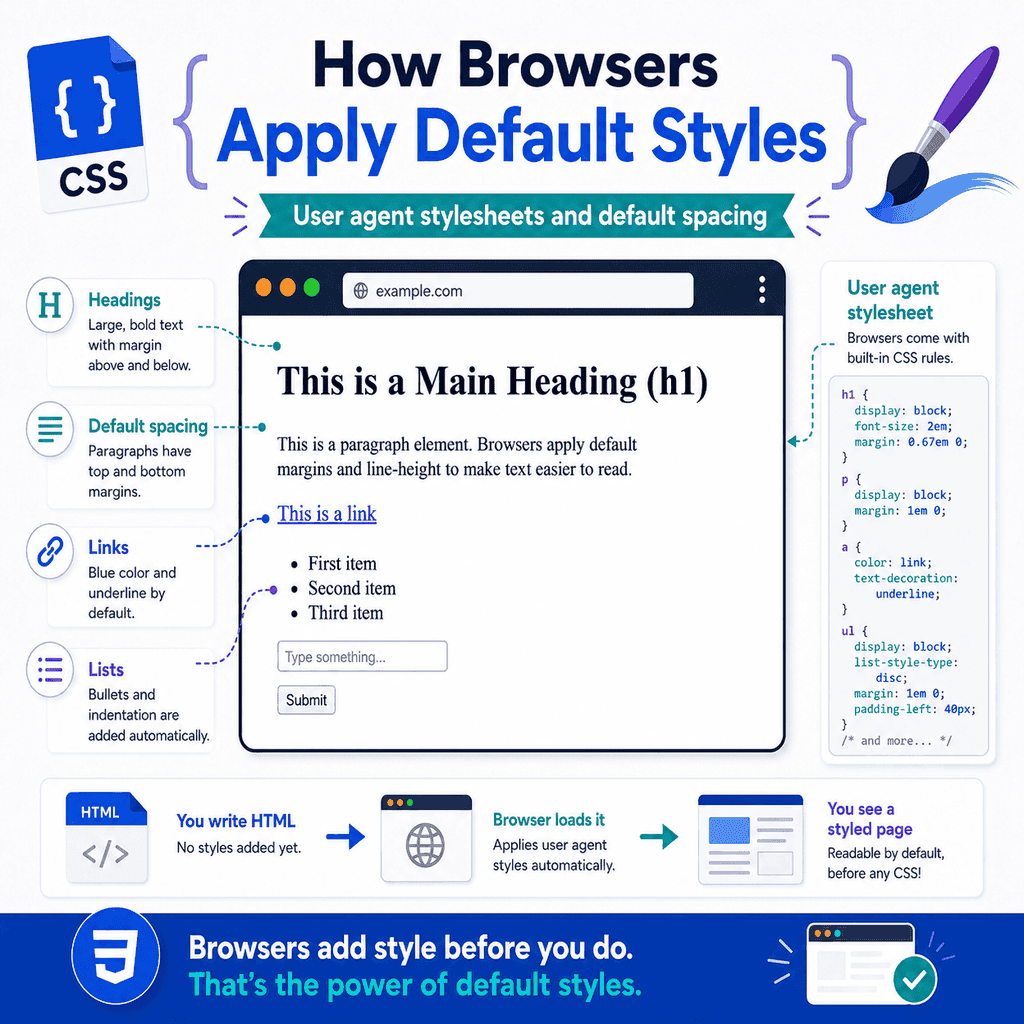
When you write an HTML page with no CSS, the page still has some styling.
Headings are large and bold.
Paragraphs have space around them.
Links are blue and underlined.
Lists have bullets and indentation.
Buttons look like buttons.
This happens because browsers apply their own default styles.
These default styles come from something called a user agent stylesheet.
A user agent stylesheet is the browser’s built-in CSS.
It gives HTML elements a basic appearance before you write any CSS yourself.
For example, this HTML:
<h1>Welcome</h1><p>This is a paragraph.</p><a href=”about.html”>About us</a>will not appear as plain unstyled text.
The browser gives each element default styling.
Understanding these default styles helps explain why pages have spacing, why headings look different from paragraphs, and why CSS resets are sometimes used.
What Are Default Browser Styles?
Default browser styles are the styles a browser applies automatically to HTML elements.
For example, browsers usually make <h1> elements large and bold:
<h1>Main Heading</h1>Paragraphs usually have spacing above and below them:
<p>This is a paragraph.</p>Links are usually blue and underlined:
<a href=”contact.html”>Contact us</a>Lists usually have indentation and bullets:
<ul> <li>HTML</li> <li>CSS</li></ul>These styles are not written in your own CSS file.
They come from the browser.
What Is a User Agent?
A user agent is software that acts on behalf of a user.
In web development, the user agent is usually the browser.
Examples include:
ChromeFirefoxSafariEdgeOperamobile browsersEach browser reads HTML, CSS, and JavaScript, then displays the web page.
Because the browser is the user agent, its built-in stylesheet is called a user agent stylesheet.
What Is a User Agent Stylesheet?
A user agent stylesheet is the browser’s default CSS.
It defines how HTML elements should look before the page author adds their own CSS.
For example, a browser might have default rules similar to this:
h1 { display: block; font-size: 2em; font-weight: bold; margin-block-start: 0.67em; margin-block-end: 0.67em;}The exact rules can vary between browsers.
The important idea is that the browser has its own CSS rules.
These rules are applied automatically.
Your CSS can then override them.
Why Browsers Need Default Styles
HTML describes structure and meaning.
For example:
<h1>About Us</h1><p>We build simple websites.</p>The HTML says one element is a heading and one element is a paragraph.
If browsers applied no styles at all, all text might look almost the same.
Default styles make HTML readable before any custom CSS is added.
They help users see the difference between:
headingsparagraphslinkslistsbuttonsform fieldstablesDefault styling gives every page a basic usable appearance.
A Page Without Custom CSS
Here is a simple HTML page with no custom CSS:
<!DOCTYPE html><html lang=”en”><head> <meta charset=”UTF-8″> <title>Default Styles Example</title></head><body> <h1>Default Browser Styles</h1> <p> This page has no custom CSS, but it still has visible styling. </p> <ul> <li>Headings are large and bold.</li> <li>Paragraphs have spacing.</li> <li>Lists have bullets.</li> </ul> <a href=”about.html”>Learn more</a> </body></html>Even without your own stylesheet, this page is readable.
That is because the browser applies default styles.
Default Styles Are Still CSS
Default browser styles are CSS rules.
They are not magic.
They are simply CSS rules supplied by the browser.
For example, when you see space around a paragraph, that space is usually caused by default margin.
A browser might apply a rule similar to:
p { display: block; margin-block-start: 1em; margin-block-end: 1em;}This means paragraphs are displayed as block-level elements and have vertical margin.
Your own CSS can override this:
p { margin: 0;}The browser default is the starting point.
Your CSS can change it.
Why Headings Look Large
Headings have default styles.
For example:
<h1>Main Heading</h1><h2>Section Heading</h2><h3>Subsection Heading</h3>Browsers usually display these headings with different sizes and bold text.
A browser may have default rules similar to:
h1 { font-size: 2em; font-weight: bold;} h2 { font-size: 1.5em; font-weight: bold;} h3 { font-size: 1.17em; font-weight: bold;}This helps users see the structure of the page.
However, you should still choose heading elements based on meaning, not default size.
Use CSS if you want to change how headings look.
Why Paragraphs Have Space Around Them
Paragraphs usually have default vertical spacing.
For example:
<p>First paragraph.</p><p>Second paragraph.</p>Browsers usually place space between these paragraphs.
That spacing often comes from default margin.
A simplified version of the default rule might be:
p { margin-block-start: 1em; margin-block-end: 1em;}This is why paragraphs do not usually appear pressed directly against each other.
If you want different spacing, you can write your own CSS:
p { margin-top: 0; margin-bottom: 16px;}Why the Body Has Space Around the Page
A new HTML page often has a small gap around the edges.
For example, content may not touch the very edge of the browser window.
This is usually because browsers apply default margin to the <body> element.
A simplified browser default might be:
body { margin: 8px;}This is why a plain page often has a small border of empty space around the content.
If you want the page to start at the very edge, you can remove the body margin:
body { margin: 0;}This is one of the most common first CSS rules in many projects.
Why Lists Are Indented
Lists have default spacing and indentation.
For example:
<ul> <li>HTML</li> <li>CSS</li> <li>JavaScript</li></ul>A browser usually displays this with bullets and indentation.
A simplified default might include:
ul { display: block; list-style-type: disc; margin-block-start: 1em; margin-block-end: 1em; padding-inline-start: 40px;}The bullets come from list-style-type.
The indentation often comes from padding-inline-start.
You can change these styles:
ul { padding-left: 20px;}Or remove bullets:
ul { list-style-type: none; padding-left: 0;}Why Links Are Blue and Underlined
Links have default styles so users can recognise them.
For example:
<a href=”about.html”>About us</a>Browsers usually make unvisited links blue and underlined.
Visited links may appear purple.
A simplified browser default might be:
a { color: blue; text-decoration: underline;}This helps users understand that the text is clickable.
You can style links yourself:
a { color: darkgreen; text-decoration: none;}However, links should still be visually recognisable.
If you remove underlines, make sure users can still identify links clearly.
Why Buttons Look Like Buttons
Buttons have default browser styling.
For example:
<button type=”button”>Click me</button>Browsers usually give buttons borders, padding, backgrounds, and focus behaviour.
The exact appearance depends on the browser and operating system.
That is why buttons may look slightly different in Chrome, Safari, Firefox, Windows, macOS, iOS, or Android.
You can style buttons with CSS:
button { padding: 10px 16px; border-radius: 6px; font: inherit;}However, keep buttons clearly recognisable and usable.
Why Form Fields Have Default Styling
Form controls also have default styles.
For example:
<input type=”text” name=”name”><select name=”topic”> <option>HTML</option> <option>CSS</option></select><textarea name=”message”></textarea>Browsers provide default appearances for inputs, selects, and textareas.
This helps users recognise them as interactive controls.
However, form controls can look different across browsers and devices.
You can make them more consistent with CSS:
input,select,textarea,button { font: inherit;}This makes form controls inherit the page font.
Default Display Values
Browsers also apply default display values.
For example, headings and paragraphs are usually block-level elements.
A simplified default might be:
h1,p,section,article,div { display: block;}Links and spans are usually inline elements:
a,span,strong,em { display: inline;}This affects how elements behave on the page.
Block-level elements usually start on a new line.
Inline elements flow within text.
Default display values are a major part of how HTML elements appear before custom CSS.
Default Styles and Semantic HTML
Default styles help show the meaning of elements visually.
For example:
<strong>Important text</strong>is usually bold by default.
<em>Emphasised text</em>is usually italic by default.
<blockquote>A quoted passage.</blockquote>usually has indentation and spacing.
These default styles support the meaning of the elements.
However, do not choose semantic elements only because of their default appearance.
Choose elements for meaning first.
Use CSS for visual changes.
User Agent Styles vs Author Styles
There are different sources of CSS.
Two important ones are:
user agent stylesauthor stylesUser agent styles are the browser’s default styles.
Author styles are the CSS written by the website author.
For example, the browser may have a default style:
h1 { font-size: 2em;}Your stylesheet can override it:
h1 { font-size: 3rem;}The browser starts with default styles.
Then it applies your CSS.
Your CSS usually wins when it targets the same element and property.
What Is the Cascade?
The cascade is the system CSS uses to decide which styles apply.
Default browser styles are part of the cascade.
Your own CSS is also part of the cascade.
For example:
/* Browser default, simplified */h1 { color: black;} /* Your CSS */h1 { color: navy;}The heading appears navy because your author CSS overrides the browser default.
The cascade considers things such as:
where the CSS comes fromselector specificityorder of rulesimportanceYou do not need to master the full cascade immediately.
For now, understand that browser defaults are the starting layer.
Your CSS can build on top of them.
Inspecting User Agent Styles
Browser developer tools can show default styles.
In most browsers, you can right-click an element and choose:
InspectThen look at the Styles panel.
You may see rules labelled as:
user agent stylesheetThese are the browser’s built-in styles.
For example, if you inspect a paragraph, you may see default margin.
If you inspect a heading, you may see default font size and margin.
This is a useful way to learn where unexpected spacing comes from.
Why Pages Have Default Spacing
Default spacing usually comes from margins and padding in the user agent stylesheet.
Common examples include:
body marginheading marginsparagraph marginslist marginslist paddingblockquote marginsfieldsets and form control spacingFor example, this HTML:
<h1>Page Title</h1><p>First paragraph.</p><p>Second paragraph.</p>has visible spacing because the browser applies margins.
If you want full control over spacing, you need to define your own margin and padding rules.
Removing Default Body Margin
A common rule is:
body { margin: 0;}This removes the default page edge spacing.
You might then add your own layout spacing:
main { width: 90%; max-width: 1000px; margin: 0 auto;}This gives you more control.
The body no longer has browser-provided edge spacing.
The main content is centred using your own CSS.
Changing Default Heading Spacing
Headings often have default margins.
For example:
<h1>Welcome</h1><p>This is the introduction.</p>The space between the heading and paragraph may come from both the heading margin and paragraph margin.
You can set your own heading spacing:
h1 { margin-top: 0; margin-bottom: 16px;}This makes the spacing more predictable.
You might also set paragraph spacing:
p { margin-top: 0; margin-bottom: 16px;}This gives you consistent vertical rhythm.
Changing Default List Spacing
Lists have default margin and padding.
You can adjust them:
ul,ol { margin-top: 0; margin-bottom: 16px; padding-left: 24px;}For navigation menus, you may remove list styling completely:
nav ul { list-style: none; margin: 0; padding: 0;}This is common when a list is used for navigation links.
The HTML still uses a list because the content is a list of navigation items.
The CSS changes how that list looks.
Browser Defaults Can Vary
Different browsers have similar default styles, but they are not always identical.
For example, form controls may look different across browsers and operating systems.
Default margins may also vary slightly.
This is one reason developers sometimes use CSS resets or normalisation styles.
The goal is to reduce unexpected differences and create a more predictable starting point.
However, browser defaults are generally designed to make plain HTML readable and usable.
They are not mistakes.
They are a baseline.
What Is a CSS Reset?
A CSS reset is a set of CSS rules that removes or reduces browser default styles.
For example, a very simple reset might be:
* { margin: 0; padding: 0;}This removes margin and padding from all elements.
However, this is often too aggressive for learning projects.
It can remove useful spacing from headings, paragraphs, lists, and forms.
If you use a reset, you need to add your own spacing back deliberately.
A Simple Reset Example
A modest reset might look like this:
body { margin: 0;} img { max-width: 100%; height: auto;} button,input,select,textarea { font: inherit;}This does not remove every default style.
It only adjusts a few common things:
body edge marginresponsive image sizingform control font inheritanceThis kind of small reset is often easier to understand than a full reset.
What Is Normalize CSS?
Normalisation is different from resetting.
A reset often removes default styles.
A normalisation stylesheet tries to make default styles more consistent across browsers while preserving useful defaults.
The idea is not to remove everything.
The idea is to reduce browser differences.
For a new learner, you do not need to use a reset or normalisation stylesheet immediately.
It is enough to understand that browser defaults exist and that your CSS can override them.
Should You Remove All Defaults?
Not always.
Default styles can be useful.
For example:
links are recognisableheadings stand outparagraphs have readable spacinglists are clearly listsform controls look interactiveIf you remove all defaults, you must rebuild useful styling yourself.
That is fine in professional design systems, but it can be unnecessary for simple pages.
A practical approach is to override defaults only when you need better control.
For example, removing body margin is common:
body { margin: 0;}But removing all list styles everywhere may not be useful:
ul { list-style: none;}Only remove list bullets when the list should not visually look like a normal list, such as in a navigation menu.
Default Styles and Accessibility
Some default styles support usability and accessibility.
For example, browsers usually provide focus outlines for links, buttons, and form controls.
These outlines help keyboard users see where they are on the page.
Avoid removing focus outlines without replacing them.
Less suitable:
button:focus,a:focus { outline: none;}Better:
button:focus,a:focus { outline: 2px solid #0055cc; outline-offset: 2px;}Default styles are not always visually refined, but some of them serve important usability purposes.
Default Styles and Forms
Form controls are affected by both browser defaults and operating system defaults.
For example:
<input type=”text”><button type=”submit”>Submit</button>These may look slightly different depending on the browser and device.
This is normal.
You can style them, but be careful not to remove important affordances.
A form input should still look like something users can type into.
A button should still look clickable.
CSS should improve usability, not hide it.
Overriding Default Styles
To override a default style, write your own CSS rule.
For example, if the browser gives paragraphs margins, you can change them:
p { margin-top: 0; margin-bottom: 1rem;}If the browser makes links blue, you can change the colour:
a { color: #0055cc;}If the browser gives the body an 8px margin, you can remove it:
body { margin: 0;}Your CSS becomes the author stylesheet.
It customises the browser’s baseline.
A Complete Example with Default Styles
Here is a page that uses browser default styles:
<!DOCTYPE html><html lang=”en”><head> <meta charset=”UTF-8″> <title>Default Styles Example</title></head><body> <h1>Browser Default Styles</h1> <p> This page has no custom CSS, but the browser still applies default styling. </p> <h2>Topics</h2> <ul> <li>User agent stylesheets</li> <li>Default margins</li> <li>Default link styling</li> </ul> <p> <a href=”learn-more.html”>Learn more about CSS</a> </p> </body></html>This page will still have a readable structure.
The browser styles the headings, paragraphs, list, and link.
A Complete Example with Custom CSS
Now add a stylesheet:
<link rel=”stylesheet” href=”styles.css”>HTML:
<!DOCTYPE html><html lang=”en”><head> <meta charset=”UTF-8″> <title>Custom Styles Example</title> <link rel=”stylesheet” href=”styles.css”></head><body> <main> <h1>Browser Default Styles</h1> <p> This page uses custom CSS to override some browser defaults. </p> <h2>Topics</h2> <ul> <li>User agent stylesheets</li> <li>Default margins</li> <li>Default link styling</li> </ul> <p> <a href=”learn-more.html”>Learn more about CSS</a> </p> </main> </body></html>CSS:
body { margin: 0; font-family: Arial, sans-serif; line-height: 1.6;} main { width: 90%; max-width: 900px; margin: 0 auto; padding: 32px 0;} h1,h2 { margin-top: 0;} p { margin-top: 0; margin-bottom: 16px;} a { color: #0055cc;}This CSS changes the browser defaults.
The page still uses semantic HTML.
The CSS simply controls the presentation more deliberately.
How to Find the Source of Unexpected Spacing
If you see unexpected spacing on a page, inspect the element.
The spacing may come from:
default margindefault paddingyour own CSSinherited stylesa stylesheet from a librarya browser extensionFor example, if a heading has more space than expected, inspect it and check its margin.
You may find a default rule from the user agent stylesheet.
Then you can override it:
h1 { margin-bottom: 12px;}Developer tools are the best way to confirm where spacing comes from.
Common Mistake: Thinking HTML Has No Style Without CSS
A page with no author CSS still has browser styles.
For example, headings, paragraphs, lists, and links still look different.
This does not mean you accidentally added CSS.
It means the browser is applying its user agent stylesheet.
Default styles are normal.
Common Mistake: Fighting Defaults Without Understanding Them
Sometimes developers remove a default style without understanding what it does.
For example:
* { margin: 0; padding: 0;}This removes a lot of useful default spacing.
If you do this, you need to rebuild spacing yourself.
For learning projects, it is often better to make smaller, deliberate changes.
Example:
body { margin: 0;}This removes the page edge gap without removing every element’s spacing.
Common Mistake: Removing Link Underlines Everywhere
Less suitable:
a { text-decoration: none;}This may make links harder to identify.
Better:
nav a { text-decoration: none;}This removes underlines only in navigation, where the design may make links clear in another way.
For body text links, underlines are often useful.
If you remove them, provide another strong visual cue.
Common Mistake: Removing Focus Outlines
Avoid this:
:focus { outline: none;}This can make keyboard navigation difficult.
If you do not like the default focus style, replace it:
:focus { outline: 2px solid #0055cc; outline-offset: 2px;}Focus indicators help users know which element is active.
Do not remove them without a clear replacement.
Common Mistake: Using Headings for Size Only
Headings look large by default.
That does not mean you should use a heading just to make text large.
Less appropriate:
<h2>This is large text, but not a heading</h2>Better:
<p class=”large-text”>This is large text, but not a heading.</p>.large-text { font-size: 1.5rem;}Use HTML for meaning.
Use CSS for visual size.
Common Mistake: Assuming Every Browser Looks Identical
Browser defaults are similar but not identical.
A button or input may look different on different systems.
This is expected.
If consistency matters, write CSS to control the appearance.
If native appearance is acceptable, keep the browser defaults.
The right choice depends on the project.
Best Practices
Understand that browsers apply default styles.
Remember that these styles come from the user agent stylesheet.
Use browser developer tools to inspect default styles.
Expect default margin on body, headings, paragraphs, and lists.
Override defaults deliberately.
Avoid removing all defaults without a reason.
Use CSS to control spacing instead of relying only on browser defaults.
Keep useful focus styles.
Keep links visually recognisable.
Use HTML elements for meaning, not default appearance.
Use small resets when they help.
Do not assume all browsers have identical defaults.
Test pages in more than one browser when possible.
Summary
Browsers apply default styles to HTML elements.
These styles come from the browser’s user agent stylesheet.
They explain why a page has styling even before you write CSS.
For example:
<h1>Welcome</h1><p>This is a paragraph.</p><ul> <li>HTML</li> <li>CSS</li></ul>will usually display with large headings, paragraph spacing, list bullets, and indentation.
Default spacing often comes from margin and padding.
For example, the body may have default margin, paragraphs may have vertical margin, and lists may have padding.
Your own CSS can override browser defaults:
body { margin: 0;} p { margin-bottom: 16px;}The key idea is that browser defaults are the starting point.
Your CSS customises that starting point.
Understanding user agent stylesheets makes CSS less confusing and helps you control spacing, layout, typography, and appearance more deliberately.