
Introduction
CSS selectors tell the browser which HTML elements to style.
You can select elements by tag name:
button { padding: 10px 16px;}You can select elements by class:
.button { padding: 10px 16px;}You can select elements by ID:
#main-content { max-width: 1000px;}CSS also lets you select elements by their HTML attributes.
These are called attribute selectors.
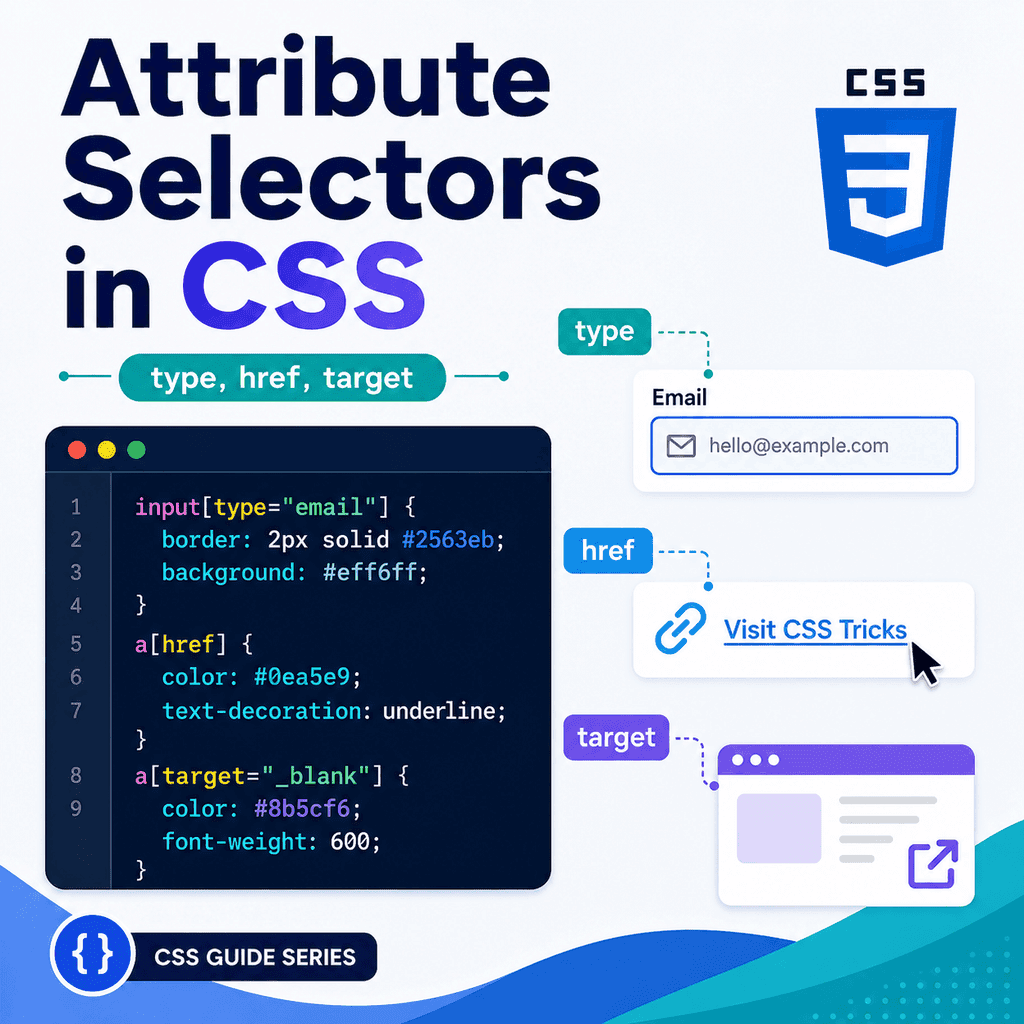
For example, you can select inputs by their type attribute:
input[type=”email”] { border-color: blue;}You can select links by their href attribute:
a[href] { text-decoration: underline;}You can select links that open in a new tab using the target attribute:
a[target=”_blank”] { font-weight: bold;}Attribute selectors are useful when you want to style elements based on information already written in the HTML.
What Is an Attribute?
An attribute adds extra information to an HTML element.
For example:
<input type=”email” name=”email”>This input has two attributes:
typenameThe type attribute says what kind of input it is.
The name attribute gives the form field a name when form data is submitted.
Another example:
<a href=”https://example.com” target=”_blank”>Visit Example</a>This link has two attributes:
hreftargetThe href attribute says where the link goes.
The target attribute says how the link should open.
CSS attribute selectors let you target elements based on these attributes.
What Is an Attribute Selector?
An attribute selector selects elements by looking at their attributes.
A basic attribute selector uses square brackets:
[attribute] { property: value;}For example:
[target] { font-weight: bold;}This selects any element that has a target attribute.
You can also combine an attribute selector with an element selector:
a[target] { font-weight: bold;}This selects only <a> elements that have a target attribute.
That is usually safer than selecting every element with the attribute.
Selecting Elements That Have an Attribute
The simplest attribute selector checks whether an attribute exists.
Example:
a[target] { font-weight: bold;}HTML:
<a href=”about.html”>About</a> <a href=”https://example.com” target=”_blank”>External site</a>The CSS selects the second link because it has a target attribute.
It does not select the first link because the first link does not have target.
This kind of selector does not care what the attribute value is.
It only checks whether the attribute is present.
Selecting Elements by Exact Attribute Value
You can select elements when an attribute has an exact value.
The syntax is:
element[attribute=”value”] { property: value;}Example:
input[type=”email”] { border-color: blue;}HTML:
<input type=”text” name=”name”><input type=”email” name=”email”><input type=”password” name=”password”>This CSS selects only the email input:
<input type=”email” name=”email”>It does not select the text input or password input.
The attribute value must match exactly.
Attribute Selectors with Input Types
Form inputs often use the type attribute.
Examples:
<input type=”text”><input type=”email”><input type=”password”><input type=”search”><input type=”checkbox”><input type=”radio”><input type=”submit”>You can style each type differently:
input[type=”text”],input[type=”email”],input[type=”password”],input[type=”search”] { width: 100%; padding: 10px;}This selector list targets text-like inputs.
You can style submit buttons separately:
input[type=”submit”] { padding: 10px 16px; cursor: pointer;}Attribute selectors are useful here because many form controls use the same <input> element but behave differently depending on type.
Why Input Attribute Selectors Are Useful
Without attribute selectors, this CSS would affect every input:
input { width: 100%;}That may be a problem.
It would also affect checkboxes and radio buttons.
For example:
<input type=”checkbox” id=”terms”><label for=”terms”>I agree to the terms</label>A checkbox should not usually be width: 100%.
A more careful approach is:
input[type=”text”],input[type=”email”],input[type=”password”],input[type=”search”] { width: 100%;}This targets the larger text-entry fields without affecting checkboxes and radio buttons.
Styling Required Fields
HTML form controls can use the required attribute:
<input type=”email” name=”email” required>You can select required fields:
input[required],textarea[required],select[required] { border-color: #0055cc;}This targets form controls that have the required attribute.
You can also combine this with a type selector:
input[type=”email”][required] { border-color: navy;}This selects only required email inputs.
Combining Multiple Attribute Selectors
You can use more than one attribute selector on the same element.
Example:
input[type=”email”][required] { border-color: navy;}This means:
select input elementswhere type=”email”and required is presentHTML:
<input type=”email” required><input type=”email”><input type=”text” required>Only the first input matches both conditions.
The second has type="email" but is not required.
The third is required but is not an email input.
Attribute Selectors with Links
Links use the href attribute.
Example:
<a href=”about.html”>About</a>You can select links that have an href attribute:
a[href] { color: #0055cc;}This targets links with destinations.
It does not target an <a> element without href:
<a>Placeholder link</a>In most real cases, links should have meaningful href values if they are intended to navigate somewhere.
Selecting External Links
You can use attribute selectors to target links based on the start of the href value.
For example:
a[href^=”https://”] { font-weight: bold;}The ^= operator means “starts with”.
This selects links whose href starts with https://.
HTML:
<a href=”about.html”>About</a><a href=”https://example.com”>External website</a>The second link matches.
The first link does not.
This can be useful for styling external links differently.
Selecting Links That Open in a New Tab
Links can use target="_blank" to open in a new browsing context.
Example:
<a href=”https://example.com” target=”_blank”>Visit Example</a>You can select these links:
a[target=”_blank”] { font-weight: bold;}This targets links where the target attribute is exactly _blank.
You might use this to add a visual cue:
a[target=”_blank”]::after { content: ” ↗”;}This adds a small symbol after links that open in a new tab.
Use this kind of visual cue carefully so it improves clarity rather than adding clutter.
Attribute Selector Operators
CSS supports several attribute selector patterns.
The most common ones are:
[attr] selects elements with the attribute[attr=”value”] selects an exact value[attr^=”value”] selects values that start with something[attr$=”value”] selects values that end with something[attr*=”value”] selects values that contain something[attr~=”value”] selects a word in a space-separated list[attr|=”value”] selects a value or value followed by a hyphenYou do not need to memorise every operator immediately.
Start with [attr] and [attr="value"].
Then learn the others when you need more flexible matching.
Exact Match: [attr="value"]
The exact match selector checks whether the attribute value matches exactly.
Example:
input[type=”password”] { letter-spacing: 0.05em;}HTML:
<input type=”password”><input type=”text”>Only the password input matches.
Another example:
a[target=”_blank”] { font-weight: bold;}This selects links where target is exactly _blank.
Exact match selectors are clear and common.
Starts With: [attr^="value"]
The ^= operator means the attribute value starts with a certain string.
Example:
a[href^=”https://”] { color: darkgreen;}This matches:
<a href=”https://example.com”>Secure external link</a>It does not match:
<a href=”about.html”>Internal page</a>This can be useful when styling links by URL pattern.
Another example:
a[href^=”mailto:”] { color: purple;}This selects email links:
<a href=”mailto:[email protected]”>Email us</a>Ends With: [attr$="value"]
The $= operator means the attribute value ends with a certain string.
Example:
a[href$=”.pdf”] { font-weight: bold;}This matches:
<a href=”files/report.pdf”>Download report</a>It does not match:
<a href=”files/report.docx”>Download document</a>This can be useful for styling links to file types.
Other examples:
a[href$=”.zip”] { font-weight: bold;}img[src$=”.svg”] { max-width: 100%;}Use this carefully because URLs may include query strings that change what the value ends with.
Contains: [attr*="value"]
The *= operator means the attribute value contains a certain string.
Example:
a[href*=”example.com”] { font-weight: bold;}This matches:
<a href=”https://example.com/page”>Example page</a>It also matches:
<a href=”https://docs.example.com”>Example docs</a>The value only needs to appear somewhere inside the attribute.
This is flexible, but it can also match more than you expect.
Use contains selectors carefully.
Space-Separated Word Match: [attr~="value"]
The ~= operator checks for a word inside a space-separated attribute value.
This is commonly useful for attributes that contain lists of words.
Example:
[data-tags~=”featured”] { border: 2px solid navy;}HTML:
<article data-tags=”featured tutorial css”> Featured article</article>This matches because featured is one of the space-separated words.
It would not match:
<article data-tags=”featured-tutorial”> Different article</article>because featured is not a separate word there.
Hyphen Match: [attr|="value"]
The |= operator matches an exact value or a value followed by a hyphen.
It is often associated with language codes.
Example:
[lang|=”en”] { font-family: Arial, sans-serif;}This matches:
<p lang=”en”>English text.</p>It also matches:
<p lang=”en-GB”>British English text.</p>It does not match:
<p lang=”fr”>French text.</p>This selector is less common than exact, starts-with, ends-with, and contains selectors, but it is useful in specific cases.
Attribute Selectors with Data Attributes
HTML supports custom data attributes.
They start with data-.
Example:
<article data-featured=”true”> Featured article</article>You can select them with CSS:
[data-featured=”true”] { border: 2px solid navy;}Another example:
<button data-variant=”primary”>Save</button><button data-variant=”secondary”>Cancel</button>CSS:
button[data-variant=”primary”] { background-color: navy; color: white;} button[data-variant=”secondary”] { background-color: white; color: navy;}Data attributes can be useful for styling, scripting, and storing small pieces of custom information.
Attribute Selectors and Case Sensitivity
Attribute selector matching can be case-sensitive or case-insensitive depending on the attribute, document language, and selector flags.
For normal learning projects, the safest approach is to keep attribute values consistent.
For example, prefer:
<input type=”email”>rather than mixing:
<input type=”Email”>You can also use a case-insensitive flag in some selectors:
a[href$=”.pdf” i] { font-weight: bold;}The i means case-insensitive matching.
This can match .pdf, .PDF, or .Pdf.
You do not need this often at first, but it is useful to know it exists.
Attribute Selectors and Specificity
An attribute selector has similar specificity to a class selector.
For example:
input[type=”email”] { border-color: blue;}has more specificity than:
input { border-color: gray;}HTML:
<input type=”email”>If both rules apply, the email-specific rule can override the general input rule.
Attribute selectors are not as specific as ID selectors, but they are more specific than simple type selectors.
Combining Attribute Selectors with Classes
You can combine attribute selectors with class selectors.
HTML:
<input class=”form-control” type=”email” required>CSS:
.form-control[type=”email”] { border-color: blue;}This means:
select elements with class=”form-control”that also have type=”email”You can also write:
.form-control[required] { border-left: 4px solid navy;}This targets required form controls with the form-control class.
Combining Attribute Selectors with Pseudo-Classes
Attribute selectors can work with pseudo-classes.
Example:
input[type=”email”]:focus { outline: 2px solid #0055cc;}This selects an email input when it has focus.
Another example:
a[target=”_blank”]:hover { text-decoration: underline;}This styles links that open in a new tab when the user hovers over them.
These combinations are common when styling form states and link states.
Attribute Selectors with Forms
Here is a form example:
<form> <label for=”name”>Name</label> <input type=”text” id=”name” name=”name”> <label for=”email”>Email</label> <input type=”email” id=”email” name=”email” required> <label for=”password”>Password</label> <input type=”password” id=”password” name=”password”> <input type=”submit” value=”Create account”></form>CSS:
input[type=”text”],input[type=”email”],input[type=”password”] { width: 100%; padding: 10px;} input[required] { border-left: 4px solid navy;} input[type=”submit”] { padding: 10px 16px; cursor: pointer;}This uses attribute selectors to style different inputs appropriately.
Attribute Selectors with Links
Here is a link example:
<p> <a href=”about.html”>About us</a></p> <p> <a href=”https://example.com” target=”_blank”>External resource</a></p> <p> <a href=”files/guide.pdf”>Download the guide</a></p>CSS:
a[href^=”https://”] { font-weight: bold;} a[target=”_blank”]::after { content: ” ↗”;} a[href$=”.pdf”]::after { content: ” PDF”;}This styles external links, links opening in new tabs, and PDF links.
Be careful with generated content.
If a label is important for understanding, consider including it in the HTML rather than only in CSS.
Attribute Selectors with Target
The target attribute commonly appears on links.
Example:
<a href=”https://example.com” target=”_blank”>Visit Example</a>CSS:
a[target=”_blank”] { font-weight: bold;}This can help indicate that the link behaves differently.
However, opening links in new tabs or windows can affect user experience.
When you use target="_blank", it is often good practice to make that behaviour clear to users.
A visible cue can help:
a[target=”_blank”]::after { content: ” opens in new tab”;}This may be too long for some designs, but it shows the idea.
Attribute Selectors with Download Links
The download attribute can be used on links.
Example:
<a href=”files/template.zip” download>Download template</a>You can select download links:
a[download] { font-weight: bold;}This selects links that have a download attribute.
You can also combine it with file extension matching:
a[href$=”.zip”][download] { color: darkgreen;}This selects download links that point to .zip files.
A Complete Example
HTML:
<!DOCTYPE html><html lang=”en”><head> <meta charset=”UTF-8″> <title>Attribute Selectors Example</title> <link rel=”stylesheet” href=”styles.css”></head><body> <main class=”container”> <h1>Attribute Selectors</h1> <form class=”signup-form”> <label for=”name”>Name</label> <input type=”text” id=”name” name=”name”> <label for=”email”>Email address</label> <input type=”email” id=”email” name=”email” required> <label for=”password”>Password</label> <input type=”password” id=”password” name=”password”> <input type=”submit” value=”Create account”> </form> <section> <h2>Useful Links</h2> <p> <a href=”about.html”>About this website</a> </p> <p> <a href=”https://example.com” target=”_blank”>External resource</a> </p> <p> <a href=”files/css-guide.pdf”>Download the CSS guide</a> </p> </section> </main> </body></html>CSS:
/* Text-like form fields */input[type=”text”],input[type=”email”],input[type=”password”] { width: 100%; padding: 10px; margin-bottom: 16px;} /* Required fields */input[required] { border-left: 4px solid navy;} /* Submit input */input[type=”submit”] { padding: 10px 16px; cursor: pointer;} /* External links */a[href^=”https://”] { font-weight: bold;} /* Links that open in a new tab */a[target=”_blank”]::after { content: ” ↗”;} /* PDF links */a[href$=”.pdf”] { font-weight: bold;}This example uses attribute selectors for form controls, required fields, external links, new-tab links, and PDF links.
How the Complete Example Works
This selector targets text-like input fields:
input[type=”text”],input[type=”email”],input[type=”password”] { width: 100%;}This selector targets required inputs:
input[required] { border-left: 4px solid navy;}This selector targets submit inputs:
input[type=”submit”] { cursor: pointer;}This selector targets links that start with https://:
a[href^=”https://”] { font-weight: bold;}This selector targets links that open in a new tab:
a[target=”_blank”]::after { content: ” ↗”;}This selector targets PDF links:
a[href$=”.pdf”] { font-weight: bold;}Each rule selects elements based on attributes already present in the HTML.
Common Mistake: Forgetting Square Brackets
Incorrect:
input type=”email” { border-color: blue;}Correct:
input[type=”email”] { border-color: blue;}Attribute selectors use square brackets.
The attribute condition goes inside the brackets.
Common Mistake: Confusing Classes with Attributes
This selects a class:
.email { color: blue;}This selects an attribute value:
input[type=”email”] { color: blue;}They are not the same.
HTML for the class selector:
<p class=”email”>Email us today.</p>HTML for the attribute selector:
<input type=”email”>Use class selectors for class names.
Use attribute selectors for attributes and attribute values.
Common Mistake: Using Exact Match When the Value Can Vary
This selector matches only exactly .pdf at the end:
a[href$=”.pdf”] { font-weight: bold;}It may not match a URL like:
<a href=”files/guide.pdf?download=true”>Download guide</a>because the value ends with true, not .pdf.
In this case, a contains selector may be more useful:
a[href*=”.pdf”] { font-weight: bold;}But use *= carefully because it can match more than expected.
Common Mistake: Overusing Attribute Selectors Instead of Classes
This works:
button[data-variant=”primary”] { background-color: navy;}But for many simple styling patterns, a class may be clearer:
<button class=”button button-primary”>Save</button>.button-primary { background-color: navy;}Attribute selectors are useful when the attribute itself is meaningful.
Classes are often clearer for general styling.
Use the tool that best describes the purpose.
Common Mistake: Making Selectors Too Specific
This may be more specific than needed:
form.signup-form input[type=”email”][required] { border-color: navy;}A simpler selector may be enough:
input[type=”email”][required] { border-color: navy;}or:
.form-control[required] { border-color: navy;}Overly specific selectors can make CSS harder to override later.
Use enough specificity to target the element, but not more than necessary.
Common Mistake: Using Generated Content for Essential Information
This can add a visual note:
a[target=”_blank”]::after { content: ” ↗”;}That may be fine as a visual cue.
However, do not put essential information only in CSS if users need it to understand the page.
Important content should usually be present in the HTML.
CSS should support presentation, not become the only source of meaning.
Common Mistake: Forgetting Attribute Values Must Match
CSS:
input[type=”email”] { border-color: blue;}HTML:
<input type=”text” name=”email”>This does not match because the input type is text, not email.
The name attribute is email, but the selector checks the type attribute.
To select by name, you would write:
input[name=”email”] { border-color: blue;}Make sure the selector checks the correct attribute.
Common Mistake: Styling All Inputs the Same
This can cause layout problems:
input { width: 100%;}It affects text inputs, checkboxes, radio buttons, submit buttons, hidden inputs, and more.
A better approach:
input[type=”text”],input[type=”email”],input[type=”password”],input[type=”search”] { width: 100%;}This targets text-entry fields more carefully.
Attribute selectors help prevent broad input rules from affecting controls that should look different.
Best Practices
Use [attr] to select elements that have an attribute.
Use [attr="value"] to select exact attribute values.
Use input[type="..."] to style different form controls appropriately.
Use a[href] to target real links.
Use a[target="_blank"] to style links that open in a new tab.
Use a[href^="https://"] for links that start with a URL pattern.
Use a[href$=".pdf"] for links ending with a file extension.
Use *= carefully because it can match more than expected.
Combine attribute selectors with element or class selectors for clearer targeting.
Avoid making selectors more specific than necessary.
Use classes when they communicate styling intent more clearly.
Keep important content in HTML, not only in CSS-generated content.
Use browser developer tools to check whether an attribute selector matches.
Summary
Attribute selectors let CSS target elements based on HTML attributes.
The simplest form checks whether an attribute exists:
a[href] { color: blue;}An exact match checks for a specific value:
input[type=”email”] { border-color: blue;}You can also match parts of attribute values:
a[href^=”https://”] { font-weight: bold;}a[href$=”.pdf”] { font-weight: bold;}a[href*=”example.com”] { font-weight: bold;}Attribute selectors are especially useful for forms and links.
They let you style email fields, password fields, required fields, submit inputs, external links, download links, and links that open in new tabs.
The main idea is simple:
Attribute selectors style elements based on information already written in the HTML.Used carefully, they help you write more precise CSS without adding unnecessary classes.