
Introduction
CSS often has more than one rule that could apply to the same element.
For example:
p { color: black;} .intro { color: navy;}HTML:
<p class=”intro”>Welcome to the page.</p>Both rules apply to the paragraph.
The paragraph is a <p> element.
It also has class="intro".
So which colour should the browser use?
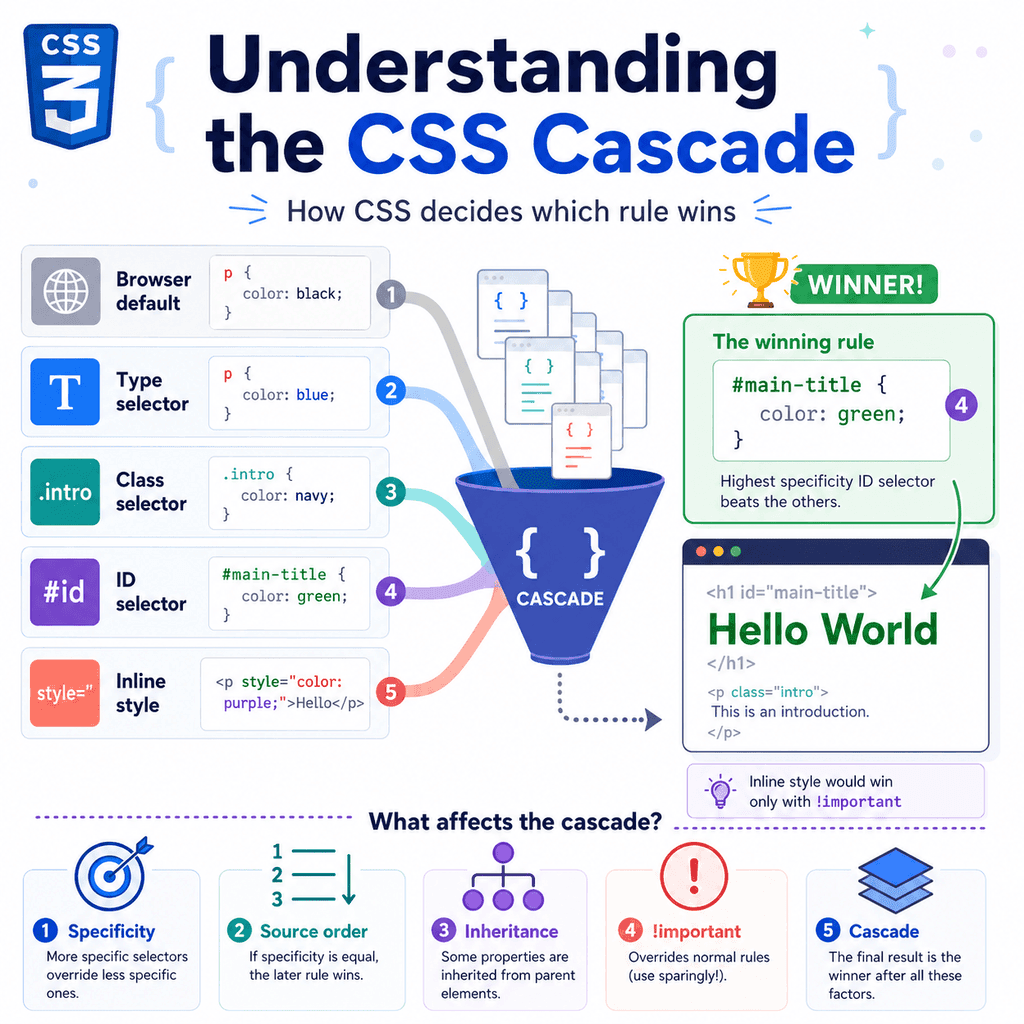
That decision is made by the CSS cascade.
The cascade is the system CSS uses to decide which declarations win when multiple declarations apply to the same element.
Understanding the cascade helps explain why some styles work, why other styles are crossed out in browser developer tools, and why CSS sometimes behaves differently from what you expected.
What Is the CSS Cascade?
The CSS cascade is the decision-making process the browser uses when more than one CSS declaration could apply to the same element and property.
For example:
p { color: black;} p { color: blue;}Both rules target paragraphs.
Both set the color property.
The browser must choose one value.
In this simple case, the later rule usually wins:
p { color: blue;}The paragraph becomes blue.
This is the cascade in action.
Why CSS Needs a Cascade
CSS can come from several places.
For example, a page can have:
browser default stylesexternal stylesheetsinternal style elementsinline stylesCSS from frameworksCSS from componentsCSS from user settingsSeveral rules may target the same element.
Example:
body { color: #222222;} p { color: #333333;} .intro { color: navy;}If a paragraph has class="intro", all of these may be relevant.
The cascade provides rules for deciding the final value.
Without the cascade, the browser would not know which style to apply.
A Simple Cascade Example
HTML:
<p class=”intro”>This is the introduction.</p>CSS:
p { color: black;} .intro { color: navy;}The paragraph matches both selectors.
The p selector says the text should be black.
The .intro selector says the text should be navy.
The paragraph becomes navy because .intro is more specific than p.
This is one of the main cascade rules:
more specific selectors can override less specific selectorsThe Main Factors in the Cascade
When CSS declarations compete, the browser considers several factors.
The main ones are:
origin and importancespecificitysource orderinheritanceFor most everyday CSS, the three most important ideas are:
specificityorderinheritanceYou do not need to master every advanced cascade detail immediately.
Start by understanding why one selector wins over another.
Browser Default Styles
Before your CSS is applied, browsers already have default styles.
These are called user agent styles.
For example, browsers usually make headings large and bold:
<h1>Page Title</h1>They usually give paragraphs margin:
<p>This is a paragraph.</p>They usually make links blue and underlined:
<a href=”about.html”>About</a>These styles come from the browser.
Your CSS can override them.
For example:
a { color: darkgreen; text-decoration: none;}This changes the browser’s default link styling.
Author Styles
Author styles are the styles written by the website author.
That usually means your CSS.
Example:
body { font-family: Arial, sans-serif;} h1 { color: navy;} p { line-height: 1.6;}Author styles usually override browser default styles when they target the same property.
For example, if the browser gives <h1> a default size, you can write:
h1 { font-size: 2rem;}Your rule becomes the author rule for that heading size.
Source Order
Source order means that later rules can override earlier rules when they have equal strength.
Example:
p { color: black;} p { color: blue;}Both selectors are the same.
Both set the same property.
The second rule comes later, so the paragraph becomes blue.
This is source order.
A simple rule is:
when specificity is equal, the later rule winsSource Order Example with Classes
HTML:
<p class=”message”>Your settings were saved.</p>CSS:
.message { color: green;} .message { color: blue;}Both rules use the same selector.
Both have the same specificity.
The second rule comes later, so the message becomes blue.
If you reverse the order:
.message { color: blue;} .message { color: green;}the message becomes green.
Order matters when competing selectors are equally specific.
Stylesheet Order
Source order also applies across multiple CSS files.
Example:
<link rel=”stylesheet” href=”base.css”><link rel=”stylesheet” href=”theme.css”>If both files contain a rule for the same selector and property, the later file can win.
base.css:
button { background-color: white;}theme.css:
button { background-color: navy;}Because theme.css is loaded after base.css, the button may become navy.
This is why resets and base styles usually load before main styles.
Specificity
Specificity is how strong a selector is.
When two selectors target the same element and property, the more specific selector usually wins.
Example:
p { color: black;} .intro { color: navy;}HTML:
<p class=”intro”>Welcome.</p>The paragraph becomes navy because .intro is more specific than p.
A class selector is stronger than a type selector.
Specificity Basics
A simple specificity order is:
type selectorclass selectorID selectorinline styleFrom weaker to stronger:
p.intro#main-intro<p style=”color: red;”>This is simplified, but it explains many common CSS conflicts.
The stronger selector can win even if it appears earlier.
Type Selector Specificity
A type selector targets an HTML element by tag name.
Example:
p { color: black;}This selects all <p> elements.
Type selectors have low specificity.
They are useful for broad base styles.
Example:
body { font-family: Arial, sans-serif;} p { line-height: 1.6;}Because they are low specificity, they are usually easy to override with classes.
Class Selector Specificity
A class selector targets elements with a specific class.
Example:
.highlight { color: blue;}HTML:
<p class=”highlight”>Important text.</p>Class selectors are more specific than type selectors.
Example:
p { color: black;} .highlight { color: blue;}The paragraph becomes blue because .highlight is more specific than p.
Classes are usually the best choice for reusable styling.
ID Selector Specificity
An ID selector targets an element with a specific ID.
Example:
#main-title { color: green;}HTML:
<h1 id=”main-title” class=”page-title”>Welcome</h1>ID selectors are more specific than class selectors.
Example:
.page-title { color: navy;} #main-title { color: green;}The heading becomes green because the ID selector is more specific.
IDs are powerful.
Use them carefully, because they can make styles harder to override later.
Inline Styles
Inline styles are written directly inside the HTML element using the style attribute.
Example:
<p style=”color: red;”>This paragraph is red.</p>Inline styles are usually stronger than normal stylesheet rules.
Example:
<p class=”intro” style=”color: red;”>Welcome.</p>CSS:
.intro { color: navy;}The paragraph becomes red because the inline style is stronger.
For normal websites, avoid inline styles unless there is a specific reason.
They can make CSS harder to maintain.
Specificity Example
HTML:
<p id=”main-intro” class=”intro”>Welcome to the page.</p>CSS:
p { color: black;} .intro { color: navy;} #main-intro { color: green;}All three rules apply to the paragraph.
The type selector says black.
The class selector says navy.
The ID selector says green.
The paragraph becomes green because the ID selector has the highest specificity.
Specificity and Source Order Together
Specificity usually matters before source order.
Example:
.intro { color: navy;} p { color: black;}HTML:
<p class=”intro”>Welcome.</p>The paragraph becomes navy, even though the p rule comes later.
Why?
Because .intro is more specific than p.
Source order decides the winner only when specificity is equal or when other cascade factors allow it.
When Later Rules Win
If specificity is the same, the later rule wins.
Example:
.intro { color: navy;} .intro { color: green;}HTML:
<p class=”intro”>Welcome.</p>Both rules use .intro.
They have equal specificity.
The second rule comes later, so the text becomes green.
This is why the order of your CSS matters.
Inheritance
Some CSS properties are inherited.
Inheritance means a child element can receive a property value from its parent.
Example:
body { color: #333333; font-family: Arial, sans-serif;}HTML:
<body> <p>This paragraph inherits text colour and font family.</p></body>The paragraph can inherit color and font-family from the body.
This is useful because you can set general text styles once on a parent element.
Inherited vs Directly Applied Styles
Inherited styles are weaker than styles directly applied to an element.
Example:
body { color: black;} p { color: navy;}HTML:
<p>This paragraph is navy.</p>The paragraph inherits black from body, but it also has a direct p rule setting navy.
The direct rule wins.
Inheritance provides a default value.
Direct styles override inherited values.
Properties That Commonly Inherit
Text-related properties often inherit.
Common examples include:
colorfont-familyfont-sizefont-weightline-heighttext-alignvisibilityFor example:
body { font-family: Arial, sans-serif; line-height: 1.6;}Many child elements can inherit these text styles.
This is why setting base typography on the body is common.
Properties That Usually Do Not Inherit
Many layout and box model properties do not inherit.
Examples include:
marginpaddingborderwidthheightbackground-colordisplaypositionFor example:
section { padding: 24px;}A paragraph inside the section does not automatically inherit that padding.
The padding belongs to the section.
This is usually what you want.
The inherit Keyword
You can force a property to inherit using the inherit keyword.
Example:
button { font: inherit;}This tells buttons to inherit font settings from their parent.
This is often useful because form controls may use browser or operating system fonts by default.
Another example:
a { color: inherit;}This makes links use the same text colour as their parent.
Use inherit when you deliberately want a property to come from the parent.
The initial Keyword
The initial keyword resets a property to its initial value.
Example:
p { color: initial;}This does not necessarily mean “browser default styling for paragraphs”.
It means the property’s initial CSS value.
For simple learning projects, you will use initial less often than normal values or inherit.
Still, it is useful to know that CSS has keywords for resetting and controlling values.
The unset Keyword
The unset keyword behaves differently depending on whether the property normally inherits.
If the property is inherited, unset acts like inherit.
If the property is not inherited, unset acts like initial.
Example:
.example { color: unset; margin: unset;}color normally inherits, so it behaves like inherited colour.
margin does not normally inherit, so it resets toward its initial value.
This is more advanced, but useful when resetting styles.
The revert Keyword
The revert keyword rolls a property back to the value it would have had from a previous cascade origin.
For example, it can be used to move away from author styles and back toward browser defaults.
Example:
button { all: revert;}This is an advanced reset-style technique.
You do not need it for most basic styling.
For now, focus mainly on specificity, order, and inheritance.
!important
The !important flag gives a declaration extra priority.
Example:
p { color: red !important;}This can override normal declarations that would otherwise win.
Example:
p { color: red !important;} .intro { color: navy;}HTML:
<p class=”intro”>Welcome.</p>The paragraph may become red because the p rule is marked !important.
Use !important sparingly.
It can make CSS harder to maintain.
Why !important Can Cause Problems
The problem with !important is that it bypasses normal expectations.
Example:
.button { background-color: navy !important;} .button-secondary { background-color: white;}HTML:
<button class=”button button-secondary”>Cancel</button>You may expect .button-secondary to make the button white.
But .button has !important, so it may still stay navy.
Then you may be tempted to write another !important rule.
This can become difficult to manage.
A better approach is usually to improve selector structure and order.
Avoiding !important
Instead of using !important, try:
using a clearer classplacing override rules laterreducing overly specific selectorsavoiding unnecessary IDsorganising CSS in layers or sectionsusing component classesLess ideal:
.card p { color: navy !important;}Better:
.card-text { color: navy;}HTML:
<p class=”card-text”>Card paragraph.</p>Clear classes often reduce the need for !important.
Cascade Layers
CSS also supports cascade layers with @layer.
Layers let you organise CSS into named levels.
Example:
@layer reset, base, components; @layer reset { * { box-sizing: border-box; }} @layer base { body { font-family: Arial, sans-serif; }} @layer components { .button { padding: 10px 16px; }}Cascade layers are useful for larger projects and design systems.
They help control which groups of CSS should win.
For a first understanding of the cascade, focus on specificity and order first.
Layers can be learned after the basic cascade feels clear.
A Practical Button Example
HTML:
<button class=”button button-primary”>Save</button><button class=”button button-secondary”>Cancel</button>CSS:
.button { padding: 10px 16px; border: 1px solid #333333;} .button-primary { background-color: navy; color: white;} .button-secondary { background-color: white; color: navy;}Here, .button provides shared styles.
.button-primary and .button-secondary provide variations.
This avoids fighting the cascade.
The CSS is organised so general styles come first and specific variations come after.
A Practical Heading Example
HTML:
<h1 class=”page-title”>Welcome</h1>CSS:
h1 { font-size: 2rem; color: black;} .page-title { color: navy;}The heading uses the h1 font size.
The colour becomes navy because .page-title is more specific than h1.
This is a common pattern:
element selector for base stylingclass selector for more specific stylingA Practical Layout Example
HTML:
<main class=”container wide-container”> <p>Page content.</p></main>CSS:
.container { width: 90%; max-width: 900px; margin: 0 auto;} .wide-container { max-width: 1200px;}Both classes apply to the same element.
Both set max-width.
The .wide-container rule comes later and has equal specificity, so it wins.
The main element uses max-width: 1200px.
This is a clean cascade pattern.
A Complete Example
HTML:
<!DOCTYPE html><html lang=”en”><head> <meta charset=”UTF-8″> <title>CSS Cascade Example</title> <link rel=”stylesheet” href=”styles.css”></head><body> <main class=”container”> <h1 id=”main-title” class=”page-title”>Understanding the CSS Cascade</h1> <p class=”intro”> The cascade decides which CSS rule wins when several rules apply. </p> <article class=”card featured-card”> <h2>Featured Lesson</h2> <p class=”card-text”> Specificity, order, and inheritance are key parts of the cascade. </p> <a href=”lesson.html”>Read more</a> </article> <button class=”button button-primary”>Start Learning</button> </main> </body></html>CSS:
/* Broad inherited styles */body { font-family: Arial, sans-serif; line-height: 1.6; color: #222222;} /* Type selector */h1 { color: black;} /* Class selector */.page-title { color: navy;} /* ID selector */#main-title { font-size: 2.5rem;} /* Layout */.container { width: 90%; max-width: 900px; margin: 0 auto;} /* Component base */.card { padding: 24px; border: 1px solid #dddddd;} /* Component variation */.featured-card { border-color: navy;} /* Text inside cards */.card-text { color: #333333;} /* Button base */.button { padding: 10px 16px; border: 1px solid #333333;} /* Button variation */.button-primary { background-color: navy; color: white;}This example uses inheritance, specificity, and source order together.
How the Complete Example Works
The body rule sets inherited text styles:
body { font-family: Arial, sans-serif; line-height: 1.6; color: #222222;}Many child elements can inherit these values.
The h1 rule sets a base heading colour:
h1 { color: black;}The .page-title rule overrides the heading colour:
.page-title { color: navy;}The #main-title rule sets the heading size:
#main-title { font-size: 2.5rem;}The .card rule gives all cards shared styles:
.card { padding: 24px; border: 1px solid #dddddd;}The .featured-card rule changes the border colour:
.featured-card { border-color: navy;}This works cleanly because the CSS moves from general styles to more specific variations.
How to Debug Cascade Problems
If a style does not apply, use browser developer tools.
Inspect the element and check:
which rules applywhich declarations are crossed outwhich selector is more specificwhich rule appears laterwhether the property is inheritedwhether an inline style is overriding itwhether !important is involvedCrossed-out CSS is useful.
It usually means the browser found the declaration, but another declaration won.
Do not guess.
Inspect the element and check the active rule.
Common Mistake: Thinking the Last Rule Always Wins
The last rule wins only when specificity and other cascade factors allow it.
Example:
.intro { color: navy;} p { color: black;}HTML:
<p class=”intro”>Welcome.</p>The paragraph becomes navy, not black.
The .intro selector is more specific than p.
Source order does not beat higher specificity in this case.
Common Mistake: Overusing ID Selectors
ID selectors are very specific.
Example:
#site-header { background-color: navy;}This can be hard to override later.
For styling, classes are often more flexible:
.site-header { background-color: navy;}Use IDs when you need unique page anchors or JavaScript targets.
Use classes for most reusable styling.
Common Mistake: Using Inline Styles Too Often
Inline styles can override normal stylesheet rules.
Example:
<p class=”intro” style=”color: red;”>Welcome.</p>CSS:
.intro { color: navy;}The paragraph becomes red.
If inline styles are used often, your stylesheet becomes harder to manage.
For normal styling, put CSS in a stylesheet and use classes.
Common Mistake: Reaching for !important Too Quickly
This can work:
.intro { color: navy !important;}But it can create future problems.
If you need to override it later, you may need another !important rule.
Before using !important, check:
Can I use a better class?Can I move the rule later?Can I reduce the specificity of another rule?Can I avoid an ID selector?Can I simplify the CSS?Use !important only when there is a clear reason.
Common Mistake: Forgetting About Inheritance
This CSS sets colour on the body:
body { color: #333333;}Paragraphs may inherit that colour.
If a paragraph has no direct colour rule, it uses the inherited value.
But if you add:
p { color: navy;}then paragraphs use navy instead.
When debugging, check whether a property is directly applied or inherited.
Common Mistake: Loading Stylesheets in the Wrong Order
Less useful:
<link rel=”stylesheet” href=”theme.css”><link rel=”stylesheet” href=”reset.css”>The reset may override some theme styles because it loads later.
Better:
<link rel=”stylesheet” href=”reset.css”><link rel=”stylesheet” href=”theme.css”>Load broad foundation styles first.
Load more specific design styles after.
Common Mistake: Making Selectors Too Specific
This is hard to override:
body main .container article.card p.card-text { color: navy;}A simpler selector is usually better:
.card-text { color: navy;}Overly specific selectors can make the cascade harder to work with.
Use the simplest selector that clearly targets the element.
Common Mistake: Not Checking Crossed-Out Rules
In browser developer tools, a crossed-out declaration is important.
It tells you that the rule exists but is not winning.
For example:
p { color: black;}may be crossed out because this rule wins:
.intro { color: navy;}A crossed-out rule is evidence.
Use it to understand the cascade instead of rewriting CSS randomly.
Best Practices
Use broad type selectors for base styles.
Use classes for reusable component styles.
Avoid unnecessary ID selectors for styling.
Avoid inline styles for normal website styling.
Use !important sparingly.
Put general styles before specific styles.
Load reset or base styles before component and theme styles.
Use source order intentionally.
Keep selectors as simple as possible.
Use inheritance for text styles such as font and colour.
Use browser developer tools to inspect which rules win.
When CSS does not work, check specificity, order, inheritance, inline styles, and !important.
Summary
The CSS cascade decides which rule wins when multiple declarations apply to the same element and property.
For example:
p { color: black;} .intro { color: navy;}HTML:
<p class=”intro”>Welcome.</p>The paragraph becomes navy because .intro is more specific than p.
The main cascade ideas are:
specificity decides which selector is strongersource order decides when specificity is equalinheritance passes some values from parent to childinline styles are stronger than normal stylesheet rules!important can override normal cascade behaviourThe main idea is simple:
When more than one CSS rule applies, the cascade decides the winner.Once you understand the cascade, CSS becomes easier to debug, organise, and control.