
Introduction
CSS controls how HTML content looks.
HTML creates the structure of a web page.
CSS changes the presentation of that structure.
For example, HTML can create a heading:
<h1>Welcome to My Website</h1>CSS can change the heading colour:
h1 { color: navy;}Before CSS can affect a page, the browser needs access to the CSS code.
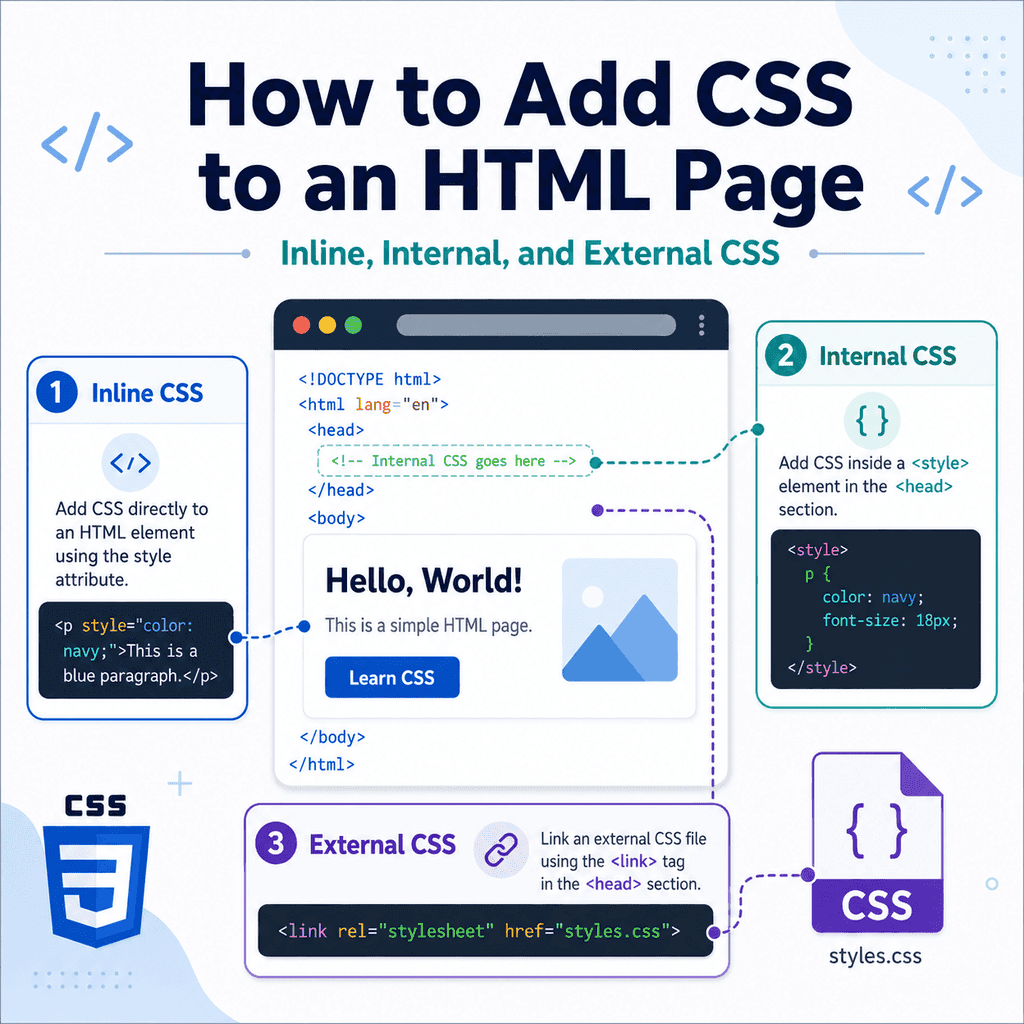
There are three common ways to add CSS to an HTML page:
inline CSSinternal CSSexternal CSSInline CSS is written directly on an HTML element.
Internal CSS is written inside a <style> element in the HTML document.
External CSS is written in a separate .css file and linked to the HTML page.
Each method works, but they are useful in different situations.
The Three Ways to Add CSS
CSS can be added in three main places.
Inline CSS is written in the style attribute:
<h1 style=”color: navy;”>Welcome</h1>Internal CSS is written inside a <style> element:
<style> h1 { color: navy; }</style>External CSS is written in a separate file and linked with <link>:
<link rel=”stylesheet” href=”styles.css”>All three methods can style HTML.
However, for most real websites, external CSS is usually the best approach.
It keeps structure and styling separate.
It also makes CSS easier to reuse across multiple pages.
Method 1: Inline CSS
Inline CSS is written directly inside an HTML element using the style attribute.
Example:
<p style=”color: blue;”>This paragraph is blue.</p>The CSS is inside the opening <p> tag.
The style declaration is:
color: blue;This only affects that specific paragraph.
Another example:
<h1 style=”font-size: 2rem;”>Welcome</h1>This changes the font size of that one heading.
How Inline CSS Works
Inline CSS uses the style attribute.
The basic structure is:
<element style=”property: value;”>Content</element>For example:
<button style=”background-color: navy; color: white;”>Send</button>This button has two CSS declarations:
background-color: navy;color: white;Both declarations are written inside the style attribute.
If you add more than one declaration, separate them with semicolons.
When Inline CSS Can Be Useful
Inline CSS can be useful for quick testing.
For example:
<p style=”color: red;”>Test paragraph colour.</p>This lets you quickly see whether a style works.
Inline CSS can also be used in some special cases, such as HTML emails, where external stylesheets may not be supported consistently.
However, for normal websites, inline CSS is usually not the best option.
It mixes structure and presentation in the same place.
Problems with Inline CSS
Inline CSS can make code harder to maintain.
For example:
<p style=”color: blue; font-size: 18px;”>First paragraph.</p><p style=”color: blue; font-size: 18px;”>Second paragraph.</p><p style=”color: blue; font-size: 18px;”>Third paragraph.</p>If you want to change all paragraphs from blue to green, you need to edit every paragraph.
A better approach is to use a CSS rule:
p { color: green; font-size: 18px;}Now one CSS rule can style all paragraphs.
Inline CSS is usually harder to reuse and harder to update.
Inline CSS Example
Here is a complete page using inline CSS:
<!DOCTYPE html><html lang=”en”><head> <meta charset=”UTF-8″> <title>Inline CSS Example</title></head><body> <h1 style=”color: navy;”>Welcome</h1> <p style=”font-size: 18px; line-height: 1.6;”> This paragraph is styled with inline CSS. </p> <button style=”padding: 10px 16px;”>Click me</button> </body></html>This works, but the styles are mixed into the HTML.
For larger pages, this becomes difficult to manage.
Method 2: Internal CSS
Internal CSS is written inside a <style> element.
The <style> element usually goes inside the <head>.
Example:
<head> <style> h1 { color: navy; } p { font-size: 18px; } </style></head>This CSS applies to the HTML document that contains it.
Internal CSS is useful when you want to style one page without creating a separate CSS file.
How Internal CSS Works
Internal CSS uses normal CSS syntax inside a <style> element.
Example:
<style> body { font-family: Arial, sans-serif; } h1 { color: navy; }</style>The browser reads the CSS inside the <style> element and applies it to the page.
A complete example:
<!DOCTYPE html><html lang=”en”><head> <meta charset=”UTF-8″> <title>Internal CSS Example</title> <style> body { font-family: Arial, sans-serif; } h1 { color: navy; } p { line-height: 1.6; } </style></head><body> <h1>Welcome</h1> <p>This page is styled using internal CSS.</p> </body></html>The CSS is still inside the HTML file, but it is separated from the visible body content.
When Internal CSS Can Be Useful
Internal CSS can be useful for:
small examplessingle-page demosquick experimentssimple test pagespages that need styles used nowhere elseFor learning, internal CSS can be convenient because the HTML and CSS are in one file.
However, for larger websites, internal CSS is usually less convenient than external CSS.
If several pages need the same styles, repeating internal CSS on every page is inefficient.
Problems with Internal CSS
Internal CSS only applies to the page where it is written.
For example, if you have three pages:
index.htmlabout.htmlcontact.htmland each page has the same internal CSS, you must update all three pages whenever the design changes.
That can lead to duplicated code.
A better approach is to use one external stylesheet:
<link rel=”stylesheet” href=”styles.css”>Then all pages can share the same CSS file.
Method 3: External CSS
External CSS is written in a separate .css file.
For example:
styles.cssThe HTML page links to that file using the <link> element:
<link rel=”stylesheet” href=”styles.css”>This is the most common approach for real websites.
It keeps HTML and CSS separate.
The HTML file contains the structure.
The CSS file contains the styles.
How External CSS Works
A simple project might have two files:
index.htmlstyles.cssThe HTML file links to the CSS file:
<!DOCTYPE html><html lang=”en”><head> <meta charset=”UTF-8″> <title>External CSS Example</title> <link rel=”stylesheet” href=”styles.css”></head><body> <h1>Welcome</h1> <p>This page is styled with an external CSS file.</p> </body></html>The styles.css file contains the CSS:
body { font-family: Arial, sans-serif;} h1 { color: navy;} p { line-height: 1.6;}When the browser opens the HTML file, it loads the CSS file and applies the styles.
The <link> Element
The <link> element connects the HTML document to an external resource.
For CSS, the basic code is:
<link rel=”stylesheet” href=”styles.css”>This belongs inside the <head> element:
<head> <link rel=”stylesheet” href=”styles.css”></head>The <link> element is an empty element.
Write:
<link rel=”stylesheet” href=”styles.css”>not:
<link rel=”stylesheet” href=”styles.css”></link>The rel Attribute
The rel attribute describes the relationship between the HTML page and the linked file.
For CSS, use:
rel=”stylesheet”Example:
<link rel=”stylesheet” href=”styles.css”>This tells the browser that the linked file is a stylesheet.
Without rel="stylesheet", the browser may not apply the CSS.
Less complete:
<link href=”styles.css”>Correct:
<link rel=”stylesheet” href=”styles.css”>The href Attribute
The href attribute tells the browser where the CSS file is.
Example:
<link rel=”stylesheet” href=”styles.css”>The value:
styles.cssis the file path.
If the CSS file is in the same folder as the HTML file, use the file name.
Example folder structure:
my-website/ index.html styles.cssThe link is:
<link rel=”stylesheet” href=”styles.css”>If the CSS file is inside a css folder, use:
<link rel=”stylesheet” href=”css/styles.css”>External CSS with a CSS Folder
Many projects keep CSS files inside a folder called css.
Example:
my-website/ index.html css/ styles.cssThe correct link is:
<link rel=”stylesheet” href=”css/styles.css”>This means:
look inside the css folderfind styles.cssload it as a stylesheetIf the path is wrong, the CSS will not load.
For example, this would fail if styles.css is inside css/:
<link rel=”stylesheet” href=”styles.css”>External CSS for Multiple Pages
One external CSS file can style several HTML pages.
Example structure:
my-website/ index.html about.html contact.html styles.cssEach page can include:
<link rel=”stylesheet” href=”styles.css”>Now all three pages share the same CSS file.
If you update styles.css, the change can apply to every linked page.
This is one of the biggest benefits of external CSS.
Comparing the Three Methods
Here is the same style written in three ways.
Inline CSS:
<h1 style=”color: navy;”>Welcome</h1>Internal CSS:
<style> h1 { color: navy; }</style>External CSS:
<link rel=”stylesheet” href=”styles.css”>with styles.css:
h1 { color: navy;}All three can work.
The difference is where the CSS is stored and how reusable it is.
Which Method Should You Use?
For most websites, use external CSS.
External CSS is usually best because:
it keeps HTML cleanerit separates structure from presentationit can be reused across many pagesit is easier to maintainit keeps styles in one placeUse internal CSS for small demos, examples, and single-page tests.
Use inline CSS only for quick testing or special cases.
A good default is:
external CSS for normal websitesinternal CSS for small examplesinline CSS only when necessaryOrder Matters
CSS can come from different places.
If more than one CSS rule targets the same element, the browser must decide which style wins.
For example:
<head> <style> h1 { color: green; } </style></head><body> <h1 style=”color: navy;”>Welcome</h1></body>The inline style may override the internal style because inline styles are very specific.
You do not need to master the cascade yet, but it is useful to know that CSS sources can interact.
If styles are not applying as expected, check whether another rule is overriding them.
External Stylesheet Order
If you link multiple CSS files, order matters.
Example:
<link rel=”stylesheet” href=”base.css”><link rel=”stylesheet” href=”theme.css”>If both files style the same element, later rules can override earlier ones when selector strength is equal.
For example:
/* base.css */h1 { color: black;}/* theme.css */h1 { color: navy;}Because theme.css is linked after base.css, the heading may appear navy.
A simple rule is:
general styles firstmore specific styles laterA Complete Example Using External CSS
HTML file:
<!DOCTYPE html><html lang=”en”><head> <meta charset=”UTF-8″> <meta name=”viewport” content=”width=device-width, initial-scale=1.0″> <title>External CSS Page</title> <link rel=”stylesheet” href=”styles.css”></head><body> <main class=”container”> <h1>Welcome</h1> <p class=”intro”> This page uses an external CSS file. </p> <a class=”button-link” href=”about.html”>Learn more</a> </main> </body></html>CSS file:
body { font-family: Arial, sans-serif; line-height: 1.6; margin: 0;} .container { width: 90%; max-width: 900px; margin: 0 auto; padding: 40px 0;} .intro { font-size: 1.2rem;} .button-link { display: inline-block; padding: 10px 16px; border: 1px solid #333333; text-decoration: none;}This is the recommended pattern for most simple websites.
The HTML and CSS are separate but connected.
A Complete Example Using Internal CSS
Internal CSS example:
<!DOCTYPE html><html lang=”en”><head> <meta charset=”UTF-8″> <title>Internal CSS Page</title> <style> body { font-family: Arial, sans-serif; line-height: 1.6; } h1 { color: navy; } .intro { font-size: 1.2rem; } </style></head><body> <h1>Welcome</h1> <p class=”intro”> This page uses internal CSS inside the style element. </p> </body></html>This works well for a small standalone page or demonstration.
However, if another page needs the same styles, you would need to copy the <style> block.
That is why external CSS is usually better for websites with multiple pages.
A Complete Example Using Inline CSS
Inline CSS example:
<!DOCTYPE html><html lang=”en”><head> <meta charset=”UTF-8″> <title>Inline CSS Page</title></head><body> <h1 style=”color: navy;”>Welcome</h1> <p style=”font-size: 18px; line-height: 1.6;”> This page uses inline CSS directly on elements. </p> </body></html>This works, but it is not ideal for most websites.
The styles are attached directly to individual elements.
If the page grows, the code becomes harder to maintain.
Using Classes with External CSS
External CSS often works with class attributes.
HTML:
<p class=”intro”>This is the introduction.</p>CSS:
.intro { font-size: 1.2rem; font-weight: bold;}The class name connects the HTML element to the CSS selector.
This is cleaner than writing the same inline style on each paragraph.
For repeated styling, classes and external CSS are usually the best combination.
File Names and Paths
CSS file names must match exactly.
If your file is named:
style.cssthen this link will not work:
<link rel=”stylesheet” href=”styles.css”>You need:
<link rel=”stylesheet” href=”style.css”>Also check capital letters.
On some systems, these may be treated as different files:
styles.cssStyles.cssSTYLES.cssUse simple lowercase file names to avoid confusion.
Testing Whether CSS Is Working
A quick way to test a CSS link is to add an obvious style.
In styles.css, write:
body { background-color: lightyellow;}Refresh the HTML page.
If the background changes, the CSS file is linked correctly.
If nothing changes, check:
is the CSS file saved?is the HTML file saved?is the file name correct?is the folder path correct?is rel=”stylesheet” included?is the browser showing an old cached version?Incorrect file paths are one of the most common problems.
Common Mistake: Putting CSS Directly in the Head Without <style>
Incorrect:
<head> h1 { color: navy; }</head>Correct:
<head> <style> h1 { color: navy; } </style></head>If CSS is inside an HTML file, it must be placed inside a <style> element.
Common Mistake: Forgetting to Link the CSS File
Less complete:
<head> <title>My Page</title></head>Better:
<head> <title>My Page</title> <link rel=”stylesheet” href=”styles.css”></head>If using external CSS, the HTML file must link to it.
Common Mistake: Missing rel="stylesheet"
Incorrect:
<link href=”styles.css”>Correct:
<link rel=”stylesheet” href=”styles.css”>The rel attribute tells the browser that the linked file is a stylesheet.
Without it, the CSS may not apply.
Common Mistake: Wrong CSS File Path
This works only if styles.css is in the same folder as the HTML file:
<link rel=”stylesheet” href=”styles.css”>If the file is inside a css folder, use:
<link rel=”stylesheet” href=”css/styles.css”>If the path is wrong, the page will appear unstyled.
Common Mistake: Overusing Inline CSS
Less maintainable:
<p style=”color: blue;”>First paragraph.</p><p style=”color: blue;”>Second paragraph.</p><p style=”color: blue;”>Third paragraph.</p>Better:
<p class=”highlight”>First paragraph.</p><p class=”highlight”>Second paragraph.</p><p class=”highlight”>Third paragraph.</p>.highlight { color: blue;}This keeps the style in one place.
Common Mistake: Using Internal CSS on Every Page
This works, but becomes repetitive:
<style> body { font-family: Arial, sans-serif; }</style>if copied into every page.
Better for a multi-page website:
<link rel=”stylesheet” href=”styles.css”>Then update the style in one CSS file.
External stylesheets are easier to manage across multiple pages.
Common Mistake: Expecting CSS to Apply Before It Is Loaded
If a stylesheet is not linked, not saved, or blocked by a bad path, the browser cannot use it.
If the page looks unstyled, check the connection first:
<link rel=”stylesheet” href=”styles.css”>Then check whether the file really exists at that path.
Browser developer tools can help by showing whether the CSS file loaded or produced a 404 error.
Best Practices
Use external CSS for most websites.
Use internal CSS for small demos and one-page examples.
Use inline CSS only when necessary.
Place internal CSS inside a <style> element.
Place external stylesheet links inside the <head>.
Use:
<link rel=”stylesheet” href=”styles.css”>Check the href path carefully.
Use simple lowercase CSS file names.
Use classes for reusable styles.
Avoid repeating the same inline styles across many elements.
Keep HTML for structure and CSS for presentation.
Use browser developer tools if your CSS does not load.
Summary
There are three main ways to add CSS to an HTML page.
Inline CSS goes directly on an element:
<h1 style=”color: navy;”>Welcome</h1>Internal CSS goes inside a <style> element:
<style> h1 { color: navy; }</style>External CSS goes in a separate stylesheet:
<link rel=”stylesheet” href=”styles.css”>For most real websites, external CSS is usually the best choice.
It keeps HTML cleaner, allows several pages to share the same styles, and makes design changes easier to manage.
Inline, internal, and external CSS all work, but they should be used in the right situations.
The main idea is simple:
HTML provides the structure.CSS provides the style.External stylesheets usually keep that separation clearest.