
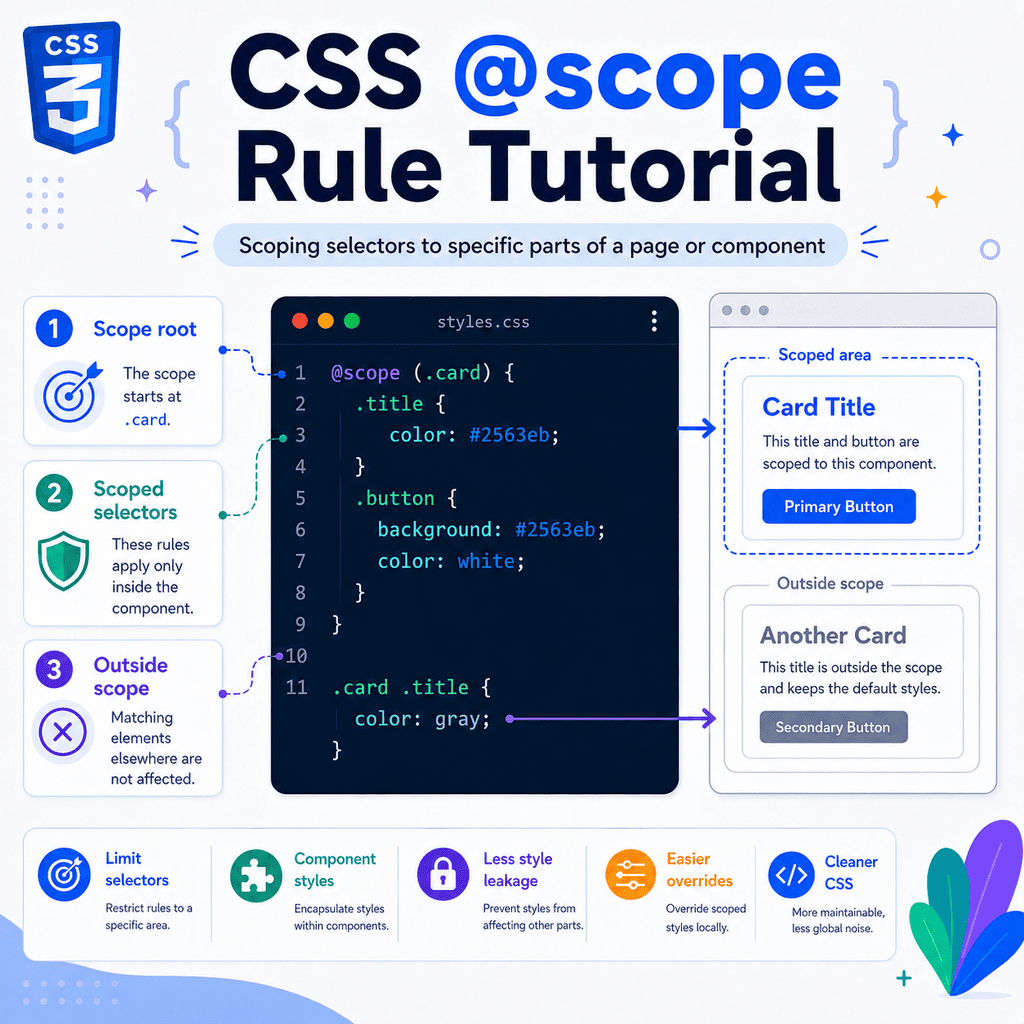
Introduction
CSS selectors usually look through the whole page.
For example:
.title { color: navy;}This selects every element with the class title.
HTML:
<section class=”card”> <h2 class=”title”>Card title</h2></section> <section class=”modal”> <h2 class=”title”>Modal title</h2></section>Both headings match .title.
That may be what you want.
But sometimes you only want a selector to apply inside one specific part of the page.
For example, you may want .title to mean:
Select .title only inside .cardTraditionally, you might write this:
.card .title { color: navy;}That works.
But CSS also has a newer at-rule called @scope.
It lets you limit a group of selectors to a specific part of the page or component.
Example:
@scope (.card) { .title { color: navy; }}This means:
Inside .card, select .title.Outside .card, do not apply this rule.The @scope rule is useful when you want component styles to stay focused, predictable, and easier to override.
What Is @scope in CSS?
@scope is a CSS at-rule.
An at-rule starts with an @ symbol.
Other CSS at-rules include:
@media@supports@layerThe @scope rule creates a styling boundary.
Inside that boundary, selectors only apply within a specific part of the document.
Example:
@scope (.profile-card) { h2 { color: navy; } p { color: #333333; }}HTML:
<section class=”profile-card”> <h2>Profile</h2> <p>This user is active.</p></section> <section class=”article”> <h2>Article title</h2> <p>This paragraph is outside the profile card.</p></section>The scoped h2 and p rules apply inside .profile-card.
They do not apply to the h2 and p inside .article.
Why Scoping Is Useful
Large pages often have many repeated class names and element types.
Example:
<article class=”post”> <h2 class=”title”>Post title</h2></article> <div class=”card”> <h2 class=”title”>Card title</h2></div> <div class=”modal”> <h2 class=”title”>Modal title</h2></div>If you write:
.title { color: blue;}you affect every .title.
If that is too broad, you may write:
.card .title { color: blue;}That is better.
But as projects grow, selectors can become long:
.page .content .sidebar .card .title { color: blue;}Long selectors can be harder to maintain.
They can also be harder to override because they have higher specificity.
@scope helps by letting you say:
@scope (.card) { .title { color: blue; }}The selector inside the scope can stay simple.
The scope controls where it applies.
Basic @scope Syntax
The basic syntax is:
@scope (scope-root) { selector { property: value; }}The scope root is the element or elements that create the scoped area.
Example:
@scope (.card) { h2 { color: navy; }}Here, the scope root is:
.cardThe scoped selector is:
h2This means:
Select h2 elements inside .card.A Simple @scope Example
HTML:
<div class=”card”> <h2>Card title</h2> <p>Card text.</p></div> <div class=”panel”> <h2>Panel title</h2> <p>Panel text.</p></div>CSS:
@scope (.card) { h2 { color: navy; } p { color: #333333; }}Only the heading and paragraph inside .card are affected.
The heading and paragraph inside .panel are not affected by these scoped rules.
The result is:
.card h2 gets color: navy.card p gets color: #333333 .panel h2 is unchanged by this scope.panel p is unchanged by this scope@scope Limits Where Selectors Match
Inside an @scope block, selectors are limited to the scope root.
Example:
@scope (.product-card) { .price { color: green; font-weight: bold; }}HTML:
<div class=”product-card”> <p class=”price”>$29</p></div> <div class=”checkout-summary”> <p class=”price”>$29</p></div>Only the .price inside .product-card is styled.
The .price inside .checkout-summary is not styled by this rule.
That is the main purpose of @scope.
It narrows where selectors are allowed to match.
@scope Compared with Descendant Selectors
This selector:
.card .title { color: navy;}and this scoped rule:
@scope (.card) { .title { color: navy; }}can target similar elements.
But they are not exactly the same in how they affect the cascade.
The descendant selector includes .card as part of the selector.
That increases specificity.
The scoped rule uses .card as the scope root.
The selector inside the block is still just .title.
That means @scope can help keep selectors simpler and lower in specificity.
Specificity Without @scope
Example:
.card .title { color: navy;} .title { color: green;}HTML:
<div class=”card”> <h2 class=”title”>Card title</h2></div>The title becomes navy.
Why?
The selector .card .title is more specific than .title.
Even if .title comes later, .card .title can still win because it has higher specificity.
Specificity With @scope
Now compare this:
@scope (.card) { .title { color: navy; }} .title { color: green;}HTML:
<div class=”card”> <h2 class=”title”>Card title</h2></div>The scoped selector is still .title.
The scope root limits where it applies, but it does not add the same specificity as writing .card .title.
This makes scoped rules easier to override than long descendant selectors.
The scope controls location.
The selector still controls specificity.
Scope Root
The scope root is the top of the scoped area.
Example:
@scope (.card) { p { color: #333333; }}The scope root is:
.cardThe scoped area includes the .card element and its descendants.
HTML:
<div class=”card”> <p>This paragraph is inside the scope.</p> <div> <p>This nested paragraph is also inside the scope.</p> </div></div>Both paragraphs are inside .card.
So both can match the scoped p rule.
The Scope Root Is Inclusive
The scope root itself is included in the scope.
However, the selector inside the block still needs to match the element.
Example:
@scope (.card) { .card { border: 1px solid #dddddd; }}This can style the .card itself because .card is inside its own scope.
But there is a better way to target the scope root.
Use :scope.
The :scope Pseudo-Class Inside @scope
Inside an @scope block, :scope refers to the scope root.
Example:
@scope (.card) { :scope { border: 1px solid #dddddd; padding: 1rem; } h2 { color: navy; } p { color: #333333; }}HTML:
<div class=”card”> <h2>Card title</h2> <p>Card text.</p></div>The :scope rule styles the .card element itself.
The h2 and p rules style elements inside the card.
This is a common pattern:
@scope (.component) { :scope { /* styles for the component container */ } .child { /* styles for children inside the component */ }}A Component Example
HTML:
<article class=”card”> <h2 class=”card-title”>CSS Basics</h2> <p class=”card-text”>Learn how CSS styles web pages.</p> <a class=”card-link” href=”/css”>Read more</a></article>CSS:
@scope (.card) { :scope { padding: 1rem; border: 1px solid #dddddd; border-radius: 8px; background-color: white; } .card-title { margin: 0 0 0.5rem; color: navy; } .card-text { color: #333333; line-height: 1.5; } .card-link { color: #2563eb; font-weight: bold; }}All of these styles belong to the .card scope.
They are easier to read as one component group.
Scoped Selectors Can Be Simple
Without @scope, you might write:
.card .card-title { margin: 0 0 0.5rem; color: navy;} .card .card-text { color: #333333;} .card .card-link { color: #2563eb;}With @scope, you can write:
@scope (.card) { .card-title { margin: 0 0 0.5rem; color: navy; } .card-text { color: #333333; } .card-link { color: #2563eb; }}The scope already says:
These rules apply inside .card.So the selectors inside the block can stay focused.
Scoping Element Selectors
@scope is especially useful when you want to use simple element selectors inside a component.
Example:
@scope (.article-card) { h2 { color: navy; } p { color: #333333; } a { color: #2563eb; }}HTML:
<article class=”article-card”> <h2>Article title</h2> <p>Article summary.</p> <a href=”/article”>Read more</a></article> <footer> <p>Footer text.</p> <a href=”/privacy”>Privacy policy</a></footer>The scoped h2, p, and a rules apply inside .article-card.
They do not apply to the footer.
This lets you use simple selectors without styling the whole page.
Scope Limits
@scope can also have a lower boundary.
That lower boundary is called a scope limit.
The syntax is:
@scope (scope-root) to (scope-limit) { selector { property: value; }}Example:
@scope (.article-body) to (figure) { img { border: 4px solid navy; }}This means:
Select images inside .article-body,but stop before entering figure elements.The scope root is:
.article-bodyThe scope limit is:
figureScope Limit Example
HTML:
<section class=”article-body”> <p>Article text.</p> <img src=”photo.jpg” alt=”Example image”> <figure> <img src=”chart.jpg” alt=”Example chart”> <figcaption>Chart caption</figcaption> </figure></section>CSS:
@scope (.article-body) to (figure) { img { border: 4px solid navy; }}The first image gets the border.
The image inside <figure> does not get the border from this scoped rule.
Why?
The figure acts as the lower boundary.
The scoped rule does not apply inside that lower boundary.
Why Scope Limits Are Useful
Scope limits are useful when a section contains nested areas that should not receive the same styles.
Example:
<article class=”content”> <p>Main article paragraph.</p> <aside class=”callout”> <p>Callout paragraph.</p> </aside></article>You may want article paragraphs to have one style, but not callout paragraphs.
You can write:
@scope (.content) to (.callout) { p { color: #333333; line-height: 1.7; }}This styles paragraphs in .content.
But it does not continue into .callout.
The callout can have its own styles.
Scope Root and Scope Limit
A scoped area can have:
an upper boundarya lower boundaryThe upper boundary is the scope root.
The lower boundary is the scope limit.
Example:
@scope (.content) to (.callout) { p { color: #333333; }}The root is:
.contentThe limit is:
.calloutThe rule applies inside .content.
It stops before .callout.
This type of scope is sometimes called a donut scope because it includes the outer area but excludes a nested area.
@scope Without a Limit
Most simple uses do not need a scope limit.
Example:
@scope (.card) { h2 { color: navy; }}This applies inside .card.
That is often enough.
Use a scope limit only when you need to exclude a nested area.
Example:
@scope (.article) to (.comments) { p { line-height: 1.7; }}This can style article paragraphs but avoid comment paragraphs.
Multiple Scope Roots
You can use more than one scope root.
Example:
@scope (.card, .panel) { h2 { color: navy; } p { color: #333333; }}This applies the same scoped styles inside .card and .panel.
HTML:
<div class=”card”> <h2>Card title</h2> <p>Card text.</p></div> <div class=”panel”> <h2>Panel title</h2> <p>Panel text.</p></div>Both areas use the scoped styles.
This can be useful when several components share the same internal styling.
Multiple Scope Roots with a Limit
You can also combine multiple roots with a limit.
Example:
@scope (.article-body, .guide-body) to (figure) { img { border-radius: 8px; }}This applies to images inside .article-body and .guide-body.
It stops before images inside figure.
Use this carefully.
If the scope becomes too broad, it may be clearer to write separate scopes.
Inline @scope
@scope can also be used inside a <style> element in HTML.
Example:
<section class=”card”> <style> @scope { h2 { color: navy; } p { color: #333333; } } </style> <h2>Card title</h2> <p>Card text.</p></section>When used this way, the scope can be based on the parent of the <style> element.
This can be useful for small examples or component-like HTML.
However, many projects keep CSS in separate files.
For normal project CSS, this standalone pattern is more common:
@scope (.card) { h2 { color: navy; }}@scope Does Not Create a Shadow DOM
@scope limits where selectors apply.
It does not create a fully isolated component.
This is important.
Scoped styles are not the same as Shadow DOM styles.
Example:
@scope (.card) { p { color: navy; }}This limits the p selector to paragraphs inside .card.
But normal CSS behaviour still exists.
For example:
body { font-family: Arial, sans-serif;}Text inside .card can still inherit the body font.
Inheritance is not blocked by @scope.
@scope Does Not Stop Inheritance
Inheritance can cross scope boundaries.
Example:
body { color: #333333;} @scope (.card) { p { font-weight: bold; }}HTML:
<div class=”card”> <p>This paragraph is bold and inherits body color.</p></div>The paragraph gets font-weight: bold from the scoped rule.
It can still inherit color: #333333 from the body.
The scope limits selector matching.
It does not block inherited values from outside.
@scope Does Not Prevent Outside Rules
Outside rules can still style elements inside the scope.
Example:
@scope (.card) { p { color: navy; }} p { font-size: 18px;}HTML:
<div class=”card”> <p>Card text.</p></div>The paragraph can get:
color: navy;font-size: 18px;The scoped rule sets the colour.
The outside rule sets the font size.
@scope does not make the inside elements invisible to the rest of CSS.
It only limits the selectors inside the scoped block.
@scope and Component Styling
A common use of @scope is component styling.
Example:
<div class=”notification”> <h2>Success</h2> <p>Your changes were saved.</p> <button>Close</button></div>CSS:
@scope (.notification) { :scope { padding: 1rem; border-radius: 8px; background-color: #ecfdf5; color: #065f46; } h2 { margin: 0 0 0.5rem; } p { margin: 0; } button { font: inherit; color: inherit; }}The styles are grouped around the .notification component.
The selectors inside can be short.
This makes the CSS easier to scan.
@scope and Reusable Components
Suppose you have two components that both use a .title class.
HTML:
<section class=”card”> <h2 class=”title”>Card title</h2></section> <section class=”banner”> <h2 class=”title”>Banner title</h2></section>CSS:
@scope (.card) { .title { color: navy; }} @scope (.banner) { .title { color: white; }}The card title becomes navy.
The banner title becomes white.
Both components can use .title.
The scope controls which title rule applies.
This can reduce the need for long class names.
Should You Still Use Component Class Names?
Yes.
@scope does not mean you should stop using clear class names.
This is still useful:
<article class=”card”> <h2 class=”card-title”>Card title</h2> <p class=”card-text”>Card text.</p></article>Clear class names help readers understand the markup.
They also make CSS easier to search and maintain.
@scope is not a replacement for good naming.
It is a way to limit where selectors apply.
@scope and BEM-Style Naming
Many projects use naming patterns such as BEM.
Example:
<article class=”card”> <h2 class=”card__title”>Card title</h2> <p class=”card__text”>Card text.</p></article>CSS:
.card__title { color: navy;} .card__text { color: #333333;}With @scope, you could write:
@scope (.card) { .title { color: navy; } .text { color: #333333; }}This can reduce long component class names.
But it also means class names like .title and .text depend more on scope.
Both approaches can work.
Choose the one that makes your project easier to understand.
@scope and Specificity
@scope can help reduce specificity problems.
Example without @scope:
.sidebar .card .title { color: navy;}This selector includes three class selectors.
It is more specific than:
.title { color: green;}Example with @scope:
@scope (.sidebar .card) { .title { color: navy; }}The scope root limits where the rule applies.
The selector inside the block is still .title.
This can make future overrides easier.
:scope Adds Specificity
The :scope pseudo-class behaves like a pseudo-class.
That means it adds class-level specificity.
Example:
@scope (.card) { :scope { padding: 1rem; } :scope .title { color: navy; }}The selector:
:scope .titleis more specific than:
.titlebecause :scope adds specificity.
Use :scope when you need to target the scope root or a relationship from the root.
Do not add it everywhere unnecessarily.
Bare Selectors Inside @scope
A bare selector is a normal selector inside the scope.
Example:
@scope (.card) { .title { color: navy; }}The bare selector is:
.titleIt is scoped to .card.
But it does not need to explicitly say .card .title.
That is the main benefit.
You get location control without always increasing selector specificity.
Using & Inside @scope
In modern CSS, the & nesting selector refers to the current context in nested CSS.
Inside @scope, you may see examples like:
@scope (.card) { & .title { color: navy; }}For simple beginner CSS, this is usually not necessary.
This is clearer:
@scope (.card) { .title { color: navy; }}Use the simplest selector that communicates your intent.
@scope and Nested Components
Scoping becomes especially useful with nested components.
Example:
<div class=”light-theme”> <p>Light text</p> <div class=”dark-theme”> <p>Dark text</p> <div class=”light-theme”> <p>Light text again</p> </div> </div></div>CSS without @scope:
.light-theme p { color: black;} .dark-theme p { color: white;}The innermost paragraph is inside both .light-theme and .dark-theme.
Both rules can match.
Source order may decide the result, and that may not match the closest theme.
Scoped rules can help.
Scoping Proximity
When scoped rules conflict, CSS can consider scoping proximity.
Scoping proximity means:
The rule whose scope root is closer to the element can win.Example:
@scope (.light-theme) { p { color: black; }} @scope (.dark-theme) { p { color: white; }}HTML:
<div class=”light-theme”> <p>Black text</p> <div class=”dark-theme”> <p>White text</p> <div class=”light-theme”> <p>Black text again</p> </div> </div></div>The innermost paragraph is closest to the inner .light-theme.
So the light theme rule can win for that paragraph.
This is useful for nested themes and nested components.
Scoping Proximity Does Not Beat Everything
Scoping proximity is part of the cascade.
But it does not beat every other cascade factor.
For example, specificity can still matter.
Important declarations can still matter.
Cascade layers can still matter.
A simple way to think about it is:
@scope helps choose the closest relevant scoped rule,but the normal cascade still exists.You do not need to master every advanced cascade detail immediately.
Start by understanding that closer scopes can matter when scoped rules conflict.
@scope and Source Order
Source order still matters.
If two scoped rules have the same strength and the same proximity, the later rule can win.
Example:
@scope (.card) { p { color: navy; }} @scope (.card) { p { color: green; }}HTML:
<div class=”card”> <p>Card text.</p></div>The paragraph becomes green.
Both rules use the same scope root.
Both target p.
The later rule wins.
@scope and Cascade Layers
You can use @scope with cascade layers.
Example:
@layer components { @scope (.card) { h2 { color: navy; } }}This means:
The rule belongs to the components layer.It is scoped to .card.It targets h2 elements inside .card.Cascade layers control broad priority.
Scope controls where selectors apply.
They solve different problems.
@scope Inside a Layer Example
@layer base, components, utilities; @layer components { @scope (.card) { :scope { padding: 1rem; border: 1px solid #dddddd; } h2 { color: navy; } }} @layer utilities { .text-red { color: red; }}HTML:
<div class=”card”> <h2 class=”text-red”>Card title</h2></div>The utility may override the scoped component colour depending on the cascade layer order.
In this example, utilities is a later layer than components.
So the utility layer can win.
The scope decides where the component rule applies.
The layer decides priority between groups.
@scope and !important
You can use !important inside @scope.
Example:
@scope (.card) { p { color: navy !important; }}But this should be used carefully.
@scope is often helpful because it reduces the need for forced overrides.
If you add !important too often, you can still make CSS hard to maintain.
Use scoped rules first.
Use normal cascade tools first.
Reach for !important only when there is a clear reason.
@scope and Browser Support
@scope is newer than many core CSS features.
If you are building for older browsers or controlled browser environments, check current browser support before relying on it for essential styling.
If support is a concern, you may need a fallback using ordinary selectors.
Example fallback:
.card h2 { color: navy;}Scoped version:
@scope (.card) { h2 { color: navy; }}For important production sites, test in the browsers your users actually use.
Fallback Approach
If you need to support browsers that do not understand @scope, use regular selectors.
Example:
.card h2 { color: navy;} .card p { color: #333333;}Then, in environments where @scope is supported, you can organise newer CSS like this:
@scope (.card) { h2 { color: navy; } p { color: #333333; }}Do not duplicate styles blindly in a production stylesheet unless you have a clear support strategy.
The fallback approach depends on your project and browser requirements.
Practical Example: Card Component
HTML:
<article class=”card”> <h2>CSS Scope</h2> <p>Scoped styles apply only inside this card.</p> <a href=”/learn”>Learn more</a></article>CSS:
@scope (.card) { :scope { padding: 1rem; border: 1px solid #dddddd; border-radius: 8px; background-color: white; } h2 { margin: 0 0 0.5rem; color: #111827; } p { color: #333333; line-height: 1.5; } a { color: #2563eb; font-weight: bold; }}This scopes the component styles to .card.
The h2, p, and a selectors do not affect the rest of the page.
Practical Example: Article Body
HTML:
<article class=”article”> <header> <h1>Article Title</h1> </header> <div class=”article-body”> <p>Article paragraph.</p> <p>Another paragraph.</p> </div> <footer> <p>Footer text.</p> </footer></article>CSS:
@scope (.article-body) { p { line-height: 1.7; color: #333333; }}Only paragraphs inside .article-body are affected.
The footer paragraph is not affected by this scoped rule.
Practical Example: Excluding Nested Content
HTML:
<article class=”article-body”> <p>Main article paragraph.</p> <aside class=”callout”> <p>Callout paragraph.</p> </aside> <p>Another main article paragraph.</p></article>CSS:
@scope (.article-body) to (.callout) { p { line-height: 1.7; color: #333333; }}The main article paragraphs are styled.
The paragraph inside .callout is not styled by this rule.
The .callout can have its own scope:
@scope (.callout) { p { color: navy; font-weight: bold; }}This keeps the main article styling and callout styling separate.
Practical Example: Theme Scopes
HTML:
<section class=”theme-light”> <p>Light theme text.</p> <section class=”theme-dark”> <p>Dark theme text.</p> </section></section>CSS:
@scope (.theme-light) { :scope { background-color: #f9fafb; color: #111827; } p { color: #111827; }} @scope (.theme-dark) { :scope { background-color: #111827; color: white; } p { color: white; }}Each theme can define styles for its own area.
If themes are nested, the closer scope can help the browser choose the right scoped rule.
Practical Example: Navigation
HTML:
<nav class=”site-nav”> <a href=”/”>Home</a> <a href=”/lessons”>Lessons</a> <a href=”/contact”>Contact</a></nav> <footer> <a href=”/privacy”>Privacy</a></footer>CSS:
@scope (.site-nav) { :scope { display: flex; gap: 1rem; } a { color: navy; text-decoration: none; } a:hover, a:focus-visible { text-decoration: underline; }}Only links inside .site-nav receive these navigation link styles.
The footer link is not affected by the scoped navigation rule.
Practical Example: Form Component
HTML:
<form class=”signup-form”> <label for=”email”>Email address</label> <input id=”email” type=”email”> <button>Subscribe</button></form>CSS:
@scope (.signup-form) { :scope { display: grid; gap: 0.75rem; max-width: 320px; } label { font-weight: bold; } input { padding: 0.5rem; border: 1px solid #cccccc; } button { padding: 0.75rem 1rem; border: 0; background-color: #2563eb; color: white; }}The form styles apply only inside .signup-form.
Other forms on the page are not affected by these rules.
Practical Example: Repeated Class Names
HTML:
<section class=”product-card”> <h2 class=”title”>Product</h2> <p class=”description”>Product description.</p></section> <section class=”profile-card”> <h2 class=”title”>Profile</h2> <p class=”description”>Profile description.</p></section>CSS:
@scope (.product-card) { .title { color: #2563eb; } .description { color: #333333; }} @scope (.profile-card) { .title { color: #065f46; } .description { color: #334155; }}The same class names can be styled differently in different scopes.
This can be useful for small components.
But be careful.
If many components use generic class names like .title, .text, and .description, your CSS can become harder to search.
Use clear naming when it helps.
When to Use @scope
Use @scope when you want to limit selectors to a particular part of the page.
Good use cases include:
component stylesarticle body stylesnavigation stylesform stylestheme areasnested componentsthird-party content areassections with repeated class namesIt is especially helpful when the selectors inside the component can be simple.
Example:
@scope (.card) { h2 { color: navy; } p { color: #333333; }}When You May Not Need @scope
You may not need @scope for very simple CSS.
Example:
.card { padding: 1rem;} .card-title { color: navy;}This is already clear.
If your component class names are specific and your stylesheet is small, ordinary selectors may be enough.
@scope becomes more useful when:
selectors are getting too broadselectors are getting too specificcomponents are nestedclass names repeat in different areasyou want clear styling boundariesUse it when it solves a real problem.
@scope vs CSS Modules
CSS Modules are a build-tool feature.
They often create unique class names automatically.
Example idea:
.card_title__abc123@scope is native CSS.
It works in the browser without a build step.
CSS Modules help avoid class name collisions by changing class names.
@scope limits where selectors match.
They solve related but different problems.
@scope vs Shadow DOM
Shadow DOM creates a stronger boundary.
Styles inside a shadow tree are isolated from the outside in a different way.
@scope does not create that kind of isolation.
It only scopes selector matching.
A simple difference:
@scope limits selectors.Shadow DOM creates encapsulated DOM and style boundaries.Use @scope when you want normal CSS with better selector boundaries.
Use Shadow DOM when you need web component encapsulation.
@scope vs @layer
@scope and @layer solve different problems.
@scope controls where selectors apply.
@layer controls style priority.
Example:
@layer components { @scope (.card) { h2 { color: navy; } }}This says:
This rule belongs to the components layer.It applies only inside .card.It targets h2 elements.Use @scope for location.
Use @layer for priority.
They can work together.
@scope vs :where()
The :where() pseudo-class can reduce specificity.
Example:
.card :where(h2, p, a) { font-family: Arial, sans-serif;}This can be useful.
But :where() does not create a scope block.
@scope groups rules inside a boundary.
Example:
@scope (.card) { h2 { color: navy; } p { color: #333333; } a { color: #2563eb; }}Use :where() when you need specificity control.
Use @scope when you want a clear scoped styling area.
Common Mistake: Thinking @scope Fully Isolates Styles
This is not correct:
@scope makes a component completely isolated.Better:
@scope limits where selectors inside the block can match.Outside CSS can still affect elements inside the scope.
Inherited values can still come from outside.
Other rules can still override scoped rules depending on the cascade.
@scope is a selector-scoping tool, not a complete isolation system.
Common Mistake: Forgetting :scope for the Root
This does not style the scope root unless the selector matches it:
@scope (.card) { h2 { color: navy; }}This styles headings inside .card.
It does not style the .card box itself.
To style the root, use:
@scope (.card) { :scope { padding: 1rem; border: 1px solid #dddddd; }}:scope means the scope root.
Common Mistake: Using Overly Broad Scoped Selectors
This can still be too broad:
@scope (.content) { * { margin: 0; }}Even though it is scoped, it affects every element inside .content.
That may be too aggressive.
A clearer version is:
@scope (.content) { h1, h2, p { margin-block: 0 1rem; }}Scope does not remove the need for careful selectors.
Common Mistake: Too Many Generic Class Names
This can become confusing:
<div class=”card”> <h2 class=”title”>Card title</h2></div> <div class=”modal”> <h2 class=”title”>Modal title</h2></div> <div class=”banner”> <h2 class=”title”>Banner title</h2></div>Scoped CSS can handle this:
@scope (.card) { .title { color: navy; }} @scope (.modal) { .title { color: purple; }} @scope (.banner) { .title { color: white; }}But if every component uses the same generic class names, the HTML may be harder to understand.
Sometimes a clearer class name is better:
<h2 class=”card-title”>Card title</h2>Use scope and naming together.
Common Mistake: Not Checking Support
Because @scope is newer than older CSS features, do not assume every older browser supports it.
If older browser support matters, check compatibility and test.
For critical styles, consider whether ordinary selectors are safer:
.card h2 { color: navy;}Use modern features deliberately.
Debugging Scoped Styles
When a scoped style does not apply, ask these questions:
Does the browser support @scope?Does the element sit inside the scope root?Is the element excluded by a scope limit?Does the selector inside the scope match the element?Is another rule overriding it?Is specificity involved?Is source order involved?Is a cascade layer involved?Is !important involved?Browser developer tools can help show which rules apply and which rules are overridden.
Full Example: Scoped Card
HTML:
<article class=”card”> <h2>Scoped Card</h2> <p>This card uses scoped CSS.</p> <a href=”/learn”>Learn more</a></article>CSS:
@scope (.card) { :scope { padding: 1rem; border: 1px solid #dddddd; border-radius: 8px; background-color: white; } h2 { margin: 0 0 0.5rem; color: #111827; } p { margin: 0 0 1rem; color: #333333; line-height: 1.5; } a { color: #2563eb; font-weight: bold; }}The .card itself gets box styling.
The heading, paragraph, and link get internal styles.
Other headings, paragraphs, and links outside .card are not affected by these scoped selectors.
Full Example: Scoped Article Body with Limit
HTML:
<article class=”article”> <div class=”article-body”> <p>Main paragraph.</p> <aside class=”note”> <p>Note paragraph.</p> </aside> <p>Another main paragraph.</p> </div></article>CSS:
@scope (.article-body) to (.note) { p { color: #333333; line-height: 1.7; }} @scope (.note) { :scope { padding: 1rem; background-color: #eff6ff; } p { color: navy; font-weight: bold; }}The main article paragraphs use the .article-body scoped styles.
The paragraph inside .note is excluded from that scope by the .note limit.
The .note scope gives the note its own styling.
Full Example: Scoped Navigation
HTML:
<nav class=”nav”> <a href=”/”>Home</a> <a href=”/lessons”>Lessons</a> <a href=”/contact”>Contact</a></nav> <main> <a href=”/article”>Article link</a></main>CSS:
@scope (.nav) { :scope { display: flex; gap: 1rem; } a { color: navy; text-decoration: none; } a:hover, a:focus-visible { text-decoration: underline; }}Only the navigation links get the scoped nav styles.
The main article link is not affected by the nav scope.
Full Example: Scoped Theme Areas
HTML:
<section class=”theme-light”> <p>Light theme text.</p> <section class=”theme-dark”> <p>Dark theme text.</p> <section class=”theme-light”> <p>Light theme text again.</p> </section> </section></section>CSS:
@scope (.theme-light) { :scope { background-color: #f9fafb; } p { color: #111827; }} @scope (.theme-dark) { :scope { background-color: #111827; } p { color: white; }}The scoped theme rules help each paragraph use the closest relevant theme styles.
This is a good example of why scoping proximity can matter.
Best Practices for @scope
Use @scope to limit selectors to a component, section, or page area.
Use :scope when you want to style the scope root itself.
Keep selectors inside the scope simple.
Do not use @scope as an excuse for vague or confusing class names.
Use scope limits when you need to exclude nested areas.
Remember that @scope does not block inheritance.
Remember that outside CSS can still affect elements inside the scope.
Use @scope with @layer when you need both location control and priority control.
Avoid unnecessary !important inside scoped rules.
Check browser support if older browsers matter.
Prefer readable CSS over clever CSS.
Quick Reference
Basic scope:
@scope (.card) { h2 { color: navy; }}Style the scope root:
@scope (.card) { :scope { padding: 1rem; }}Scope with a lower boundary:
@scope (.article-body) to (.callout) { p { line-height: 1.7; }}Multiple scope roots:
@scope (.card, .panel) { h2 { color: navy; }}Scope inside a layer:
@layer components { @scope (.card) { h2 { color: navy; } }}Quick Summary
@scope lets you limit selectors to a specific part of a page or component.
The scope root defines where the scoped area begins.
The optional scope limit defines where the scoped area stops.
Selectors inside an @scope block only apply inside that scoped area.
Use :scope to target the scope root itself.
@scope can help keep selectors shorter and easier to override.
It can reduce the need for long descendant selectors.
It does not create full style isolation like Shadow DOM.
It does not block inheritance from outside the scope.
Outside rules can still affect elements inside the scope.
Scoping proximity can help resolve conflicts between nested scopes.
@scope works well for components, article bodies, navigation areas, form components, themes, and nested UI sections.
Use it when you want clearer selector boundaries and more maintainable component styling.