
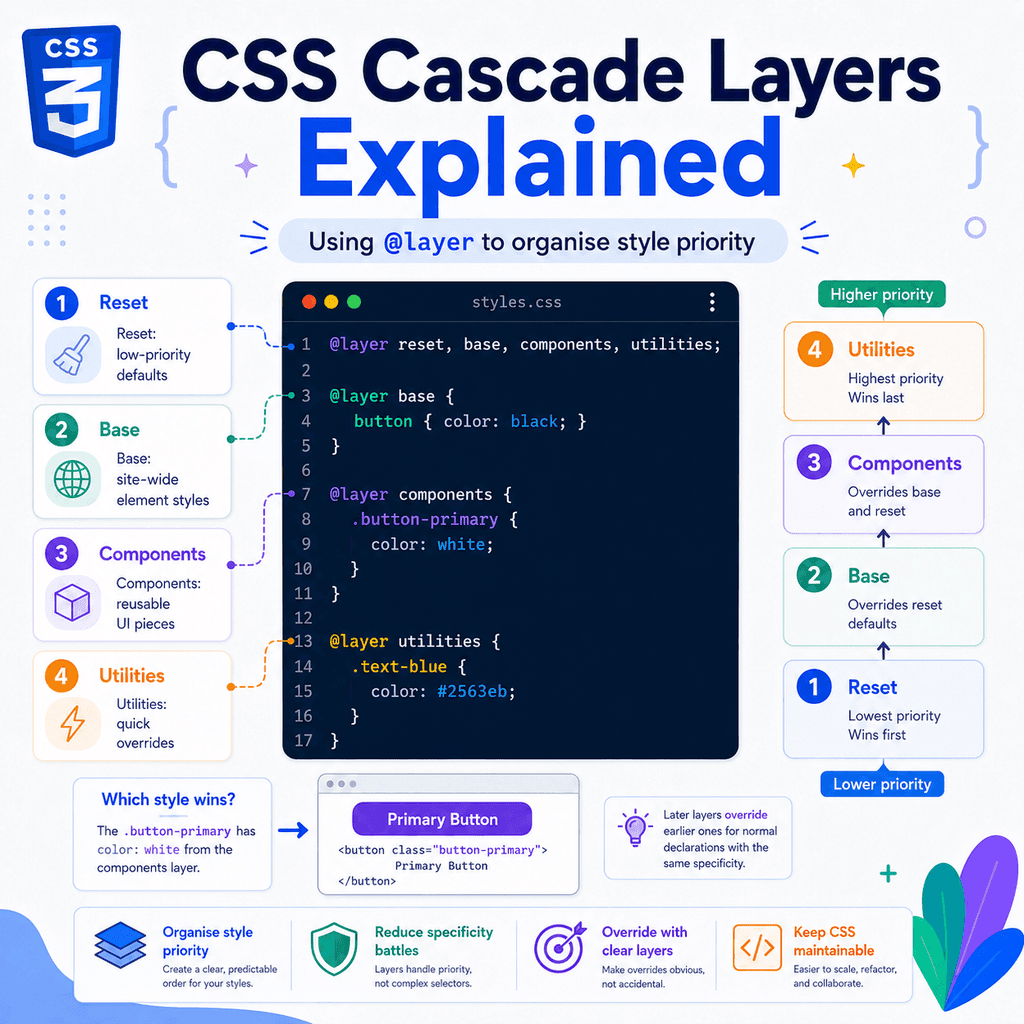
Introduction
CSS often has more than one rule that could apply to the same element.
For example:
button { background-color: gray;} .primary-button { background-color: blue;}HTML:
<button class=”primary-button”> Save</button>The browser needs to decide which background colour wins.
That decision is made by the CSS cascade.
The cascade considers several things, including:
importanceorigincascade layersspecificitysource orderCascade layers give you a way to organise CSS priority deliberately.
They let you say:
These styles are low-priority.These styles are medium-priority.These styles are high-priority.You do that with @layer.
Example:
@layer base, components, utilities;This creates a layer order.
Then you can place CSS inside those layers:
@layer base { button { background-color: gray; }} @layer components { .primary-button { background-color: blue; }}The components layer comes after the base layer.
For normal CSS declarations, later layers have higher priority.
So the .primary-button background can win over the base button background.
Cascade layers help make CSS priority clearer, especially in larger stylesheets.
What Are Cascade Layers?
Cascade layers are a way to group CSS rules into priority levels.
A layer is a named section of CSS.
Example:
@layer base { body { font-family: Arial, sans-serif; }}Here, the layer is called:
baseThe CSS rule inside that layer styles the body.
You can create several layers:
@layer reset { * { box-sizing: border-box; }} @layer base { body { font-family: Arial, sans-serif; }} @layer components { .card { padding: 1rem; }}Each layer has a place in the cascade.
That layer order helps decide which rule wins when rules conflict.
Why Cascade Layers Are Useful
Without cascade layers, CSS priority is often controlled by:
selector specificitysource order!importantThis can work for small projects.
But in larger projects, it can become difficult to manage.
You may end up with selectors like this:
.page .main-content .card .card-title { color: navy;}Then later, you need to override it:
.card-title { color: green;}But the override does not work because the earlier selector is more specific.
So you may be tempted to write:
.card-title { color: green !important;}That works, but it can make the CSS harder to maintain.
Cascade layers give you another tool.
Instead of increasing specificity or using !important, you can organise style priority at a higher level.
The Basic @layer Syntax
There are two common ways to use @layer.
You can create a layer and put rules inside it:
@layer base { body { font-family: Arial, sans-serif; color: #222222; }}You can also declare the layer order first:
@layer reset, base, components, utilities;Then add rules to those layers later:
@layer reset { * { box-sizing: border-box; }} @layer base { body { font-family: Arial, sans-serif; }} @layer components { .button { padding: 0.75rem 1rem; }} @layer utilities { .text-center { text-align: center; }}The first line defines the order:
resetbasecomponentsutilitiesFor normal declarations, the later layers have higher priority.
So utilities can override components.
components can override base.
base can override reset.
A Simple Layer Example
CSS:
@layer base, components; @layer base { button { background-color: gray; color: white; }} @layer components { .button-primary { background-color: blue; }}HTML:
<button class=”button-primary”> Save</button>The button matches both selectors:
buttonand:
.button-primaryThe final background is blue.
Why?
The components layer comes after the base layer.
For normal declarations, later layers have higher priority.
So the component style wins.
Layer Order Matters
The order of layers matters.
Example:
@layer base, components;This means:
base has lower prioritycomponents has higher priorityNow compare this:
@layer components, base;This means:
components has lower prioritybase has higher priorityThat would change which rules win.
For normal CSS declarations, the layer declared later has higher priority.
So this order is common:
@layer reset, base, layout, components, utilities;This gives the priority structure:
lowest priority: resetbaselayoutcomponentshighest priority: utilitiesDeclaring Layers Up Front
A good practice is to declare your layer order near the top of your CSS file.
Example:
@layer reset, base, layout, components, utilities;This makes the priority structure clear before the rest of the stylesheet begins.
Then you can add rules to those layers:
@layer reset { *, *::before, *::after { box-sizing: border-box; }} @layer base { body { margin: 0; font-family: Arial, sans-serif; }} @layer components { .card { padding: 1rem; border: 1px solid #dddddd; }} @layer utilities { .mt-0 { margin-top: 0; }}The first @layer statement tells the browser the intended order.
That makes the rest of the CSS easier to understand.
What Happens If You Do Not Declare Layer Order Up Front?
If you create layers without declaring the full order first, the order is based on when the layers first appear.
Example:
@layer components { .button { background-color: blue; }} @layer base { button { background-color: gray; }}Here, the components layer appears first.
The base layer appears second.
For normal declarations, the later layer has higher priority.
So base can override components.
That may not be what you wanted.
This is why declaring the layer order up front is useful:
@layer base, components;Now the intended order is clear.
Even if the components rules appear earlier in the file, the declared layer order still controls priority.
Normal Layer Priority
For normal declarations, later layers win over earlier layers.
Example:
@layer first, second; @layer first { .box { color: red; }} @layer second { .box { color: blue; }}HTML:
<div class=”box”>Text</div>The text becomes blue.
Both selectors are the same.
Both declarations are normal.
The second layer has higher priority than the first layer.
So blue wins.
A Later Layer Can Beat Higher Specificity
This is one of the most important features of cascade layers.
A low-specificity selector in a later layer can beat a high-specificity selector in an earlier layer.
Example:
@layer base, utilities; @layer base { main .content .card p { color: gray; }} @layer utilities { .text-blue { color: blue; }}HTML:
<main> <div class=”content”> <div class=”card”> <p class=”text-blue”>This text is blue.</p> </div> </div></main>The paragraph becomes blue.
Why?
The selector in the base layer is more specific:
main .content .card pThe selector in the utilities layer is less specific:
.text-blueBut utilities is a later layer.
Layer priority is considered before specificity.
So the later utilities layer wins.
This is useful because it lets utility classes override lower-priority CSS without using extremely specific selectors.
Specificity Still Matters Inside the Same Layer
Cascade layers do not remove specificity.
Specificity still matters when rules are in the same layer.
Example:
@layer components { p { color: black; } .intro { color: navy; }}HTML:
<p class=”intro”>Welcome.</p>The paragraph becomes navy.
Both declarations are in the same layer.
So the browser compares specificity.
The class selector is more specific than the type selector.
So .intro wins.
Source Order Still Matters Inside the Same Layer
Source order also still matters inside the same layer.
Example:
@layer components { .message { color: green; } .message { color: blue; }}HTML:
<p class=”message”> Your settings were saved.</p>The paragraph becomes blue.
Both selectors are the same.
Both rules are in the same layer.
Both declarations have equal specificity.
The later declaration wins.
Cascade layers add a priority level above specificity, but the normal cascade still works inside each layer.
Layer Priority Comes Before Specificity
A useful simplified order is:
importancelayer orderspecificitysource orderThis is simplified, but it helps explain everyday layer behaviour.
For normal author styles:
Layer order is checked before specificity.That means this can happen:
@layer base, components; @layer base { #main .card .title { color: red; }} @layer components { .title { color: blue; }}HTML:
<div id=”main”> <div class=”card”> <h2 class=”title”>Card title</h2> </div></div>The title becomes blue.
The base selector is much more specific.
But the components layer has higher priority.
The later layer wins.
Why This Is Helpful
This solves a common CSS problem.
Without layers, highly specific selectors can be hard to override.
Example without layers:
#main .card .title { color: red;} .title { color: blue;}The title stays red.
The ID selector is too specific.
With layers:
@layer base, components; @layer base { #main .card .title { color: red; }} @layer components { .title { color: blue; }}The title becomes blue.
The layer order gives the component layer higher priority.
You do not need !important.
You do not need an even more specific selector.
A Common Layer Structure
A useful layer structure is:
@layer reset, base, layout, components, utilities;Each layer has a purpose.
The reset layer contains low-priority reset or normalisation styles.
The base layer contains site-wide element defaults.
The layout layer contains layout structures.
The components layer contains reusable UI components.
The utilities layer contains small helper classes that should be easy to apply as overrides.
The priority order is:
resetbaselayoutcomponentsutilitiesThe later layers have more power for normal declarations.
The reset Layer
The reset layer is usually low priority.
It contains styles that remove or normalise browser defaults.
Example:
@layer reset { *, *::before, *::after { box-sizing: border-box; } body { margin: 0; } img { max-width: 100%; display: block; }}These rules should be easy to override later.
That is why reset is usually one of the first layers.
The base Layer
The base layer contains general element styles.
Example:
@layer base { body { font-family: Arial, sans-serif; color: #222222; line-height: 1.6; } h1, h2, h3 { line-height: 1.2; } a { color: #2563eb; }}These are broad defaults.
They set the basic look of the site.
They should usually be easier to override than component or utility styles.
The layout Layer
The layout layer contains page structure and layout patterns.
Example:
@layer layout { .container { width: min(100% – 2rem, 1100px); margin-inline: auto; } .grid { display: grid; gap: 1rem; } .sidebar-layout { display: grid; grid-template-columns: 250px 1fr; gap: 2rem; }}These rules control structure.
They are more specific to layout than base element defaults.
But they may still be lower priority than component-specific or utility styles.
The components Layer
The components layer contains reusable interface pieces.
Examples:
@layer components { .button { display: inline-block; padding: 0.75rem 1rem; border-radius: 6px; background-color: #2563eb; color: white; text-decoration: none; } .card { padding: 1rem; border: 1px solid #dddddd; border-radius: 8px; background-color: white; } .alert { padding: 1rem; border-radius: 8px; background-color: #fef3c7; color: #92400e; }}Component styles usually need to override base styles.
For example, base link styles might say:
a { color: #2563eb;}But a button link might need white text:
.button { color: white;}Putting .button in the components layer makes that priority clear.
The utilities Layer
The utilities layer contains small, single-purpose classes.
Examples:
@layer utilities { .text-center { text-align: center; } .text-red { color: red; } .mt-0 { margin-top: 0; } .hidden { display: none; }}Utilities are often intended to override component defaults.
Example:
@layer components { .card { text-align: left; }} @layer utilities { .text-center { text-align: center; }}HTML:
<div class=”card text-center”> This card text is centred.</div>The text becomes centred.
The utility layer comes after the component layer.
So .text-center can override .card.
Complete Layer Example
Here is a small complete example:
@layer reset, base, components, utilities; @layer reset { * { box-sizing: border-box; } body { margin: 0; }} @layer base { body { font-family: Arial, sans-serif; color: #222222; line-height: 1.6; } a { color: #2563eb; }} @layer components { .button { display: inline-block; padding: 0.75rem 1rem; border-radius: 6px; background-color: #2563eb; color: white; text-decoration: none; }} @layer utilities { .text-red { color: red; }}HTML:
<a class=”button text-red” href=”/delete”> Delete</a>The link has these relevant styles:
base layer:a { color: #2563eb; } components layer:.button { color: white; } utilities layer:.text-red { color: red; }The final colour is red.
The utilities layer has the highest priority.
So .text-red wins.
Layers Make Priority Explicit
Without layers, you might depend heavily on source order and specificity.
Example:
.button { color: white;} .text-red { color: red;}This works if .text-red appears later.
But if files are reorganised, the result could change.
With layers:
@layer components, utilities; @layer utilities { .text-red { color: red; }} @layer components { .button { color: white; }}Even though the utility rule appears earlier in the file, it still has higher priority because the layer order says:
componentsutilitiesThe declared layer order controls priority.
That makes the CSS more predictable.
Layer Order Is Not the Same as File Order
This is important.
Once you declare the layer order, that order controls layer priority.
Example:
@layer base, components, utilities; @layer utilities { .text-blue { color: blue; }} @layer base { p { color: black; }}HTML:
<p class=”text-blue”>Text</p>The text becomes blue.
The utilities rules appear earlier in the file.
But the utilities layer was declared after base in the layer order.
So it has higher priority.
The declaration order at the top matters more than where the layer block appears later.
Adding to an Existing Layer
You can add rules to the same layer in multiple places.
Example:
@layer base, components; @layer components { .button { padding: 0.75rem 1rem; }} @layer components { .card { padding: 1rem; }}Both .button and .card are in the components layer.
They are part of the same layer.
Inside the same layer, normal specificity and source order apply.
This is useful when CSS is split across files.
Different files can contribute rules to the same layer.
Anonymous Layers
You can create a layer without a name:
@layer { p { color: navy; }}This is called an anonymous layer.
It can be useful in some cases, but named layers are usually clearer.
With a named layer, you can refer to it later:
@layer base { p { color: navy; }}Then add more rules to it:
@layer base { h1 { color: #111827; }}For most projects, named layers are easier to organise and debug.
Unlayered Styles
CSS does not have to be inside a layer.
Example:
@layer base { p { color: black; }} p { color: red;}The second rule is unlayered.
For normal declarations, unlayered author styles have higher priority than layered author styles.
So the paragraph becomes red.
This is important.
Unlayered styles can override layered styles even if the unlayered selector is less specific.
Unlayered Styles Example
CSS:
@layer components { .card p { color: navy; }} p { color: black;}HTML:
<div class=”card”> <p>This paragraph is black.</p></div>The paragraph becomes black.
Why?
The p rule is unlayered.
For normal declarations, unlayered author styles have higher priority than layered author styles.
This can surprise people.
If you decide to use layers, it is usually best to put most or all of your author CSS into layers.
Why Unlayered Styles Can Be Dangerous
Suppose you create this layer structure:
@layer reset, base, components, utilities;Then you write this later:
.card { padding: 2rem;}That .card rule is not inside a layer.
It is unlayered.
For normal declarations, it can override layered styles.
That may break your intended priority system.
A better version is:
@layer components { .card { padding: 2rem; }}If you are using cascade layers, be intentional about whether a rule is layered or unlayered.
Should Everything Be Layered?
You do not have to layer every rule.
But for a clear system, it often helps to put most project styles into layers.
Example:
@layer reset, base, layout, components, utilities;Then use those layers consistently:
@layer components { .card { padding: 1rem; }}Avoid accidentally writing important project styles outside your layers.
Unlayered normal styles sit above layered normal styles in priority.
That can make your layer system less predictable.
Importing CSS into Layers
You can import a stylesheet into a layer.
Example:
@import url(“reset.css”) layer(reset);@import url(“components.css”) layer(components);@import url(“utilities.css”) layer(utilities);This places the imported CSS into named layers.
A full setup might look like this:
@layer reset, base, components, utilities; @import url(“reset.css”) layer(reset);@import url(“base.css”) layer(base);@import url(“components.css”) layer(components);@import url(“utilities.css”) layer(utilities);This is useful when your CSS is split across files.
It lets each file participate in the same cascade layer system.
Layering Third-Party CSS
Cascade layers are useful for third-party CSS.
Suppose you use a third-party library.
You can put it in a low-priority layer:
@layer vendor, base, components, utilities; @import url(“vendor.css”) layer(vendor);Then your project styles can override it more easily:
@layer components { .button { background-color: #2563eb; }}The components layer comes after the vendor layer.
So your component styles can override vendor styles without needing overly specific selectors.
This is one of the best uses of cascade layers.
Example: Overriding Vendor CSS
Vendor CSS:
.button { background-color: gray; color: black;}Import it into a layer:
@layer vendor, components; @import url(“vendor.css”) layer(vendor); @layer components { .button { background-color: blue; color: white; }}The button uses your component styles.
You do not need:
.button { background-color: blue !important;}The layer system gives your styles higher priority.
Cascade Layers and !important
Cascade layers have a special relationship with !important.
For normal declarations, later layers have higher priority.
For important declarations, the layer order is reversed.
That means important declarations in earlier layers can have higher priority than important declarations in later layers.
This is advanced, so be careful.
A simple beginner-friendly rule is:
Avoid mixing cascade layers and !important unless you know why you need it.Most of the time, layers are useful because they help you avoid !important.
Normal Layer Order Example
For normal declarations:
@layer base, utilities; @layer base { .box { color: red; }} @layer utilities { .box { color: blue; }}The box is blue.
The utilities layer comes later.
For normal declarations, later layers win.
Important Layer Order Example
Important declarations behave differently.
Example:
@layer base, utilities; @layer base { .box { color: red !important; }} @layer utilities { .box { color: blue !important; }}The result can be red because important declarations reverse the layer order.
The earlier base layer can beat the later utilities layer when both declarations are important.
This is another reason to avoid unnecessary !important.
Cascade layers are meant to make priority easier to control.
Adding !important can make the priority model more complex.
Layers Reduce the Need for !important
Before cascade layers, utility classes often used !important.
Example:
.text-center { text-align: center !important;}With layers, you may be able to avoid that:
@layer components, utilities; @layer components { .card { text-align: left; }} @layer utilities { .text-center { text-align: center; }}HTML:
<div class=”card text-center”> Centred card text</div>The text is centred.
No !important is needed.
The utility layer has higher priority.
Layers and Specificity Strategy
Cascade layers work best when combined with simple selectors.
Example:
@layer components { .card { padding: 1rem; } .card-title { font-size: 1.5rem; }}Avoid making selectors more specific than needed:
@layer components { main .page .content .card .card-title { font-size: 1.5rem; }}Layers help with priority, but they do not automatically make messy selectors clean.
Use layers with clear class names and reasonable specificity.
Layers and Component Variants
Cascade layers can help organise component variants.
Example:
@layer components { .button { background-color: gray; color: white; } .button-primary { background-color: blue; } .button-danger { background-color: red; }}HTML:
<button class=”button button-primary”> Save</button>All of these rules are in the same layer.
Inside the layer, source order and specificity decide the variant.
The .button-primary rule comes after .button.
So it can override the background.
You do not need separate layers for every small variation.
Use layers for broad priority groups.
Use classes and source order inside layers for component details.
Layers and Utility Classes
Utilities often belong in a high-priority layer.
Example:
@layer components, utilities; @layer components { .card { margin-top: 2rem; color: navy; }} @layer utilities { .mt-0 { margin-top: 0; } .text-red { color: red; }}HTML:
<div class=”card mt-0 text-red”> Card content</div>The card has:
margin-top: 0;color: red;The utilities override the component defaults.
That is usually the purpose of utility classes.
Layers and Base Styles
Base styles should usually be easy to override.
Example:
@layer base { h1 { font-size: 2rem; color: #111827; }}Later, a component can override the heading inside a card:
@layer components { .card-title { font-size: 1.25rem; color: navy; }}HTML:
<h2 class=”card-title”> Card title</h2>The component layer has higher priority.
So component-specific heading styles can override base heading styles.
Layers and Resets
Resets are ideal for a low-priority layer.
Example:
@layer reset, base, components; @layer reset { h1, h2, p { margin: 0; }} @layer base { p { margin-bottom: 1rem; }}The base paragraph margin can override the reset paragraph margin.
That is useful.
The reset creates a clean starting point.
The base layer adds desired defaults.
Layers and Browser Defaults
Cascade layers organise your author CSS.
They do not remove browser defaults by themselves.
Example:
@layer base { body { font-family: Arial, sans-serif; }}The browser still has default styles for headings, links, lists, and form controls.
Your layered CSS participates in the cascade along with those defaults.
A reset layer can help normalise browser defaults:
@layer reset { h1, h2, p { margin: 0; }}Then later layers can add your preferred styles.
Layers and Inheritance
Cascade layers decide which declarations win.
Inheritance still works normally.
Example:
@layer base { body { color: #333333; }} @layer components { .alert { color: darkred; }}HTML:
<div class=”alert”> <p>This paragraph inherits dark red.</p></div>The .alert gets color: darkred.
The paragraph inherits that final colour from its parent.
Layers help decide the parent’s final value.
Then inheritance passes that value down.
Layers and Source Order
Source order still matters, but mostly within the same layer.
Example:
@layer components { .box { color: red; } .box { color: blue; }}The box becomes blue.
Both rules are in the same layer.
Both selectors are equal.
The later rule wins.
But compare this:
@layer base, components; @layer components { .box { color: blue; }} @layer base { .box { color: red; }}The box is blue.
The base rule appears later in the file.
But the components layer has higher priority.
Layer order beats source order across layers.
Layer Order Beats Source Order Across Layers
This example is important:
@layer low, high; @layer high { .box { color: blue; }} @layer low { .box { color: red; }}HTML:
<div class=”box”>Text</div>The text is blue.
Even though the low layer rule appears later, the high layer has higher priority.
Source order only decides between rules when the earlier cascade factors are equal.
Here, layer priority is not equal.
Layers and Media Queries
You can use media queries inside layers.
Example:
@layer layout { .grid { display: grid; gap: 1rem; } @media (min-width: 700px) { .grid { grid-template-columns: 1fr 1fr; } }}You can also put layers inside media queries, but it is usually clearer to keep your layer structure simple.
A common pattern is:
@layer reset, base, layout, components, utilities; @layer layout { .container { width: min(100% – 2rem, 1100px); margin-inline: auto; } @media (min-width: 900px) { .two-column { display: grid; grid-template-columns: 1fr 1fr; } }}The media query controls when the rule applies.
The layer controls its priority.
Layers and @supports
You can also use feature queries inside layers.
Example:
@layer layout { .card-grid { display: block; } @supports (display: grid) { .card-grid { display: grid; gap: 1rem; } }}This keeps the layout rules in the layout layer.
The @supports condition decides whether the grid styles apply.
Again, the layer controls priority.
The condition controls whether the rule is active.
Nested Layers
Layers can be nested.
Example:
@layer framework { @layer reset { * { box-sizing: border-box; } } @layer components { .button { padding: 0.75rem 1rem; } }}This creates sublayers inside a parent layer.
They can be referred to with dot notation:
@layer framework.reset;@layer framework.components;Nested layers are useful for advanced organisation.
For most beginner projects, simple top-level layers are enough:
@layer reset, base, components, utilities;Start simple.
Naming Layers
Layer names should describe priority groups.
Good names:
resetbaselayoutcomponentsutilitiesvendorthemeoverridesLess useful names:
blue-stuffmiscrandomnew-cssfixesA layer name should help you understand why the rules are grouped together.
Example:
@layer vendor, reset, base, components, utilities;This tells you the intended priority system.
Vendor styles are lowest.
Utilities are highest.
Avoid Too Many Layers
Cascade layers are useful, but you do not need a layer for everything.
This is probably too much:
@layer reset, typography, forms, buttons, cards, modals, nav, footer, utilities, overrides;It might be useful in a large project.
But for a small project, it can be too complex.
Start with a simple structure:
@layer reset, base, components, utilities;Then add more layers only if they solve a real organisation problem.
Do Not Use Layers as a Dumping Ground
This is not helpful:
@layer stuff { .card { padding: 1rem; } body { margin: 0; } .text-center { text-align: center; }}The layer name stuff does not explain priority or purpose.
A better structure is:
@layer reset { body { margin: 0; }} @layer components { .card { padding: 1rem; }} @layer utilities { .text-center { text-align: center; }}The layer names make the CSS easier to reason about.
Do Not Replace Good CSS Structure with Layers
Layers are not a substitute for clear CSS.
This is still hard to maintain:
@layer components { .page .section .content .card .header .title { color: navy; }}Even inside a layer, overly specific selectors can cause problems.
Better:
@layer components { .card-title { color: navy; }}Use layers to organise priority.
Use good selectors to organise components.
You need both.
A Practical Page Example
HTML:
<article class=”article”> <h1 class=”article-title”>Cascade Layers</h1> <p class=”article-intro text-muted”> Layers help organise CSS priority. </p> <a class=”button” href=”/learn”>Learn more</a></article>CSS:
@layer reset, base, components, utilities; @layer reset { h1, p { margin: 0; }} @layer base { body { font-family: Arial, sans-serif; color: #222222; line-height: 1.6; } a { color: #2563eb; }} @layer components { .article { max-width: 700px; margin-inline: auto; padding: 2rem; } .article-title { color: #111827; margin-bottom: 1rem; } .button { display: inline-block; padding: 0.75rem 1rem; background-color: #2563eb; color: white; text-decoration: none; }} @layer utilities { .text-muted { color: #666666; }}The text-muted utility can override inherited or component text colour.
The .button component can override the base link colour.
The reset remains low priority.
The structure is clear.
A Practical Vendor Example
Suppose a vendor stylesheet styles buttons.
Vendor CSS:
.button { background-color: gray; color: black; padding: 0.5rem;}Your CSS:
@layer vendor, components; @import url(“vendor.css”) layer(vendor); @layer components { .button { background-color: #2563eb; color: white; padding: 0.75rem 1rem; }}Your button styles win because the components layer has higher priority.
You do not need to write:
.button { background-color: #2563eb !important;}This is cleaner and easier to maintain.
A Practical Utility Example
CSS:
@layer components, utilities; @layer components { .card { padding: 1rem; background-color: white; color: #222222; }} @layer utilities { .text-blue { color: #2563eb; } .p-0 { padding: 0; }}HTML:
<div class=”card text-blue p-0″> Card content</div>The final card styles include:
padding: 0;color: #2563eb;background-color: white;The utility classes override the component padding and colour.
The component still provides the background.
This is the purpose of the utility layer.
A Practical Reset and Base Example
CSS:
@layer reset, base; @layer reset { h1, h2, p { margin: 0; }} @layer base { p { margin-bottom: 1rem; }}HTML:
<p>This paragraph has base spacing.</p>The paragraph gets margin-bottom: 1rem.
The reset layer removed default margin.
The base layer added project-specific paragraph spacing.
Because base comes after reset, it wins.
Debugging Cascade Layers
When a style does not apply, ask these questions:
Is the rule inside a layer?Is the competing rule inside a different layer?Which layer has higher priority?Is one rule unlayered?Are both declarations normal, or is !important involved?Are the rules in the same layer?If they are in the same layer, which selector is more specific?If specificity is equal, which rule comes later?This is the layer-aware version of CSS debugging.
Browser developer tools can help show which declarations are active and which are overridden.
Common Mistake: Forgetting the Layer Order
This can be confusing:
@layer utilities { .text-red { color: red; }} @layer components { .card { color: navy; }}If there is no earlier layer order declaration, the first layer created is utilities.
The second layer created is components.
For normal declarations, the later layer has higher priority.
So components can override utilities.
That may be the opposite of what you intended.
Fix it by declaring the order up front:
@layer components, utilities;Now utilities have higher priority.
Common Mistake: Leaving Styles Unlayered
Example:
@layer components { .button { color: white; }} .button { color: black;}The button becomes black.
The second rule is unlayered.
For normal declarations, unlayered author styles have higher priority than layered author styles.
If this was accidental, put the rule into a layer:
@layer components { .button { color: black; }}or into a higher-priority layer:
@layer utilities { .text-black { color: black; }}Common Mistake: Expecting Specificity to Beat Layer Order
Example:
@layer low, high; @layer low { #main .card .title { color: red; }} @layer high { .title { color: blue; }}The title becomes blue.
The high layer wins before specificity is compared.
This is not a bug.
This is the point of cascade layers.
Layer order lets you override specific selectors without writing even more specific selectors.
Common Mistake: Using !important Too Quickly
If a layer override does not work, do not immediately add !important.
First check:
Is the rule in the correct layer?Is another rule unlayered?Was the layer order declared correctly?Are you dealing with an important declaration?Often, the fix is to move the rule into the right layer.
Example:
@layer components { .button { color: white; }} @layer utilities { .text-red { color: red; }}This is usually better than:
.text-red { color: red !important;}Common Mistake: Making Too Many Priority Levels
Cascade layers should simplify priority.
They should not create confusion.
This may be too many layers for a small site:
@layer reset, defaults, elements, typography, layout, grid, cards, buttons, forms, helpers, overrides;A simpler version may be better:
@layer reset, base, layout, components, utilities;Start simple.
Add layers only when you need them.
When to Use Cascade Layers
Cascade layers are useful when:
your CSS project is growingyou use third-party stylesyou want utility classes to override components without !importantyou want resets to stay low priorityyou want base styles to be easy to overrideyou want clearer control over style priorityThey are especially helpful when CSS comes from multiple sources.
Examples:
browser defaultsreset CSSvendor CSSyour base stylescomponent CSSutility classestheme overridesLayers let you organise those sources deliberately.
When You May Not Need Cascade Layers
For a very small stylesheet, cascade layers may be unnecessary.
Example:
body { font-family: Arial, sans-serif;} .button { background-color: blue;}If your CSS is simple and easy to manage, you may not need layers yet.
Cascade layers are most useful when priority becomes difficult to control.
Use them when they solve a real problem.
Choosing a Layer Order
A common order is:
@layer vendor, reset, base, layout, components, utilities;This gives the priority order:
vendorresetbaselayoutcomponentsutilitiesMeaning:
vendor styles are easiest to overridereset styles are low prioritybase styles set defaultslayout styles control structurecomponent styles define UI partsutility styles are high priority helpersYou can adjust this for your project.
For example, if you have theme styles, you might use:
@layer reset, base, components, themes, utilities;The best order depends on what should override what.
Adding an Overrides Layer
Some projects include an overrides layer.
Example:
@layer reset, base, components, utilities, overrides;The overrides layer has the highest normal priority.
It can be used for rare exceptions:
@layer overrides { .checkout-page .button { width: 100%; }}Use this carefully.
If many styles end up in overrides, it may mean your layer structure or component design needs improvement.
An overrides layer should be small.
Cascade Layers vs Specificity
Cascade layers and specificity answer different questions.
Layer order asks:
Which priority group does this rule belong to?Specificity asks:
Within the same priority group, which selector is stronger?Example:
@layer base, components; @layer base { #main .title { color: red; }} @layer components { .title { color: blue; }}The component layer wins.
The browser does not use specificity to let the base layer beat the component layer.
Layer priority comes first.
Cascade Layers vs Source Order
Layer order and source order are also different.
Layer order is the declared priority order of layers.
Source order is where rules appear in the stylesheet.
Example:
@layer base, components; @layer components { .title { color: blue; }} @layer base { .title { color: red; }}The title is blue.
The base rule appears later.
But the components layer has higher priority.
Source order matters when the rules are in the same layer or when layer priority is otherwise equal.
Cascade Layers vs !important
Cascade layers are usually a cleaner way to manage priority.
Example with !important:
.text-red { color: red !important;}Example with layers:
@layer components, utilities; @layer utilities { .text-red { color: red; }}If utilities should override components, the layer system can do that without important declarations.
Use layers to reduce the need for !important.
Do not use both unless you understand the result.
A Simple Mental Model
Think of layers like shelves.
Lower-priority CSS goes on lower shelves.
Higher-priority CSS goes on higher shelves.
Example:
top shelf: utilitiesmiddle shelf: componentslower shelf: basebottom shelf: resetWhen two normal declarations conflict, the rule on the higher shelf wins.
Only if rules are on the same shelf does the browser compare specificity and source order.
This mental model is not complete for every advanced case, but it is useful when starting.
A Step-by-Step Example
HTML:
<p class=”intro text-blue”> Welcome to the page.</p>CSS:
@layer base, components, utilities; @layer base { p { color: black; }} @layer components { .intro { color: green; }} @layer utilities { .text-blue { color: blue; }}The paragraph matches all three rules.
The base layer says black.
The components layer says green.
The utilities layer says blue.
The final colour is blue.
Why?
The utilities layer has the highest priority.
The browser does not need to compare specificity between layers.
The highest-priority matching layer wins for that property.
Another Step-by-Step Example
HTML:
<div class=”card”> <p class=”text-small”>Card text</p></div>CSS:
@layer components, utilities; @layer components { .card p { font-size: 1rem; }} @layer utilities { .text-small { font-size: 0.875rem; }}The paragraph becomes 0.875rem.
Why?
The utility layer has higher priority.
The .card p selector is more specific than .text-small.
But layer order comes before specificity.
The utility wins.
Example Without Layers
Without layers, this behaves differently:
.card p { font-size: 1rem;} .text-small { font-size: 0.875rem;}HTML:
<div class=”card”> <p class=”text-small”>Card text</p></div>The .card p selector may win because it has higher specificity.
You might need a stronger selector:
.card p.text-small { font-size: 0.875rem;}or !important:
.text-small { font-size: 0.875rem !important;}With layers, you can avoid that.
Best Practices for Cascade Layers
Declare your layer order near the top of your CSS.
Use a small number of clear layers.
Put low-priority resets in an early layer.
Put base element styles in a base layer.
Put reusable components in a components layer.
Put utility classes in a high-priority utilities layer.
Consider putting third-party CSS in a low-priority vendor layer.
Avoid accidentally leaving project styles unlayered.
Remember that unlayered normal styles override layered normal styles.
Use layers to reduce the need for !important.
Keep selectors simple inside layers.
Do not create too many layers.
Use layer names that explain purpose and priority.
Quick Reference
Basic layer order declaration:
@layer reset, base, components, utilities;Add rules to a layer:
@layer components { .button { padding: 0.75rem 1rem; }}Add more rules to the same layer:
@layer components { .card { padding: 1rem; }}Import a file into a layer:
@import url(“components.css”) layer(components);Normal declaration priority:
later layers beat earlier layersSpecificity:
specificity matters inside the same layerSource order:
source order matters inside the same layer when specificity is equalUnlayered normal styles:
unlayered normal author styles beat layered normal author stylesImportant declarations:
!important changes the layer behaviour and should be used carefullyQuick Summary
Cascade layers let you organise CSS priority with @layer.
They add a priority level to the cascade.
For normal declarations, later layers have higher priority than earlier layers.
Layer order is considered before specificity.
That means a low-specificity selector in a higher-priority layer can beat a high-specificity selector in a lower-priority layer.
Specificity still matters inside the same layer.
Source order still matters inside the same layer when specificity is equal.
Unlayered normal styles have higher priority than layered normal styles.
A common layer order is:
@layer reset, base, layout, components, utilities;This keeps resets low priority, components above base styles, and utilities high priority.
Cascade layers are especially useful for organising large CSS projects, third-party CSS, utility classes, resets, and design systems.
They can reduce the need for !important.
Use them deliberately.
A clear layer structure makes CSS easier to override, easier to debug, and easier to maintain.