
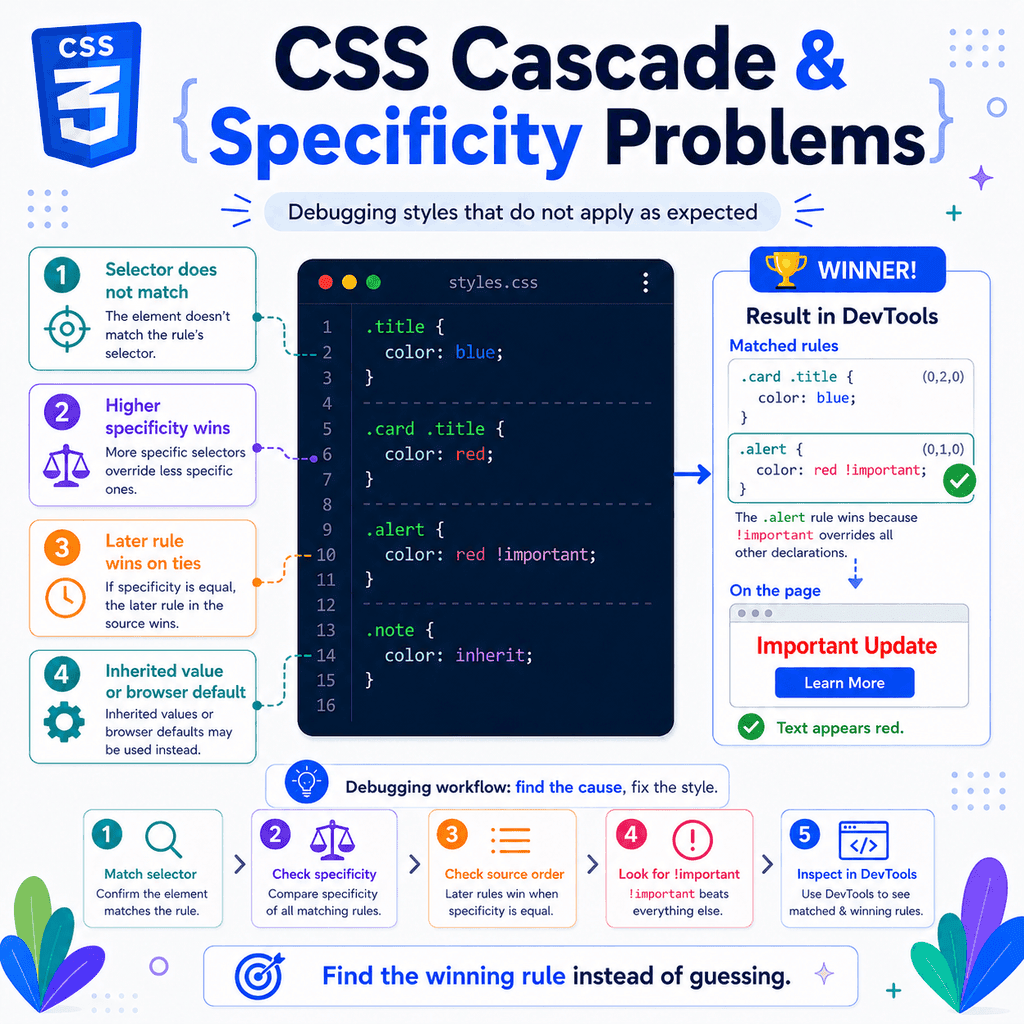
Introduction
CSS can feel confusing when a style does not apply as expected.
You write a rule like this:
.title { color: blue;}But the page still shows the title in red.
Or you write:
.button { background-color: green;}But the button stays gray.
When this happens, CSS is not choosing styles randomly.
The browser is following the cascade.
The cascade is the system CSS uses to decide which declaration wins when more than one declaration could apply to the same element and property.
Specificity is one part of that system.
Source order is another part.
Inheritance, browser defaults, cascade layers, !important, media queries, and inline styles can also affect the result.
This guide explains common cascade and specificity problems and how to debug styles that do not apply as expected.
The Basic Problem
Suppose you have this HTML:
<p class=”intro”>Welcome to the page.</p>And this CSS:
p { color: black;} .intro { color: navy;}Both rules apply to the paragraph.
The p selector applies because the element is a paragraph.
The .intro selector applies because the paragraph has class="intro".
Both rules set the same property:
colorThe browser must choose one value.
The paragraph becomes navy.
Why?
Because .intro is more specific than p.
This is a normal specificity conflict.
What the Cascade Decides
The cascade decides which CSS declaration wins.
A declaration is a property and value pair.
Example:
color: navy;A rule can contain several declarations:
.card { color: navy; padding: 1rem; background-color: white;}The cascade works declaration by declaration.
It does not simply choose one whole rule and ignore the other whole rule.
Example:
.card { color: black; padding: 1rem;} .card { color: blue;}The final styles are:
color: blue;padding: 1rem;The later rule overrides color.
The earlier rule still provides padding.
This is important when debugging.
A crossed-out declaration in developer tools does not mean the whole CSS rule failed.
It usually means that one declaration lost to another declaration.
A Simple Cascade Order
A simplified version of the cascade is:
importancecascade layersspecificitysource orderThere are more details in the full CSS cascade, but this simplified order explains many everyday problems.
In practical terms, ask:
Is one declaration marked !important?Are cascade layers involved?Which selector is more specific?If specificity is equal, which declaration comes later?You should also check:
Does the selector actually match the element?Is the rule inside a media query that applies?Is the property inherited instead of directly applied?Is there an inline style?Is a browser default involved?Problem 1: The Selector Does Not Match the Element
Before thinking about specificity, first check whether your selector matches the element at all.
HTML:
<p class=”intro”>Welcome.</p>CSS:
.introduction { color: blue;}This rule does not apply.
Why?
The HTML has:
class=”intro”But the CSS selects:
.introductionThose are different class names.
The browser will not guess what you meant.
Debugging a Selector That Does Not Match
Check spelling carefully.
This does not match:
<div class=”card-title”>Title</div>.card_title { color: navy;}The HTML uses a hyphen:
card-titleThe CSS uses an underscore:
card_titleThose are different.
Also check whether you used the right selector type.
This selects a class:
.title { color: navy;}This selects an ID:
#title { color: navy;}This selects an element:
title { color: navy;}These are not the same.
Problem 2: The Selector Is Too Broad
Sometimes your selector works, but it affects more elements than expected.
Example:
.title { color: blue;}HTML:
<article class=”post”> <h2 class=”title”>Post title</h2></article> <section class=”card”> <h2 class=”title”>Card title</h2></section>Both titles become blue.
If you only wanted card titles to change, the selector was too broad.
A more focused selector is:
.card .title { color: blue;}Or use a more specific class name:
.card-title { color: blue;}Problem 3: Another Rule Is More Specific
This is one of the most common problems.
CSS:
.title { color: blue;} .card .title { color: red;}HTML:
<div class=”card”> <h2 class=”title”>Card title</h2></div>The title becomes red.
Why?
Both selectors match the heading.
But .card .title is more specific than .title.
The selector .card .title contains two class selectors.
The selector .title contains one class selector.
So .card .title wins.
Specificity Basics
A simplified specificity order is:
type selectorclass selectorID selectorinline styleFrom weaker to stronger:
p { color: black;}.intro { color: navy;}#main-intro { color: green;}<p style=”color: red;”>Text</p>In general:
class selectors beat type selectorsID selectors beat class selectorsinline styles beat normal stylesheet rulesThis is simplified, but it is useful for most beginner CSS problems.
Specificity Score
Specificity is often described with a score.
A common format is:
IDs – classes/attributes/pseudo-classes – types/pseudo-elementsExample:
pSpecificity:
0-0-1Example:
.introSpecificity:
0-1-0Example:
#main-titleSpecificity:
1-0-0Example:
.card pSpecificity:
0-1-1Example:
#main-content .card pSpecificity:
1-1-1The leftmost column matters most.
An ID selector usually beats many class or type selectors because the ID column is stronger.
Problem 4: You Expected Source Order to Win, but Specificity Won
Source order means later rules can win when specificity is equal.
But source order does not automatically beat specificity.
Example:
.intro { color: navy;} p { color: black;}HTML:
<p class=”intro”>Welcome.</p>The paragraph becomes navy.
Why?
The p rule comes later.
But .intro is more specific.
A later weaker rule does not beat an earlier stronger rule.
When Source Order Wins
Source order wins when competing declarations have equal specificity.
Example:
.message { color: green;} .message { color: blue;}HTML:
<p class=”message”>Saved.</p>The paragraph becomes blue.
Both selectors are the same.
Both set color.
The later declaration wins.
Another example:
.success { color: green;} .warning { color: orange;}HTML:
<p class=”success warning”>Check your email.</p>The paragraph becomes orange.
Both .success and .warning have equal specificity.
Both apply to the paragraph.
.warning appears later in the CSS.
So .warning wins.
Problem 5: The HTML Class Order Does Not Control the Winner
This is a common beginner mistake.
HTML:
<p class=”success warning”>Message</p>Some people expect .warning to win because it appears last in the HTML class attribute.
But class order in HTML does not decide the winner.
CSS order decides.
Example:
.warning { color: orange;} .success { color: green;}HTML:
<p class=”success warning”>Message</p>The paragraph becomes green.
Why?
The .success rule appears later in the CSS.
This version gives the same result:
<p class=”warning success”>Message</p>The class order in HTML does not matter for this conflict.
The CSS rule order matters.
Problem 6: Inline Styles Are Winning
Inline styles are written directly on an HTML element.
Example:
<p class=”intro” style=”color: red;”> Welcome.</p>CSS:
.intro { color: blue;}The paragraph becomes red.
Why?
The inline style is stronger than the normal class rule.
This is why inline styles can be difficult to override.
They are useful in rare cases, but they often make CSS harder to maintain.
Overriding Inline Styles
A normal stylesheet rule usually does not override an inline style:
.intro { color: blue;}But an important stylesheet rule can override a normal inline style:
.intro { color: blue !important;}HTML:
<p class=”intro” style=”color: red;”> Welcome.</p>The paragraph becomes blue.
Use this carefully.
If you control the HTML, it is usually better to remove the inline style.
Problem 7: !important Is Blocking Your Rule
The !important flag makes a declaration harder to override.
Example:
.alert { color: red !important;} .alert { color: black;}HTML:
<p class=”alert”>Important message.</p>The paragraph stays red.
The later black declaration is normal.
The earlier red declaration is important.
Important declarations beat normal declarations.
Important Does Not Always Win Against Important
If both declarations are important, specificity still matters.
Example:
.alert { color: red !important;} .warning.alert { color: orange !important;}HTML:
<p class=”alert warning”>Warning message.</p>The paragraph becomes orange.
Both declarations are important.
.warning.alert is more specific than .alert.
So orange wins.
If specificity is equal, source order decides between important declarations:
.alert { color: red !important;} .alert { color: orange !important;}The paragraph becomes orange.
Debugging !important
When a style does not apply, check developer tools for !important.
If the winning declaration has !important, your normal rule will not beat it.
You have several options:
remove the unnecessary !importantuse a better cascade structureuse a more specific important rulemove the rule into a stronger cascade layer if layers are involvedavoid fighting the rule if it is a deliberate utility or state classDo not automatically add more !important.
That can create a chain where every future override also needs !important.
Problem 8: The Property Is Inherited, Not Directly Applied
Inheritance can make debugging confusing.
Example:
.card { color: green;} p { color: blue;}HTML:
<div class=”card”> <p>This paragraph is blue.</p></div>The paragraph is blue.
Why?
The .card rule sets the colour on the parent.
The paragraph could inherit green from the parent.
But the paragraph also has a direct rule:
p { color: blue;}A direct value on the element beats an inherited value from the parent.
Parent Specificity Does Not Transfer to Children
This surprises many people.
CSS:
#main { color: green;} p { color: blue;}HTML:
<div id=”main”> <p>This paragraph is blue.</p></div>The paragraph becomes blue.
The #main selector is more specific than p.
But #main targets the parent <div>, not the paragraph.
The p selector targets the paragraph directly.
The paragraph receives:
inherited color: greendirect color: blueThe direct colour wins.
Specificity from the parent does not transfer to inherited child values.
Problem 9: You Expected a Property to Inherit, but It Does Not
Not every CSS property inherits.
Text-related properties often inherit:
colorfont-familyfont-sizefont-stylefont-weightline-heightletter-spacingtext-aligntext-transformvisibilityBox and layout properties usually do not inherit:
marginpaddingborderbackgroundwidthheightdisplaypositiongapgrid-template-columnsflex-directionExample:
.card { padding: 2rem;}HTML:
<div class=”card”> <p>Card text.</p></div>The paragraph does not inherit padding: 2rem.
The card has padding.
The paragraph sits inside the padded card.
If you want the paragraph itself to have padding, you must style the paragraph directly:
.card p { padding: 2rem;}Problem 10: Browser Defaults Are Applying
Browsers have default styles.
For example, browsers usually give headings a large bold font, paragraphs margins, links blue underlined styling, and lists indentation.
Example:
<h1>Page title</h1><p>Paragraph text.</p><a href=”/about”>About</a>Even with no CSS, these elements have visible styles.
Those styles come from the browser’s user agent stylesheet.
This can confuse debugging because a style may appear even though you did not write it.
Browser Default Example
CSS:
body { font-size: 18px;}HTML:
<h1>Page title</h1><p>Paragraph text.</p>The paragraph may use 18px.
The heading may still appear much larger.
Why?
The heading has browser default styles.
The browser likely gives h1 a direct font size.
That direct browser rule can override inherited font-size from body.
If you want control, write a direct heading rule:
h1 { font-size: 2rem;}Problem 11: A Reset Removed Default Styles
Many projects use a reset.
Example:
h1,h2,p,ul { margin: 0;}This removes default margins from headings, paragraphs, and lists.
If you expect paragraphs to have spacing, but they do not, a reset may be responsible.
Add your own spacing:
p { margin-bottom: 1rem;}Or for article content:
.article p { margin-block: 1rem;}A reset is not a bug.
It just means you are responsible for adding the styles you want.
Problem 12: A Shorthand Property Overrode a Longhand Property
Shorthand properties can override multiple related longhand properties.
Example:
.box { margin-top: 2rem;} .box { margin: 0;}The final top margin is 0.
Why?
The shorthand property margin sets all four sides:
margin-topmargin-rightmargin-bottommargin-leftSo margin: 0; overrides the earlier margin-top: 2rem;.
Now reverse the order:
.box { margin: 0;} .box { margin-top: 2rem;}The final top margin is 2rem.
The later longhand overrides one part of the earlier shorthand.
Shorthand Border Example
CSS:
.card { border-color: blue;} .card { border: 1px solid gray;}The final border colour is gray.
Why?
The border shorthand sets:
border-widthborder-styleborder-colorBecause it comes later, it overrides the earlier border-color.
Reverse the order:
.card { border: 1px solid gray;} .card { border-color: blue;}Now the border colour is blue.
When debugging, look for shorthand properties that silently reset longhand values.
Problem 13: The Rule Is Inside a Media Query That Does Not Apply
Media queries apply only when their condition is true.
Example:
.card { width: 100%;} @media (min-width: 900px) { .card { width: 50%; }}If the viewport is 700px wide, the media query does not apply.
The card remains 100%.
If the viewport is 950px wide, the media query applies.
The card becomes 50%.
When a style does not apply, check whether it is inside a media query.
Media Query Order Problems
Multiple media queries can apply at the same time.
Example:
.box { width: 100%;} @media (min-width: 900px) { .box { width: 50%; }} @media (min-width: 600px) { .box { width: 75%; }}At 950px, both media queries apply.
The 900px rule says 50%.
The 600px rule says 75%.
The 600px rule comes later.
If specificity is equal, the later rule wins.
The box becomes 75%.
That may be unexpected.
A common mobile-first order is:
.box { width: 100%;} @media (min-width: 600px) { .box { width: 75%; }} @media (min-width: 900px) { .box { width: 50%; }}Now larger breakpoint rules come later.
Problem 14: The File Order Is Wrong
Source order also applies across CSS files.
HTML:
<link rel=”stylesheet” href=”theme.css”><link rel=”stylesheet” href=”base.css”>If both files style the same thing, base.css can override theme.css because it is loaded later.
Example:
theme.css:
button { background-color: blue;}base.css:
button { background-color: gray;}The button becomes gray.
If you expected the theme to win, load it later:
<link rel=”stylesheet” href=”base.css”><link rel=”stylesheet” href=”theme.css”>Problem 15: A Cascade Layer Is Winning
Cascade layers are created with @layer.
Example:
@layer base, components, utilities; @layer base { .title { color: black; }} @layer utilities { .text-blue { color: blue; }}HTML:
<h2 class=”title text-blue”>Heading</h2>The heading becomes blue.
The utilities layer comes after the base layer.
For normal declarations, later layers have higher priority.
Layer order is considered before specificity.
Layer Order Can Beat Specificity
Example:
@layer base, utilities; @layer base { #main .card .title { color: red; }} @layer utilities { .text-blue { color: blue; }}HTML:
<div id=”main”> <div class=”card”> <h2 class=”title text-blue”>Title</h2> </div></div>The title becomes blue.
Why?
The base selector is more specific.
But utilities is a later layer.
For normal declarations, later layers beat earlier layers before specificity is compared.
If layers are involved, check the layer order before blaming specificity.
Problem 16: Unlayered CSS Is Overriding Layered CSS
This can surprise people.
CSS:
@layer components { .card p { color: navy; }} p { color: black;}HTML:
<div class=”card”> <p>This paragraph is black.</p></div>The paragraph becomes black.
Why?
The p rule is unlayered.
For normal author styles, unlayered CSS has higher priority than layered CSS.
If you are using cascade layers, be careful with unlayered rules.
A better version may be:
@layer base { p { color: black; }} @layer components { .card p { color: navy; }}Now the component layer can override the base layer.
Problem 17: The Element Is Outside the Scope
If you use @scope, selectors inside the scope only apply within the scope root.
Example:
@scope (.card) { .title { color: navy; }}HTML:
<div class=”card”> <h2 class=”title”>Card title</h2></div> <div class=”modal”> <h2 class=”title”>Modal title</h2></div>Only the card title becomes navy.
The modal title is outside .card.
So the scoped rule does not apply.
When debugging scoped CSS, check whether the element is actually inside the scope root.
Problem 18: A Scope Limit Excludes the Element
@scope can have a lower boundary.
Example:
@scope (.article) to (.callout) { p { color: #333333; }}HTML:
<article class=”article”> <p>Main paragraph.</p> <aside class=”callout”> <p>Callout paragraph.</p> </aside></article>The main paragraph is styled.
The callout paragraph is not styled by this scoped rule.
Why?
.callout is the scope limit.
The scoped rule stops before entering it.
If a scoped rule does not apply, check whether a scope limit excludes the element.
Problem 19: The Pseudo-Class State Is Not Active
Pseudo-classes apply only in certain states.
Example:
button:hover { background-color: blue;}This rule applies when the button is hovered.
If the button is not hovered, the rule does not apply.
Another example:
input:focus { border-color: blue;}This applies when the input has focus.
If the input is not focused, the rule does not apply.
When debugging pseudo-classes, check whether the state is active.
Browser developer tools can often force states like :hover, :focus, and :active.
Problem 20: Link State Order Is Causing Conflicts
Links have several states:
a:linka:visiteda:hovera:focusa:activeSome states can overlap.
Example:
a:hover { color: red;} a:focus { color: blue;}If a link is both hovered and focused, both rules may apply.
If specificity is equal, the later rule wins.
So the link may become blue.
A clear pattern is:
a:link { color: blue;} a:visited { color: purple;} a:hover,a:focus-visible { text-decoration: underline;} a:active { color: red;}Think about overlapping states when debugging link styles.
Problem 21: A Pseudo-Element Is Not Being Created
Pseudo-elements like ::before and ::after often need content.
Example:
.note::before { content: “Note: “; font-weight: bold;}If you forget content, the pseudo-element may not appear:
.note::before { font-weight: bold;}The rule exists, but there may be no generated content to show.
Add content:
.note::before { content: “Note: “;}Also check whether the selected element can use the pseudo-element as expected.
Problem 22: The Property Does Not Apply to That Element
Some properties only work in certain contexts.
Example:
.item { justify-self: center;}This works on grid items.
But if the parent is not a grid container, the result may not be what you expect.
Example:
.parent { display: block;} .item { justify-self: center;}The justify-self declaration may not affect layout as expected.
Another example:
span { width: 200px;}A normal inline <span> does not behave like a block box.
The width may not apply as expected.
You may need:
span { display: inline-block; width: 200px;}When a declaration appears active but has no visible effect, check whether the property applies in that layout context.
Problem 23: The Parent Layout Controls the Child
Some styles affect children without being inherited.
Example:
.container { display: flex;}HTML:
<div class=”container”> <div class=”item”>One</div> <div class=”item”>Two</div></div>The children become flex items.
But they do not inherit display: flex.
The parent creates a flex formatting context.
The children participate in that layout.
If child layout is not behaving as expected, inspect the parent.
Look for:
display: flexdisplay: gridpositionoverflowalign-itemsjustify-contentgrid-template-columnsgapThe issue may be on the parent, not the child.
Problem 24: display: none on a Parent Hides Everything
If a parent has display: none, its children are not displayed.
Example:
.modal { display: none;} .modal .message { display: block;}HTML:
<div class=”modal”> <p class=”message”>Hello.</p></div>The message does not appear.
Why?
The parent .modal is not displayed.
Setting the child to display: block does not make it visible while the parent is display: none.
You must display the parent:
.modal.is-open { display: block;}Problem 25: opacity on a Parent Affects Children Visually
The opacity property does not inherit in the normal way.
But it affects the rendered element and its contents.
Example:
.card { opacity: 0.5;} .card p { opacity: 1;}HTML:
<div class=”card”> <p>Card text.</p></div>The paragraph still appears faded.
Why?
The whole card is rendered at 0.5 opacity.
The child cannot escape the parent’s rendered opacity.
If you only want a faded background, use a background colour with alpha instead:
.card { background-color: rgb(0 0 0 / 0.5);}instead of fading the whole card.
Problem 26: z-index Does Not Work as Expected
z-index only works in certain positioning and stacking contexts.
Example:
.box { z-index: 10;}If .box is not positioned or not in a relevant stacking context, z-index may not behave as expected.
Often you need:
.box { position: relative; z-index: 10;}But stacking contexts can also be created by properties such as:
position with z-indexopacity less than 1transformfilterisolationcertain contain valuesIf z-index is not working, inspect the stacking context.
The problem may not be the number.
A z-index: 9999 inside a lower stacking context can still appear behind something in a higher stacking context.
Problem 27: A Custom Property Is Not Defined Where You Use It
CSS custom properties inherit.
Example:
.card { –brand-color: blue;} .card h2 { color: var(–brand-color);}This works because --brand-color is defined on .card and inherited by the heading.
But this may fail:
.card h2 { color: var(–brand-color);}If --brand-color is not defined anywhere in the heading’s inheritance path, the property may become invalid.
Use a fallback:
.card h2 { color: var(–brand-color, navy);}Now the heading uses navy if --brand-color is missing.
Problem 28: A Custom Property Value Is Invalid
Custom properties are substituted later.
Example:
:root { –spacing: blue;} .card { padding: var(–spacing);}This does not make sense.
padding needs a length or valid spacing value.
blue is not valid for padding.
The declaration becomes invalid when used.
Use valid values:
:root { –spacing: 1rem;} .card { padding: var(–spacing);}If a custom property-based style does not apply, check both where the variable is defined and whether the value is valid for the property.
Problem 29: The CSS Has a Syntax Error
A missing brace or semicolon can make later CSS behave strangely.
Example:
.card { color: navy; padding: 1rem; .button { background-color: blue;}The .card rule is missing a closing brace:
}The browser may parse the following CSS differently than you expect.
Correct:
.card { color: navy; padding: 1rem;} .button { background-color: blue;}When styles stop applying after a certain point in a file, check for syntax errors above that point.
Problem 30: Invalid Values Are Ignored
If a property has an invalid value, the browser ignores that declaration.
Example:
.card { color: 20px;}20px is not a valid value for color.
The declaration is ignored.
Another example:
.box { display: centre;}The valid value is not centre.
The browser ignores the invalid declaration.
Correct:
.box { text-align: center;}or:
.box { display: flex; justify-content: center;}depending on what you are trying to do.
Problem 31: The Stylesheet Is Not Loading
Sometimes the CSS rule is fine, but the file is not loaded.
HTML:
<link rel=”stylesheet” href=”style.css”>Check:
Is the file path correct?Is the file name correct?Is the file extension correct?Is the server returning the file?Is the CSS cached?Is the link tag in the document?If the file is named:
styles.cssbut the HTML links to:
style.cssthe stylesheet will not load.
Use browser developer tools to check the Network panel if needed.
Problem 32: Browser Cache Is Showing Old CSS
Sometimes you change CSS, but the browser still shows an old version.
Try:
hard refreshdisable cache in developer toolscheck whether your build process generated the updated filecheck whether the server or CDN is caching the CSSThis is especially common when working with bundled files or deployed sites.
If developer tools show the old CSS, your latest changes are not reaching the browser.
Problem 33: The Build Tool Generated Different CSS
If you use Sass, PostCSS, Tailwind, CSS Modules, a framework, or a bundler, the CSS you write may not be exactly what the browser receives.
Example:
.card { &__title { color: navy; }}This may compile to:
.card__title { color: navy;}If your HTML uses:
<h2 class=”card-title”>Title</h2>the rule does not match.
The CSS expects:
<h2 class=”card__title”>Title</h2>When using tools, inspect the final CSS in the browser, not only the source file.
Problem 34: CSS Modules Changed the Class Name
CSS Modules may transform class names.
You may write:
.title { color: navy;}But the final class may become something like:
Title_title__abc123If you manually write:
<h2 class=”title”>Title</h2>the generated CSS may not match.
With CSS Modules, classes usually need to be applied through the imported styles object in your component code.
This is not a cascade problem.
It is a class name generation problem.
Problem 35: Framework Styles Are Overriding Your CSS
Frameworks and component libraries often ship their own CSS.
Example:
.btn { background-color: gray;}Your CSS:
.button { background-color: blue;}HTML:
<button class=”btn button”>Save</button>If the framework CSS loads later, or if its selector is more specific, it may win.
Options:
load your CSS after the framework CSSuse a clearer component selectoruse cascade layersuse framework theming optionsavoid fighting the framework when configuration is availableuse !important only when necessaryA Debugging Workflow
When a style does not apply, use this workflow.
First, inspect the element in browser developer tools.
Second, check whether your selector appears in the Styles panel.
Third, check whether the declaration is crossed out.
Fourth, find the winning declaration.
Fifth, compare the two declarations.
Ask:
Does my selector match?Is my declaration invalid?Is another declaration setting the same property?Is the other declaration important?Are cascade layers involved?Is the other selector more specific?Does the other rule come later?Is the value inherited?Is a media query involved?Is an inline style involved?This process is more reliable than guessing.
Step 1: Check Whether the Rule Exists
If your rule does not appear in developer tools at all, possible causes include:
the selector does not matchthe CSS file is not loadedthe CSS is inside a media query that does not applythe CSS is inside an unsupported feature querythere is a syntax erroryour build tool did not output the ruleExample:
@media (min-width: 900px) { .card { padding: 2rem; }}At 700px, this rule may not appear as active because the media condition is false.
Step 2: Check Whether the Declaration Is Crossed Out
If a declaration is crossed out, it matched but lost.
Example:
.card { color: black;} .card.featured { color: blue;}HTML:
<div class=”card featured”>Text</div>In developer tools, color: black; may be crossed out.
That means another declaration wins for the same property.
Find the winning declaration and compare:
importancelayerspecificitysource orderStep 3: Check Computed Styles
The Computed panel shows the final value the browser uses.
For example, the Styles panel might show many possible color declarations.
The Computed panel shows the final color.
This helps you answer:
What value is actually being used?Which rule provided that value?Is the value inherited?Is the value coming from a browser default?Computed styles are especially useful for inherited properties and layout properties.
Step 4: Disable Rules Temporarily
In developer tools, you can usually uncheck declarations.
This helps you see what changes.
For example, if this declaration is winning:
.card .title { color: red;}Uncheck it.
If your blue style appears, you know the red declaration was blocking it.
This is a fast way to identify conflicts.
Step 5: Test a Simpler Selector
If your selector is complex, test a simpler one.
Original:
main .content .article .card .title { color: blue;}Test:
.title { outline: 2px solid red;}If the outline appears, the element matches .title.
Then the issue may be specificity, source order, or the original selector path.
If the outline does not appear, maybe the class name is wrong or the CSS is not loaded.
Step 6: Avoid Random !important
Do not immediately fix this:
.title { color: blue;}by writing this:
.title { color: blue !important;}First, find out why the original rule lost.
Maybe the winning rule is:
.card .title { color: red;}Then a cleaner fix may be:
.card .title { color: blue;}or:
.card-title { color: blue;}or reorganising source order.
Use !important only when it is intentional.
Example Debugging Session: Colour Does Not Apply
HTML:
<div class=”card”> <h2 class=”title”>Card title</h2></div>CSS:
.title { color: blue;} .card .title { color: red;}Problem:
The title is red, but you expected blue.Debug:
Both selectors match.Both set color.Neither uses !important.No layers are involved..card .title has higher specificity than .title.Therefore red wins.Fix options:
.card .title { color: blue;}or:
.card-title { color: blue;}or remove the competing red rule if it is not needed.
Example Debugging Session: Button Background Does Not Apply
HTML:
<button class=”button primary”>Save</button>CSS:
.primary { background-color: blue;} .button { background-color: gray;}Problem:
The button is gray, but you expected blue.Debug:
Both .primary and .button match.Both are class selectors.Specificity is equal..button appears later.Therefore gray wins.Fix:
.button { background-color: gray;} .primary { background-color: blue;}or use a clearer modifier:
.button { background-color: gray;} .button-primary { background-color: blue;}HTML:
<button class=”button button-primary”>Save</button>Example Debugging Session: Card Text Inherits Unexpected Colour
HTML:
<section class=”warning”> <div class=”card”> <p>Card text.</p> </div></section>CSS:
.warning { color: red;} .card { background-color: white;}Problem:
The card text is red, but you expected normal text.Debug:
color inherits..warning sets color on the parent section..card does not set color.p does not set color.The paragraph inherits red through its ancestors.Fix:
.card { background-color: white; color: #222222;}This gives the card its own text colour.
Example Debugging Session: Link Does Not Match Parent Colour
HTML:
<p class=”notice”> Read the <a href=”/guide”>guide</a>.</p>CSS:
.notice { color: green;}Problem:
The paragraph is green, but the link is blue.Debug:
color normally inherits.But browsers commonly style links directly.The link has browser default link colour.A direct link rule can override inherited parent colour.Fix:
.notice a { color: inherit;}Now the link uses the notice colour.
Example Debugging Session: Utility Class Does Not Work
HTML:
<div class=”card text-center”> Card content</div>CSS:
.text-center { text-align: center;} .card { text-align: left;}Problem:
The text is left-aligned, but you expected centered.Debug:
Both selectors are class selectors.Specificity is equal..card appears later.Therefore text-align: left wins.Fix:
.card { text-align: left;} .text-center { text-align: center;}Or, if using layers:
@layer components, utilities; @layer components { .card { text-align: left; }} @layer utilities { .text-center { text-align: center; }}Example Debugging Session: Layered Utility Does Not Work
HTML:
<div class=”card text-red”> Card content</div>CSS:
@layer utilities { .text-red { color: red; }} @layer components { .card { color: navy; }}Problem:
The text is navy, but you expected red.Debug:
No layer order was declared up front.utilities layer was created first.components layer was created second.For normal declarations, later layers have higher priority.components wins.Fix:
@layer components, utilities; @layer utilities { .text-red { color: red; }} @layer components { .card { color: navy; }}Now the declared layer order gives utilities higher priority.
Example Debugging Session: Media Query Override Does Not Work
CSS:
.card { padding: 1rem;} @media (min-width: 900px) { .card { padding: 2rem; }}Problem:
The card still has 1rem padding.Debug:
Check viewport width.If viewport is below 900px, the media query does not apply.If the viewport is above 900px, check for another later rule:
.card { padding: 1rem;} @media (min-width: 900px) { .card { padding: 2rem; }} .card.featured { padding: 3rem;}If the card has class featured, .card.featured is more specific and appears later.
So 3rem wins.
Example Debugging Session: Width Does Not Apply to Span
HTML:
<span class=”badge”>New</span>CSS:
.badge { width: 100px; background-color: yellow;}Problem:
The width does not seem to work.Debug:
span is inline by default.Width does not affect normal inline elements the way it affects block or inline-block elements.Fix:
.badge { display: inline-block; width: 100px; background-color: yellow;}The issue was not specificity.
The property did not apply as expected because of the element’s display type.
Common Fixes
Common cascade and specificity fixes include:
correct the selectormove the rule laterreduce the specificity of the competing ruleincrease specificity deliberatelyremove unnecessary !importantuse a modifier classuse cascade layersput utilities in a higher-priority layermove broad styles into a lower-priority layerwrite direct styles on the elementset inherited properties on the right parentremove inline styles when possibleChoose the fix based on the actual cause.
Do not use the same fix for every problem.
Fix 1: Correct the Selector
If the selector does not match, fix the selector or the HTML.
Wrong:
<h2 class=”card-title”>Title</h2>.card_title { color: navy;}Correct:
.card-title { color: navy;}Or change the HTML if the CSS class is the one you want.
Fix 2: Move the Rule Later
If specificity is equal, source order can solve the problem.
Before:
.primary { background-color: blue;} .button { background-color: gray;}After:
.button { background-color: gray;} .primary { background-color: blue;}Use this when the rule order is the actual problem.
Fix 3: Use a More Specific Selector
Sometimes you need a selector that describes the target more clearly.
Before:
.title { color: blue;}Competing rule:
.card .title { color: red;}Fix:
.card .title { color: blue;}Use specificity deliberately.
Do not create unnecessarily long selectors.
Fix 4: Use a Modifier Class
Instead of fighting base styles, use a modifier.
HTML:
<button class=”button button-primary”>Save</button>CSS:
.button { background-color: gray; color: white;} .button-primary { background-color: blue;}This is clearer than writing random overrides later.
Modifier classes are useful for component variations.
Fix 5: Reduce Specificity
If a selector is too specific, it becomes hard to override.
Hard to override:
.page .main .content .card .title { color: navy;}Better:
.card-title { color: navy;}Lower specificity makes CSS easier to maintain.
Use structure, naming, layers, and source order instead of long selector chains.
Fix 6: Use Cascade Layers
Cascade layers help organise priority.
Example:
@layer reset, base, components, utilities; @layer components { .card { color: navy; }} @layer utilities { .text-red { color: red; }}HTML:
<div class=”card text-red”> Text</div>The text is red because the utilities layer has higher priority.
This can reduce the need for !important.
Fix 7: Remove Unnecessary !important
Before:
.button { background-color: gray !important;} .button-primary { background-color: blue;}The primary button stays gray.
Better:
.button { background-color: gray;} .button-primary { background-color: blue;}Now the modifier can work normally.
Avoid placing !important in base component styles unless there is a strong reason.
Fix 8: Use inherit Intentionally
If a child should match its parent, use inherit.
Example:
.card { color: navy;} .card a { color: inherit;}Now links inside the card use the card’s text colour.
This is useful for links, buttons, form controls, and icons.
Fix 9: Use Direct Styling Instead of Relying on Inheritance
If a child should not inherit a parent style, give it its own value.
Example:
.warning { color: red;} .card { color: #222222;}HTML:
<section class=”warning”> <div class=”card”> <p>Normal card text.</p> </div></section>The card text can now use its own colour instead of inheriting warning red.
Fix 10: Check Layout Context
If a property has no visible effect, check the layout context.
Example:
.item { align-self: center;}This needs the item to be inside a flex or grid container.
Parent:
.container { display: flex;}Without the correct parent layout, the property may not work as expected.
A Practical Debugging Checklist
Use this checklist when styles do not apply.
1. Is the stylesheet loaded?2. Does the selector match the element?3. Is the declaration valid?4. Is the rule inside a media query that applies?5. Is the rule inside @supports that applies?6. Is the rule inside @scope, and is the element inside the scope?7. Is the property being set somewhere else?8. Is the other declaration !important?9. Are cascade layers involved?10. Is one rule unlayered?11. Which selector is more specific?12. If specificity is equal, which rule comes later?13. Is an inline style involved?14. Is the value inherited from a parent?15. Is a browser default involved?16. Is a reset involved?17. Is a shorthand overriding a longhand?18. Does the property apply to this element or layout context?19. Is a parent controlling the layout?20. Is a build tool or framework changing the final CSS?Work through the list in order.
Most CSS problems become clear once you identify the winning declaration.
Developer Tools Are Essential
Browser developer tools are the best way to debug cascade and specificity problems.
Use them to inspect the element.
Look for:
matched CSS rulescrossed-out declarationsinherited stylescomputed final valuesmedia query conditionscascade layersbrowser default stylesinline stylesThe browser already knows why a rule won.
Developer tools help you see that decision.
What Crossed-Out CSS Means
A crossed-out declaration means:
This declaration matched, but another declaration won.Example:
.title { color: blue;} .card .title { color: red;}If the element is inside .card, developer tools may cross out:
color: blue;because:
color: red;wins.
Crossed-out CSS is not always an error.
It is often just the cascade working.
What Missing CSS Means
If your rule does not appear at all in developer tools, possible causes include:
the selector does not matchthe CSS file did not loadthe CSS is not included in the final buildthe media query is inactivethe feature query is inactivethe browser does not support the syntaxthere is a syntax errorThis is different from crossed-out CSS.
Crossed-out means the rule matched but lost.
Missing means the rule may not be active or may not match.
Use Outlines for Debugging
A useful debugging trick is adding an outline:
.card { outline: 2px solid red;}Outlines do not affect layout like borders do.
They are useful for checking whether a selector matches.
If the outline appears, your selector matches the element.
If the outline does not appear, the selector may be wrong or the CSS may not be loaded.
Remove debugging outlines after you finish.
Avoid Specificity Battles
A specificity battle happens when each new rule becomes more specific than the last.
Example:
.card .title { color: navy;} .page .card .title { color: green;} body .page .card .title { color: red;}This gets harder to maintain.
Better:
.card-title { color: navy;} .card-title-success { color: green;} .card-title-error { color: red;}Or use layers and modifiers.
Good CSS should be predictable.
It should not require increasingly long selectors.
Avoid Overusing IDs in CSS
ID selectors are very specific.
Example:
#main-title { color: navy;}This can be hard to override later with classes.
Example:
.title { color: green;}The ID selector wins.
For reusable styling, classes are usually easier to manage:
.page-title { color: navy;}Use IDs when they are appropriate, but do not rely on them for everyday component styling.
Avoid Random Overrides
This is hard to debug:
.card { padding: 1rem;} .button { background-color: blue;} .card { padding: 2rem;} .title { color: navy;} .card { padding: 0.5rem;}The final .card padding is 0.5rem, but you have to scan the whole stylesheet to know that.
Better:
.card { padding: 0.5rem;} .button { background-color: blue;} .title { color: navy;}Keep related styles together when possible.
Organise CSS from General to Specific
A common organisation pattern is:
resetbaselayoutcomponentsutilitiesoverridesExample:
/* reset */* { box-sizing: border-box;} /* base */body { font-family: Arial, sans-serif;} /* component */.button { padding: 0.75rem 1rem;} /* utility */.text-center { text-align: center;}This makes the cascade more predictable.
Cascade layers can make this structure even clearer:
@layer reset, base, layout, components, utilities;Keep Specificity Low by Default
Low specificity is easier to override.
Good:
.card { padding: 1rem;}Harder to override:
main .content .card { padding: 1rem;}Even harder:
body main .content section.card[data-featured=”true”] { padding: 1rem;}Use the simplest selector that accurately targets the element.
Prefer Classes for Components
Classes are reusable and predictable.
Example:
.card { padding: 1rem;} .card-title { color: navy;} .card-text { color: #333333;}This is usually easier to manage than deeply nested selectors:
main section article div h2 { color: navy;}Class-based component styling makes debugging easier.
Use Utility Classes Deliberately
Utility classes are small classes that do one job.
Example:
.text-center { text-align: center;} .mt-0 { margin-top: 0;}If utilities should override components, place them later or in a higher-priority layer:
@layer components, utilities;Then:
@layer utilities { .text-center { text-align: center; }}This avoids unnecessary !important.
Use Comments for Intentional Overrides
If an override exists for a special reason, explain it.
Example:
/* Overrides third-party chat widget position */.chat-widget { bottom: 80px !important;}or:
/* Utility state class must override component display rules */.is-hidden { display: none !important;}Comments are useful when the CSS would otherwise look strange.
Full Example: Debugging a Component Conflict
HTML:
<div class=”card featured-card”> <h2 class=”card-title”>Featured article</h2> <p class=”card-text”>Read this article first.</p></div>CSS:
.card { color: #333333; padding: 1rem;} .card .card-title { color: navy;} .featured-card { color: darkred;} .featured-card .card-title { color: red;}What happens?
The card text inherits darkred from .featured-card.
The title becomes red.
Why?
For the card text:
.card sets color: #333333.featured-card sets color: darkredboth apply to the same elementboth are class selectors.featured-card comes laterdarkred winsFor the title:
.card .card-title sets navy.featured-card .card-title sets redboth have similar specificity.featured-card .card-title comes laterred winsThis is predictable once you compare the matching declarations.
Full Example: Debugging Inheritance and Direct Styles
HTML:
<section id=”theme”> <p class=”note”>This is a note.</p></section>CSS:
#theme { color: green;} .note { color: purple;}The paragraph is purple.
Why?
The parent #theme has a more specific selector.
But it styles the parent.
The .note selector styles the paragraph directly.
A direct declaration on the element beats an inherited value from the parent.
This is not a specificity conflict between #theme and .note on the same element.
They apply to different elements.
Full Example: Debugging Layers
HTML:
<button class=”button text-red”> Delete</button>CSS:
@layer utilities, components; @layer utilities { .text-red { color: red; }} @layer components { .button { color: white; }}The button text is white.
Why?
The declared layer order is:
@layer utilities, components;For normal declarations, later layers have higher priority.
So components beats utilities.
If you want utilities to override components, write:
@layer components, utilities;Then the button text becomes red.
Full Example: Debugging !important
HTML:
<div class=”alert alert-success”> Saved successfully.</div>CSS:
.alert { color: red !important;} .alert-success { color: green;}The text is red.
Why?
The base .alert declaration is important.
The .alert-success declaration is normal.
Important beats normal.
Better CSS:
.alert { color: red;} .alert-success { color: green;}Now the success modifier can work normally.
Full Example: Debugging Shorthand
HTML:
<div class=”box”>Box</div>CSS:
.box { border-color: blue; border-style: solid; border-width: 4px;} .box { border: 1px solid gray;}The final border is 1px solid gray.
Why?
The later border shorthand resets width, style, and colour.
If you want only the colour to change later, write:
.box { border: 1px solid gray;} .box { border-color: blue;}Now the border is 1px solid blue.
Best Practices for Avoiding Cascade Problems
Use simple class selectors for components.
Keep specificity low.
Avoid unnecessary IDs in CSS.
Avoid long descendant selector chains.
Organise CSS from broad rules to specific rules.
Use source order deliberately.
Put component variants after base component styles.
Use cascade layers for larger projects.
Put resets and vendor styles in low-priority layers.
Put utilities in higher-priority layers if they should override components.
Avoid unnecessary !important.
Use !important only for deliberate utility states, third-party overrides, or exceptional cases.
Use browser developer tools instead of guessing.
Check computed styles to find final values.
Keep related styles close together.
Use clear naming for components and modifiers.
Quick Summary
When a CSS style does not apply, the browser is usually following the cascade.
First, check whether your selector matches the element.
Then check whether the declaration is valid and active.
If the declaration is crossed out, find the winning declaration.
Compare importance, cascade layers, specificity, and source order.
Remember that class order in HTML does not decide which class wins.
Remember that direct styles on an element beat inherited values from a parent.
Remember that parent selector specificity does not transfer to children.
Remember that browser defaults and CSS resets can affect the result.
Remember that media queries only apply when their conditions are true.
Remember that shorthand properties can override longhand properties.
Remember that unlayered CSS can override layered CSS.
Avoid fixing every problem with !important.
Use developer tools, inspect the cascade, and choose the smallest clear fix.
Good CSS debugging is not guessing.
It is finding the winning declaration and understanding why it won.