
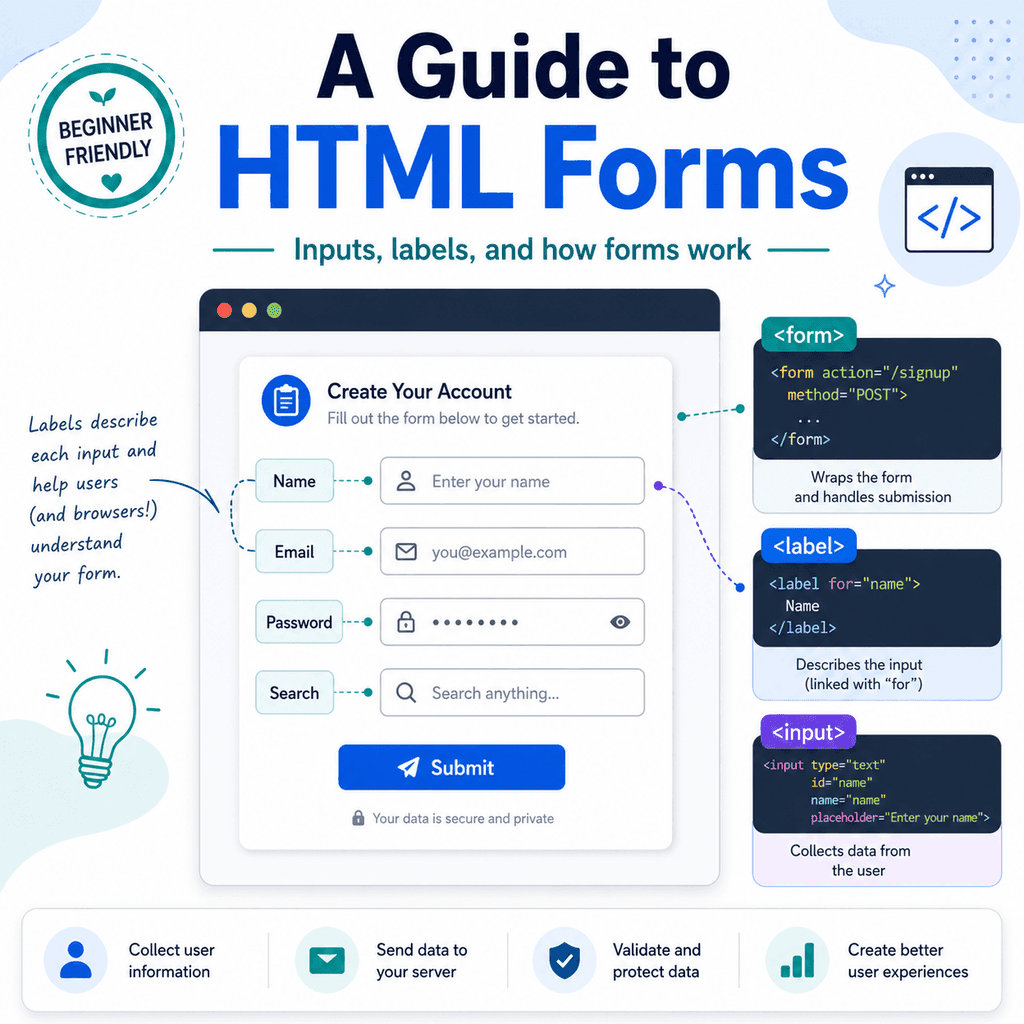
HTML forms are used to collect information from users.
A form might ask for a name, email address, password, search term, message, booking details, login information, payment details, or other user input.
For example, a simple contact form might contain a text field for a person’s name and an email field for their email address:
<form> <label for=”name”>Name</label> <input type=”text” id=”name” name=”name”> <label for=”email”>Email</label> <input type=”email” id=”email” name=”email”></form>Forms are one of the most important parts of HTML because they allow users to interact with a website, not just read it.
Introduction
What Is an HTML Form?
An HTML form is a section of a page that contains controls for collecting user input.
A form might include:
text fieldsemail fieldspassword fieldssearch fieldscheckboxesradio buttonsdropdown menustext areassuggested option listscalculated outputsmetersprogress indicatorsbuttonsThis guide starts with text-based form fields and labels.
Later in the tutorial, it also introduces some more advanced HTML form-related elements:
<datalist><output><meter><progress>These advanced elements can make forms more helpful, but they are easier to understand once the basic form structure is clear.
The main basic elements and attributes covered are:
<form><input><label>typeidnameforThese are the basic building blocks for many common forms.
What Forms Are Used For
Forms are used whenever a website needs information from a user.
Common examples include:
contact formslogin formsregistration formssearch boxesnewsletter sign-up formsbooking formscheckout formsfeedback formssupport request formsFor example, a search form might look like this:
<form> <label for=”site-search”>Search this website</label> <input type=”search” id=”site-search” name=”search”> <button type=”submit”>Search</button></form>The user types a search term into the field, then submits the form.
The <form> Element
The <form> element wraps the form controls.
For example:
<form> …</form>Any fields, labels, and buttons that belong to the form are usually placed inside the opening <form> tag and closing </form> tag.
A simple form might look like this:
<form> <label for=”name”>Name</label> <input type=”text” id=”name” name=”name”> <button type=”submit”>Send</button></form>The form contains a label, an input field, and a submit button.
How Forms Work
A form collects information from the user.
When the user submits the form, the browser can send the form data somewhere, such as a server.
In a real website, the form usually needs extra setup to process the submitted data. That might involve a server-side script, a form handling service, a content management system, or JavaScript.
For example:
<form action=”/contact” method=”post”> <label for=”message”>Message</label> <input type=”text” id=”message” name=”message”> <button type=”submit”>Send</button></form>The action attribute tells the browser where to send the form data.
The method attribute tells the browser how to send the form data.
For early HTML practice, you can still create form fields without making them fully functional. However, to actually send or save the data, the form needs something to handle the submission.
The action Attribute
The action attribute tells the browser where to send the form data when the form is submitted.
For example:
<form action=”/contact”> …</form>This means the form data should be sent to /contact.
Another example:
<form action=”thank-you.html”> …</form>This sends the user to thank-you.html when the form is submitted, although this does not process or save the data by itself.
On a real website, the action usually points to a form processing URL.
The method Attribute
The method attribute tells the browser how to send the form data.
The two common values are:
getand:
postA get form sends data in the URL.
For example, a search form often uses get:
<form action=”/search” method=”get”> <label for=”search”>Search</label> <input type=”search” id=”search” name=”q”> <button type=”submit”>Search</button></form>A post form sends data in the request body instead of placing it directly in the URL.
For example, a contact form often uses post:
<form action=”/contact” method=”post”> <label for=”message”>Message</label> <input type=”text” id=”message” name=”message”> <button type=”submit”>Send</button></form>As a simple rule, get is often used for searches and filters. post is often used for sending information that changes something, creates something, or contains more private user input.
The <input> Element
The <input> element creates an input control.
For example:
<input type=”text” id=”name” name=”name”>The <input> element is an empty element. It does not wrap around text and does not need a closing tag.
Write:
<input type=”text”>Not:
<input type=”text”></input>The behaviour of an input depends mostly on its type attribute.
The type Attribute
The type attribute tells the browser what kind of input field to create.
For example:
<input type=”text”>creates a normal text field.
<input type=”email”>creates an email field.
<input type=”password”>creates a password field.
<input type=”search”>creates a search field.
Different input types can change how the field behaves, how it is checked, and what keyboard appears on mobile devices.
Text Fields with type="text"
A text field is used for general single-line text input.
For example:
<label for=”first-name”>First name</label><input type=”text” id=”first-name” name=”first-name”>This creates a field where the user can type their first name.
Text fields are useful for:
namesusernamesshort answerstowns or citiessingle-line commentssimple text valuesAnother example:
<label for=”company”>Company name</label><input type=”text” id=”company” name=”company”>Use type="text" when the input is ordinary single-line text.
Email Fields with type="email"
An email field is used for email addresses.
For example:
<label for=”email”>Email address</label><input type=”email” id=”email” name=”email”>The browser knows this field expects an email address.
On some devices, the keyboard may show helpful email characters, such as @.
The browser may also check that the value looks like an email address when the form is submitted.
For example, if the user types:
hellothe browser may ask them to enter a valid email address.
Use type="email" when asking for an email address.
Password Fields with type="password"
A password field hides the characters as the user types.
For example:
<label for=”password”>Password</label><input type=”password” id=”password” name=”password”>The browser usually displays dots or bullets instead of the actual characters.
This is useful for login and registration forms.
However, hiding the characters on screen does not make the password secure by itself. Real password security also depends on proper server handling, HTTPS, secure storage, and other security measures.
HTML creates the field. It does not handle all password security on its own.
Search Fields with type="search"
A search field is used for search input.
For example:
<label for=”search”>Search</label><input type=”search” id=”search” name=”q”>This is similar to a text field, but it tells the browser that the field is for searching.
Some browsers may style search fields slightly differently or provide a clear button inside the field.
A complete search form might look like this:
<form action=”/search” method=”get”> <label for=”site-search”>Search this website</label> <input type=”search” id=”site-search” name=”q”> <button type=”submit”>Search</button></form>The name="q" value is commonly used for a search query, but you can use another name if your website expects it.
The name Attribute
The name attribute gives a form control a name for submission.
For example:
<input type=”email” id=”email” name=”email”>When the form is submitted, the browser uses the name attribute to identify the data.
For example, if the user enters:
alex@example.comthe submitted data may include something like:
email=alex@example.comWithout a name attribute, the value may not be included properly when the form is submitted.
A common beginner mistake is adding id but forgetting name.
This is incomplete for submission:
<input type=”text” id=”first-name”>Better:
<input type=”text” id=”first-name” name=”first-name”>The id helps connect the field to a label.
The name helps identify the submitted data.
The id Attribute
The id attribute gives an element a unique identifier on the page.
For form controls, id is often used to connect the input to a label.
For example:
<label for=”email”>Email address</label><input type=”email” id=”email” name=”email”>The label’s for attribute matches the input’s id:
for=”email”and:
id=”email”This connection is important for accessibility and usability.
Each id value should be unique on the page.
Avoid this:
<input type=”text” id=”name” name=”first-name”><input type=”text” id=”name” name=”last-name”>Better:
<input type=”text” id=”first-name” name=”first-name”><input type=”text” id=”last-name” name=”last-name”>Each field now has its own unique id.
The <label> Element
The <label> element provides a label for a form control.
For example:
<label for=”name”>Name</label><input type=”text” id=”name” name=”name”>The label tells the user what the field is for.
Without a label, the user may not know what information to enter.
Less clear:
<input type=”text” id=”name” name=”name”>Clearer:
<label for=”name”>Name</label><input type=”text” id=”name” name=”name”>Labels are especially important for accessibility.
Connecting Labels to Form Controls
The most common way to connect a label to a form control is with for and id.
For example:
<label for=”email”>Email address</label><input type=”email” id=”email” name=”email”>The value of for must match the value of id.
This creates a proper connection between the label and the input.
Correct:
<label for=”username”>Username</label><input type=”text” id=”username” name=”username”>Incorrect:
<label for=”username”>Username</label><input type=”text” id=”user-name” name=”username”>In the incorrect example, for="username" does not match id="user-name".
The label and input are not correctly connected.
Why Connected Labels Matter
Connected labels improve usability and accessibility.
When a label is properly connected to an input, users can often click the label to focus the input field.
For example:
<label for=”email”>Email address</label><input type=”email” id=”email” name=”email”>Clicking “Email address” can place the cursor inside the email field.
This is helpful for mouse users, touch users, and people with motor difficulties.
Connected labels also help screen reader users understand what each form field is for.
A screen reader can announce the label when the user focuses the input.
Wrapping an Input Inside a Label
Another way to connect a label and input is to place the input inside the label.
For example:
<label> Name <input type=”text” name=”name”></label>This is called an implicit label.
The label contains the input directly.
Both approaches can work:
<label for=”name”>Name</label><input type=”text” id=”name” name=”name”>and:
<label> Name <input type=”text” name=”name”></label>For many beginners, the for and id method is clearer because the relationship is explicit.
Placeholder Text Is Not a Label
The placeholder attribute shows temporary hint text inside a field.
For example:
<input type=”email” id=”email” name=”email” placeholder=”you@example.com”>This can be useful as an example, but it should not replace a real label.
Less accessible:
<input type=”email” name=”email” placeholder=”Email address”>Better:
<label for=”email”>Email address</label><input type=”email” id=”email” name=”email” placeholder=”you@example.com”>Placeholder text can disappear when the user starts typing. It may also be harder for some users to read.
Use labels to identify fields. Use placeholders only for extra hints or examples.
A Simple Contact Form
Here is a simple contact form using text and email inputs:
<form action=”/contact” method=”post”> <label for=”name”>Name</label> <input type=”text” id=”name” name=”name”> <label for=”email”>Email address</label> <input type=”email” id=”email” name=”email”> <button type=”submit”>Send</button></form>This form contains:
<form>to group the form,
<label>to describe each field,
<input type=”text”>for the name,
<input type=”email”>for the email address,
and:
<button type=”submit”>to submit the form.
A Simple Login Form
A login form usually contains a username or email field and a password field.
For example:
<form action=”/login” method=”post”> <label for=”login-email”>Email address</label> <input type=”email” id=”login-email” name=”email”> <label for=”login-password”>Password</label> <input type=”password” id=”login-password” name=”password”> <button type=”submit”>Log in</button></form>The email field uses:
type=”email”The password field uses:
type=”password”The id values are unique:
login-emailand:
login-passwordThe labels connect to those IDs.
A Simple Search Form
A search form usually uses type="search" and often uses method="get".
For example:
<form action=”/search” method=”get”> <label for=”search”>Search</label> <input type=”search” id=”search” name=”q”> <button type=”submit”>Search</button></form>When the form is submitted, the search term is sent using the field name.
For example, if the user searches for:
html formsthe URL might look something like:
/search?q=html+formsThe exact URL depends on how the website is set up.
Adding Required Fields
The required attribute tells the browser that a field must be completed before the form can be submitted.
For example:
<label for=”email”>Email address</label><input type=”email” id=”email” name=”email” required>The required attribute is a boolean attribute.
That means it does not need a value.
Write:
requirednot:
required=”true”A full example:
<form> <label for=”name”>Name</label> <input type=”text” id=”name” name=”name” required> <label for=”email”>Email address</label> <input type=”email” id=”email” name=”email” required> <button type=”submit”>Send</button></form>The browser may prevent submission until the required fields are filled in.
Adding Helpful Hints
Sometimes a field needs extra guidance.
For example, a password field might need a short instruction:
<label for=”password”>Password</label><input type=”password” id=”password” name=”password”><p>Use at least 8 characters.</p>This helps users understand what to enter.
For more advanced accessibility, you can connect hint text to a field using attributes such as aria-describedby, but for a beginner-level article, the main idea is to provide clear visible instructions near the relevant field.
Good form design should not make users guess.
Advanced HTML Form Elements
The form elements covered so far are the basic building blocks that most beginners should learn first.
HTML also includes some more advanced form-related elements that can improve forms and user interfaces:
<datalist><output><meter><progress>These elements are not needed in every form, but they are useful when you want to provide suggestions, show calculated results, display a value within a known range, or show task progress.
The word “advanced” does not mean they are too difficult for beginners. It simply means they are usually learned after the basic form elements.
The <datalist> Element
The <datalist> element provides a list of suggested options for an <input> field.
It is commonly used to help users enter a value more quickly.
For example:
<label for=”course-topic”>Course topic</label><input type=”text” id=”course-topic” name=”course-topic” list=”topic-options”> <datalist id=”topic-options”> <option value=”HTML”> <option value=”CSS”> <option value=”JavaScript”> <option value=”Accessibility”></datalist>The <input> element has a list attribute:
list=”topic-options”The <datalist> element has a matching id:
id=”topic-options”The browser uses this connection to show the suggested options.
The user can choose one of the suggestions, but they can usually still type their own value.
For example, the user could choose:
HTMLor type another value, such as:
Web performanceThat is an important difference between <datalist> and a normal dropdown menu.
A normal dropdown usually asks the user to choose from a fixed list.
A datalist suggests values, but it does not normally force the user to choose one of them.
Use <datalist> when you want to suggest common answers without blocking other valid answers.
Useful examples include:
search suggestionscourse topicstowns or citiesproduct categoriescommon job titlesfrequent support topicsA datalist can make a form faster to complete, especially when there are common answers that users often type.
The <datalist> Element with a Search Field
A datalist can also be used with type="search".
For example:
<form action=”/search” method=”get”> <label for=”help-search”>Search help articles</label> <input type=”search” id=”help-search” name=”q” list=”help-topics”> <datalist id=”help-topics”> <option value=”HTML forms”> <option value=”CSS layout”> <option value=”JavaScript basics”> <option value=”Website accessibility”> </datalist> <button type=”submit”>Search</button></form>This gives the user suggestions while still letting them search for something else.
The submitted value still comes from the input field’s name attribute:
name=”q”If the user searches for:
HTML formsthe submitted data may include:
q=HTML formsThe <datalist> provides suggestions, but the <input> still collects the actual value.
The <output> Element
The <output> element is used to display the result of a calculation or user action.
For example, a form might ask for a quantity and a price, then show a total.
The <output> element is useful because it gives the result a meaningful HTML element instead of using a generic <div> or <span>.
For example:
<form oninput=”total.value = Number(quantity.value) * Number(price.value)”> <label for=”quantity”>Quantity</label> <input type=”number” id=”quantity” name=”quantity” value=”1″> <label for=”price”>Price</label> <input type=”number” id=”price” name=”price” value=”10″> <p> Total: <output id=”total” name=”total” for=”quantity price”>10</output> </p></form>This example uses a small amount of JavaScript in the oninput attribute.
The calculation is:
quantity × priceIf the quantity is 2 and the price is 10, the output shows:
20The for attribute on the <output> element can list the IDs of the elements that helped create the result.
In this example:
for=”quantity price”means the output is related to these two inputs:
id=”quantity”and:
id=”price”For beginners, the main idea is simple:
input fields collect valuesJavaScript can calculate something from those values<output> displays the resultThe <output> element does not make the calculation happen by itself.
HTML creates the structure. JavaScript performs the calculation.
Important Note About <output> and Submitted Data
The <output> element displays a result, but it is usually used for showing information to the user.
If you need to save or submit a calculated value, do not rely only on the <output> element.
A real website should usually calculate important values again on the server.
For example, prices, totals, booking costs, discounts, and order values should be checked by the server, not trusted only from the browser.
That is because users can change browser-side values.
A simple beginner rule is:
Use <output> to show a result.Use proper server-side processing to save or trust important results.The <meter> Element
The <meter> element displays a value within a known range.
It is often shown as a horizontal gauge.
For example:
<label for=”storage-used”>Storage used</label><meter id=”storage-used” min=”0″ max=”100″ value=”60″>60%</meter>This shows that the current value is 60 out of a possible 100.
The important attributes are:
minmaxand:
valueIn the example:
min=”0″means the range starts at 0.
max=”100″means the range ends at 100.
value=”60″means the current value is 60.
The text between the opening and closing <meter> tags is fallback text:
60%This can help if the meter is not displayed as expected.
Using <meter> for Scores and Ratings
The <meter> element is useful when the value is a measurement, score, rating, or level within a known range.
For example:
<label for=”password-strength”>Password strength</label><meter id=”password-strength” min=”0″ max=”100″ low=”40″ high=”80″ optimum=”100″ value=”75″> 75%</meter>This example shows a password strength score of 75 out of 100.
The extra attributes provide more information about the range:
low=”40″means values below 40 are considered low.
high=”80″means values above 80 are considered high.
optimum=”100″means the best value is 100.
The browser may use these values when displaying the meter.
Common uses for <meter> include:
password strengthstorage usagereview scoresskill levelsrisk levelsresource usageUse <meter> when the value is a measurement within a known range.
Do not use <meter> for task progress, such as an upload or download. For task progress, use <progress> instead.
The <progress> Element
The <progress> element shows how much of a task has been completed.
It is commonly displayed as a progress bar.
For example:
<label for=”upload-progress”>Upload progress</label><progress id=”upload-progress” value=”70″ max=”100″>70%</progress>This shows that the task is 70 out of 100 complete.
The important attributes are:
valueand:
maxIn this example:
value=”70″means 70 units have been completed.
max=”100″means the task is complete at 100 units.
The text inside the element is fallback text:
70%Use <progress> for tasks that are happening or being completed.
Useful examples include:
file upload progressdownload progressform completion progresscheckout step progressinstallation progressloading progressProgress with an Unknown Value
Sometimes you know that a task is happening, but you do not know how much has been completed.
In that case, you can use <progress> without a value attribute:
<label for=”loading”>Loading</label><progress id=”loading”>Loading…</progress>This is called an indeterminate progress bar.
It tells the user that something is happening, but it does not give a specific percentage.
Use this when the browser or website cannot calculate the exact progress yet.
<meter> vs <progress>
The <meter> and <progress> elements can look similar, but they have different meanings.
Use <meter> for a value within a known range.
For example:
<label for=”score”>Accessibility score</label><meter id=”score” min=”0″ max=”100″ value=”85″>85%</meter>This means the page has a score of 85 out of 100.
Use <progress> for the completion of a task.
For example:
<label for=”form-progress”>Form progress</label><progress id=”form-progress” value=”3″ max=”5″>Step 3 of 5</progress>This means the user has completed 3 out of 5 steps.
A simple way to remember the difference is:
<meter> measures a value.<progress> tracks a task.A Simple Form Using Advanced Elements
Here is a form that uses all four advanced elements:
<form action=”/course-enquiry” method=”post” oninput=”estimatedCost.value = Number(hours.value) * Number(rate.value)”> <div> <label for=”topic”>Topic of interest</label> <input type=”text” id=”topic” name=”topic” list=”topic-list”> <datalist id=”topic-list”> <option value=”HTML”> <option value=”CSS”> <option value=”JavaScript”> <option value=”Accessibility”> </datalist> </div> <div> <label for=”hours”>Number of hours</label> <input type=”number” id=”hours” name=”hours” value=”1″ min=”1″> </div> <div> <label for=”rate”>Hourly rate</label> <input type=”number” id=”rate” name=”rate” value=”30″ min=”0″> </div> <p> Estimated cost: <output id=”estimated-cost” name=”estimatedCost” for=”hours rate”>30</output> </p> <div> <label for=”match-score”>Course match score</label> <meter id=”match-score” min=”0″ max=”100″ value=”80″>80%</meter> </div> <div> <label for=”enquiry-progress”>Enquiry progress</label> <progress id=”enquiry-progress” value=”2″ max=”3″>Step 2 of 3</progress> </div> <button type=”submit”>Send enquiry</button> </form>This form includes:
<datalist>to suggest course topics,
<output>to show an estimated cost,
<meter>to show a score within a known range,
and:
<progress>to show how far through the enquiry process the user is.
This example is only a simple demonstration.
On a real website, important calculations should be checked by the server, and progress values would usually be updated by JavaScript or by the website’s application logic.
Grouping Form Fields
As forms grow, it helps to group related fields.
For example:
<form> <div> <label for=”first-name”>First name</label> <input type=”text” id=”first-name” name=”first-name”> </div> <div> <label for=”last-name”>Last name</label> <input type=”text” id=”last-name” name=”last-name”> </div> <button type=”submit”>Send</button></form>The <div> elements are used here as generic layout wrappers.
They group each label and input pair.
This can make the form easier to style with CSS.
Styling Forms with CSS
HTML creates the form structure.
CSS controls how the form looks.
For example:
<form class=”contact-form”> <div> <label for=”name”>Name</label> <input type=”text” id=”name” name=”name”> </div> <div> <label for=”email”>Email address</label> <input type=”email” id=”email” name=”email”> </div> <button type=”submit”>Send</button></form>CSS:
.contact-form { max-width: 500px;} .contact-form div { margin-bottom: 16px;} .contact-form label { display: block; margin-bottom: 6px;} .contact-form input { width: 100%; padding: 8px;}The display: block; rule makes each label appear above its input.
The width: 100%; rule makes the inputs fill the available width.
A Complete Example
Here is a complete HTML page with a simple form:
<!DOCTYPE html><html lang=”en”><head> <meta charset=”UTF-8″> <title>HTML Form Example</title></head><body> <h1>Contact Us</h1> <form action=”/contact” method=”post”> <div> <label for=”contact-name”>Name</label> <input type=”text” id=”contact-name” name=”name” required> </div> <div> <label for=”contact-email”>Email address</label> <input type=”email” id=”contact-email” name=”email” required> </div> <div> <label for=”contact-password”>Account password</label> <input type=”password” id=”contact-password” name=”password”> </div> <div> <label for=”contact-search”>Search topic</label> <input type=”search” id=”contact-search” name=”topic”> </div> <button type=”submit”>Send</button> </form> </body></html>This example includes:
<form>to group the form,
<label>to describe the fields,
<input type=”text”>for ordinary text,
<input type=”email”>for an email address,
<input type=”password”>for a password,
<input type=”search”>for a search field,
and:
<button type=”submit”>to submit the form.
A Complete Example with Basic and Advanced Form Elements
Here is a larger example that keeps the basic form structure but also includes the advanced elements covered in this tutorial:
<!DOCTYPE html><html lang=”en”><head> <meta charset=”UTF-8″> <title>Advanced HTML Form Example</title></head><body> <h1>Course Enquiry</h1> <form action=”/course-enquiry” method=”post” oninput=”estimatedCost.value = Number(courseHours.value) * Number(hourlyRate.value)”> <div> <label for=”visitor-name”>Name</label> <input type=”text” id=”visitor-name” name=”name” required> </div> <div> <label for=”visitor-email”>Email address</label> <input type=”email” id=”visitor-email” name=”email” required> </div> <div> <label for=”course-topic”>Course topic</label> <input type=”text” id=”course-topic” name=”topic” list=”course-topics”> <datalist id=”course-topics”> <option value=”HTML”> <option value=”CSS”> <option value=”JavaScript”> <option value=”Accessibility”> </datalist> </div> <div> <label for=”course-hours”>Number of hours</label> <input type=”number” id=”course-hours” name=”hours” value=”2″ min=”1″> </div> <div> <label for=”hourly-rate”>Hourly rate</label> <input type=”number” id=”hourly-rate” name=”rate” value=”30″ min=”0″> </div> <p> Estimated cost: <output id=”estimated-cost” name=”estimatedCost” for=”course-hours hourly-rate”>60</output> </p> <div> <label for=”course-match”>Course match</label> <meter id=”course-match” min=”0″ max=”100″ value=”75″>75%</meter> </div> <div> <label for=”form-progress”>Form progress</label> <progress id=”form-progress” value=”3″ max=”4″>Step 3 of 4</progress> </div> <button type=”submit”>Send enquiry</button> </form> </body></html>This example includes the basic form elements:
<form><label><input><button>It also includes the advanced elements:
<datalist><output><meter><progress>The datalist suggests course topics.
The output shows a calculated estimate.
The meter shows a score within a known range.
The progress element shows progress through a task.
Common Mistake: Missing Labels
A common mistake is creating inputs without labels.
Less accessible:
<input type=”text” name=”name”><input type=”email” name=”email”>Better:
<label for=”name”>Name</label><input type=”text” id=”name” name=”name”> <label for=”email”>Email address</label><input type=”email” id=”email” name=”email”>Labels help users understand what each field is for.
Common Mistake: Label for Does Not Match Input id
Incorrect:
<label for=”email”>Email address</label><input type=”email” id=”user-email” name=”email”>The label points to email, but the input has id="user-email".
Correct:
<label for=”user-email”>Email address</label><input type=”email” id=”user-email” name=”email”>The for and id values now match.
Common Mistake: Forgetting the name Attribute
An input may appear on the page without a name attribute, but it may not submit useful data.
Incomplete:
<label for=”email”>Email address</label><input type=”email” id=”email”>Better:
<label for=”email”>Email address</label><input type=”email” id=”email” name=”email”>The id connects the field to the label.
The name identifies the submitted value.
You usually need both.
Common Mistake: Using the Wrong Input Type
Use input types that match the data you are asking for.
Less useful:
<label for=”email”>Email address</label><input type=”text” id=”email” name=”email”>Better:
<label for=”email”>Email address</label><input type=”email” id=”email” name=”email”>The email type gives the browser more information about the expected value.
Another example:
Less useful:
<label for=”search”>Search</label><input type=”text” id=”search” name=”q”>Better:
<label for=”search”>Search</label><input type=”search” id=”search” name=”q”>Choose the input type that matches the purpose.
Common Mistake: Using Placeholder Text Instead of Labels
Avoid this:
<input type=”email” name=”email” placeholder=”Email address”>Better:
<label for=”email”>Email address</label><input type=”email” id=”email” name=”email” placeholder=”you@example.com”>The placeholder gives an example.
The label identifies the field.
Do not rely on placeholder text as the only label.
Common Mistake: Reusing the Same ID
Each id should be unique.
Incorrect:
<label for=”name”>First name</label><input type=”text” id=”name” name=”first-name”> <label for=”name”>Last name</label><input type=”text” id=”name” name=”last-name”>Correct:
<label for=”first-name”>First name</label><input type=”text” id=”first-name” name=”first-name”> <label for=”last-name”>Last name</label><input type=”text” id=”last-name” name=”last-name”>Each label now points to the correct field.
Common Mistake: Expecting HTML Alone to Process the Form
HTML can create the form, but it does not automatically store, email, or process the submitted data.
For example:
<form> <label for=”message”>Message</label> <input type=”text” id=”message” name=”message”> <button type=”submit”>Send</button></form>This creates a visible form, but it does not automatically send the message to you.
To process form submissions, you usually need a server, a form handling service, JavaScript, or a content management system.
HTML creates the structure. Something else must handle the submitted data.
Common Mistake: Expecting <datalist> to Force a Choice
A datalist usually provides suggestions, but it does not normally force the user to choose one of them.
For example:
<label for=”city”>City</label><input type=”text” id=”city” name=”city” list=”city-options”> <datalist id=”city-options”> <option value=”London”> <option value=”Manchester”> <option value=”Birmingham”></datalist>The user may choose one of the suggested cities, but they may also type another city.
If the user must choose from a fixed list, a dropdown menu is usually more suitable.
Common Mistake: Expecting <output> to Calculate by Itself
The <output> element displays a result.
It does not perform calculations by itself.
This creates an output element, but no calculation happens automatically:
<output id=”total”>0</output>To update an output value, you need JavaScript or another system to set the value.
For example:
<form oninput=”total.value = Number(a.value) + Number(b.value)”> <input type=”number” id=”a” name=”a” value=”1″> <input type=”number” id=”b” name=”b” value=”2″> <output id=”total” for=”a b”>3</output></form>HTML provides the structure.
JavaScript updates the result.
Common Mistake: Using <meter> and <progress> for the Same Thing
The <meter> and <progress> elements have different meanings.
Use <meter> for a measurement, score, rating, or level.
For example:
<label for=”rating”>Rating</label><meter id=”rating” min=”0″ max=”5″ value=”4″>4 out of 5</meter>Use <progress> for task completion.
For example:
<label for=”download”>Download progress</label><progress id=”download” value=”40″ max=”100″>40%</progress>A rating is not a task, so it should use <meter>.
A download is a task, so it should use <progress>.
Common Mistake: Forgetting Text for <meter> and <progress>
It is a good idea to include useful text between the opening and closing tags.
Less helpful:
<meter min=”0″ max=”100″ value=”60″></meter><progress value=”40″ max=”100″></progress>Better:
<meter min=”0″ max=”100″ value=”60″>60%</meter><progress value=”40″ max=”100″>40%</progress>This text can act as fallback content and makes the value clearer in the HTML.
Best Practices
Use <form> to group related form controls.
Use the correct input type for the data you need.
Use type="text" for ordinary single-line text.
Use type="email" for email addresses.
Use type="password" for passwords.
Use type="search" for search fields.
Use <label> for every input.
Connect labels to inputs with matching for and id values.
Use unique id values.
Use name attributes so submitted data can be identified.
Do not rely on placeholder text as the only label.
Use required when a field must be completed.
Use <datalist> when you want to suggest possible values while still allowing the user to type their own answer.
Use <output> when you want to display the result of a calculation or user action.
Use <meter> for scores, measurements, ratings, or values within a known range.
Use <progress> for task completion, such as upload progress or form completion progress.
Do not use <meter> and <progress> as if they mean the same thing.
Keep forms clear, simple, and well organised.
Remember that HTML creates the form, but another system must process the submitted data.
Summary
HTML forms are used to collect information from users.
A simple form starts with the <form> element:
<form> …</form>Text-based inputs are created with the <input> element:
<input type=”text”>Different input types are used for different kinds of data:
<input type=”text”><input type=”email”><input type=”password”><input type=”search”>More advanced form-related elements can add suggestions, calculated results, measurements, and progress indicators:
<datalist><output><meter><progress>Use <datalist> to provide suggested options for an input.
Use <output> to display the result of a calculation or user action.
Use <meter> to display a value within a known range.
Use <progress> to display how much of a task has been completed.
Labels describe form fields:
<label for=”email”>Email address</label><input type=”email” id=”email” name=”email”>The label’s for value should match the input’s id value.
The name attribute identifies the submitted data.
Good forms are clear, accessible, and easy to use. Use labels, correct input types, unique IDs, and meaningful names to make your forms easier for users and browsers to understand.